2024-11-26-Tue-T-SSM
SSM
SSM三者的关系
1 Spring IoC容器
父子工程
1 |
|
1.1 组件到容器
注册组件的方式:
- 使用@Import注解标识启动类
1 |
|
- 使用@Bean注解标识配置类方法
1 |
|
1.2 @Scope调整组件的作用域
四个作用域:
- singleton: 默认值, 单例模式, 容器启动时创建对象, 并且只会创建一个实例, 无论调用多少次getBean方法, 都会返回同一个对象
- prototype: 多例模式, 每次调用getBean方法, 都会创建一个新的对象
- request: 同一个请求创建一个单实例
- session: 同一个会话创建一个单实例
1
2
3
4
5
6
7
8
9
public class PersonConfig {
public Person person(){
return new Person();
}
}
1.3 @Lazy懒加载
- 默认情况下, 容器启动时, 会创建所有的单实例对象
- @Lazy注解, 容器启动时不创建对象, 而是调用getBean方法时才创建对象
- @Lazy注解, 只对单实例有效, 多实例无效
1 |
|
1.4 FactoryBean
FactoryBean, 用于创建复杂对象, 并且返回对象, 而不是直接返回对象
1 |
|
1.5 @Conditional条件注册
@Conditional注解, 用于判断条件是否成立, 如果成立, 则执行对应的配置
@Conditional使用范围:
- @Bean注解标注的方法上
- @Configuration注解标注的类上
场景:
判断当前电脑系统是否是windows系统还是Mac, 如果是windows, 则创建一个windowsMouse, 否则创建一个macMouse
- 定义一个Mouse类
1
2
3
4
5
6
7
8
9
10
11
public class Mouse {
private int id;
private String name;
public Mouse(int id, String name) {
this.id = id;
this.name = name;
}
} - 定义两个条件类, 实现Spring context的Condition接口
1
2
3
4
5
6
7
8
9
10
11
12public class WindowEnvCondition implements Condition {
public boolean matches(ConditionContext context, AnnotatedTypeMetadata metadata) {
String osEnv = context.getEnvironment().getProperty("OS");
System.out.println(osEnv);
if ("Windows".equals(osEnv)) {
return true;
}
//返回true标识条件匹配
return false;
}
}1
2
3
4
5
6
7
8
9
10
11
12public class MacEnvCondition implements Condition {
public boolean matches(ConditionContext context, AnnotatedTypeMetadata metadata) {
String osEnv = context.getEnvironment().getProperty("OS");
System.out.println(osEnv);
if ("Mac".equals(osEnv)) {
return true;
}
//返回true标识条件匹配
return false;
}
} - 在配置类中, 使用@Conditional注解, 指定条件类, 如果条件成立, 则创建对应的Mouse对象
1 |
|
- 测试
1
2
3
4
5
6
7
8
9
public class Application {
public static void main(String[] args) {
//1. 跑起一个Spring的应用, 获取一个ApplicationContext, 即ioc容器
ConfigurableApplicationContext ioc = SpringApplication.run(Application.class, args);
System.out.println("=============================");
System.out.println(ioc.getBean(Mouse.class));
}
}
Spring中也实现了一些条件类, 如:
@ConditionalOnBean(name = “”)
@ConditionalOnMissingBean(name = “”)
@ConditionalOnClass(name = “”)等等
1.6 注入
- @Autowired注解: 依赖注入, 根据类型自动注入
- @Qualifier注解: 依赖注入, 根据名称自动注入, 配合@Autowired注解使用
- @Resource注解: 依赖注入, 根据名称自动注入, 不属于Spring官方注解
- @Value注解: 注入普通值
- @Value(“hello”): 注入普通值
- @Value(“${name}”): 注入配置文件中的值
- @Value(“#{SpEL}”): 注入SpEL表达式, 可以结合2使用
@Value("#{'${app.name}'.toUpperCase()}")
- @Profile注解: 根据环境变量, 注入不同的配置, 比如开发环境: @Profile(“dev”), 对应的配置文件中的内容为:
spring.profiles.active=dev - @PropertiesSource注解: 注入配置文件, 不使用此注解的默认配置文件是application.properties
- @Primary注解: 默认注入的组件, 如果有多个同类型的组件, 则会报错, 需要使用@Primary注解指定一个默认的组件
1.7 组件生命周期
@Bean注解标注的方法, 在Bean初始化完成后调用
InitializingBean: 在Bean初始化完成后调用
DisposableBean: 在Bean销毁前调用
@PostConstruct: 在Bean初始化完成后调用, 可以在构造方法之后调用
@PreDestroy: 在Bean销毁前调用
BeanPostProcessor: 在Bean初始化前后调用, 可以在Bean初始化前后进行操作(很强大, 可以修改Bean的任何内容)
@Bean注解标注的方法, 在Bean初始化完成后调用
1
2
3
4
5
6
7
8
9
10
11
12
13
14//定义一个User类
public class User {
private String name;
private int age;
public void initMethod() {
System.out.println("User initMethod ......");
}
public void destroyMethod() {
System.out.println("User destroyMethod ......");
}
}1
2
3
4
5
6
7
8
9
10
11
12
13//定义一个UserConfig类
public class UserConfig {
public User user() {
User user = new User();
user.setName("tom");
user.setAge(18);
return user;
}
}测试
1
2
3
4
5
6
7
public class Application {
public static void main(String[] args) {
ConfigurableApplicationContext ioc = SpringApplication.run(Application.class, args);
System.out.println(ioc.getBean(User.class));
}
}结果
1
2
3User initMethod ......
User(name=tom, age=18)
User destroyMethod ......InitializingBean: 在Bean初始化前调用
DisposableBean: 在Bean销毁前调用
1
2
3
4
5
6
7
8
9
10
11
12
13
14
15
public class User implements InitializingBean, DisposableBean {
//在Bean销毁前调用
public void destroy() throws Exception {
System.out.println("[DisposableBean] ======= User destroy");
}
//在属性设置之后调用
public void afterPropertiesSet() throws Exception {
System.out.println("[initialization]======User afterPropertiesSet ......");
}
}@PostConstruct: 在构造方法之后调用
@PreDestroy: 在Bean销毁前调用
1 | //User类中 |
- BeanPostProcessor: 后置处理器, 需要编写继承类并注解@Component
1 | package com.learning.ssm.spring.ioc.processor; |
2. 单元测试
3. Spring AOP
- 添加aop依赖
1 | <dependency> |
1 |
|
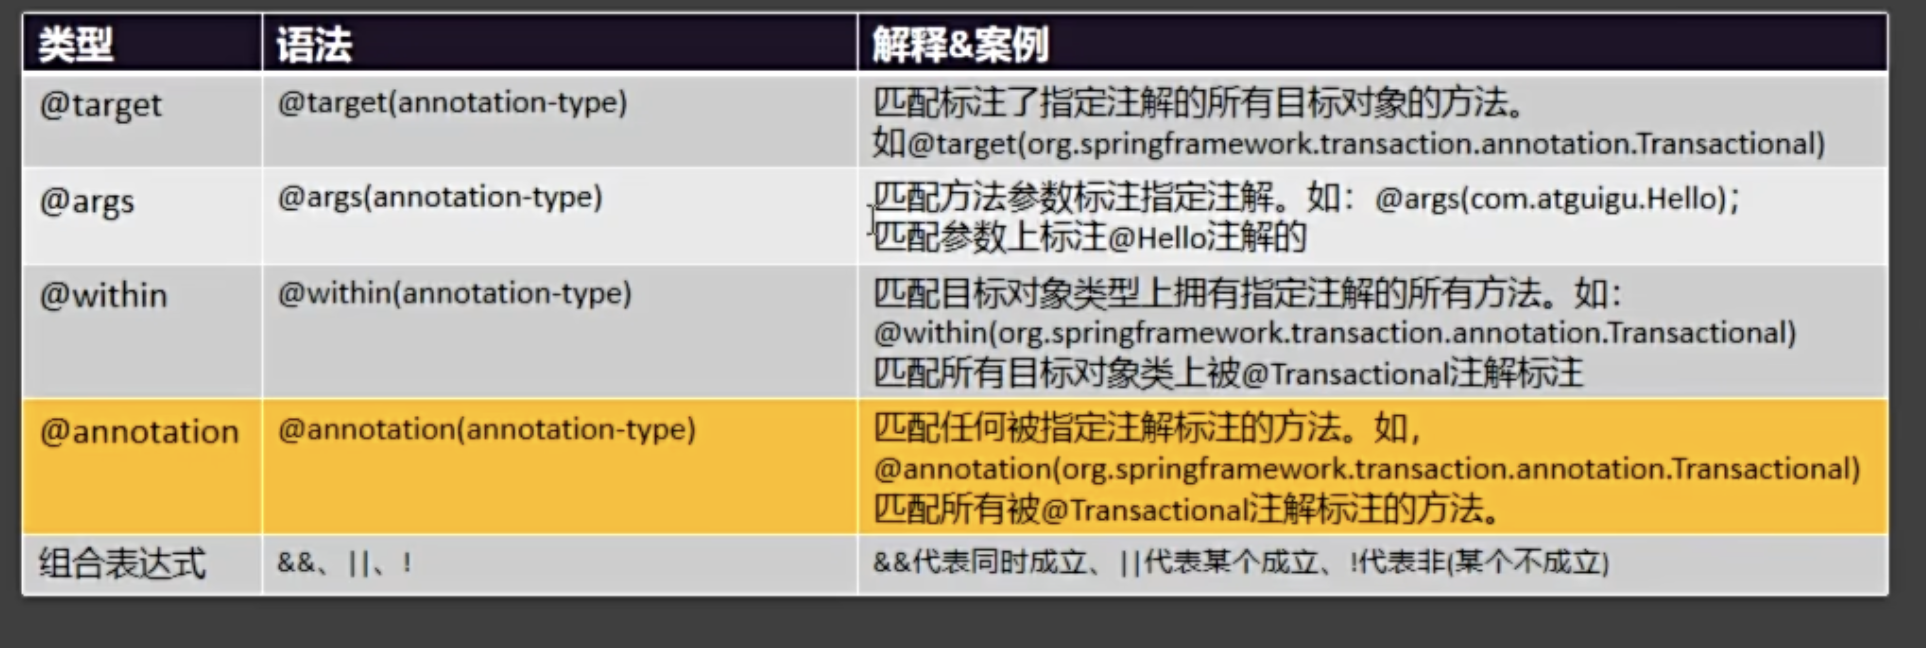
切入点表达式
3.1 切入点执行顺序
通过@Order注解指定执行顺序
数字越小, 优先级越高
1 |
|
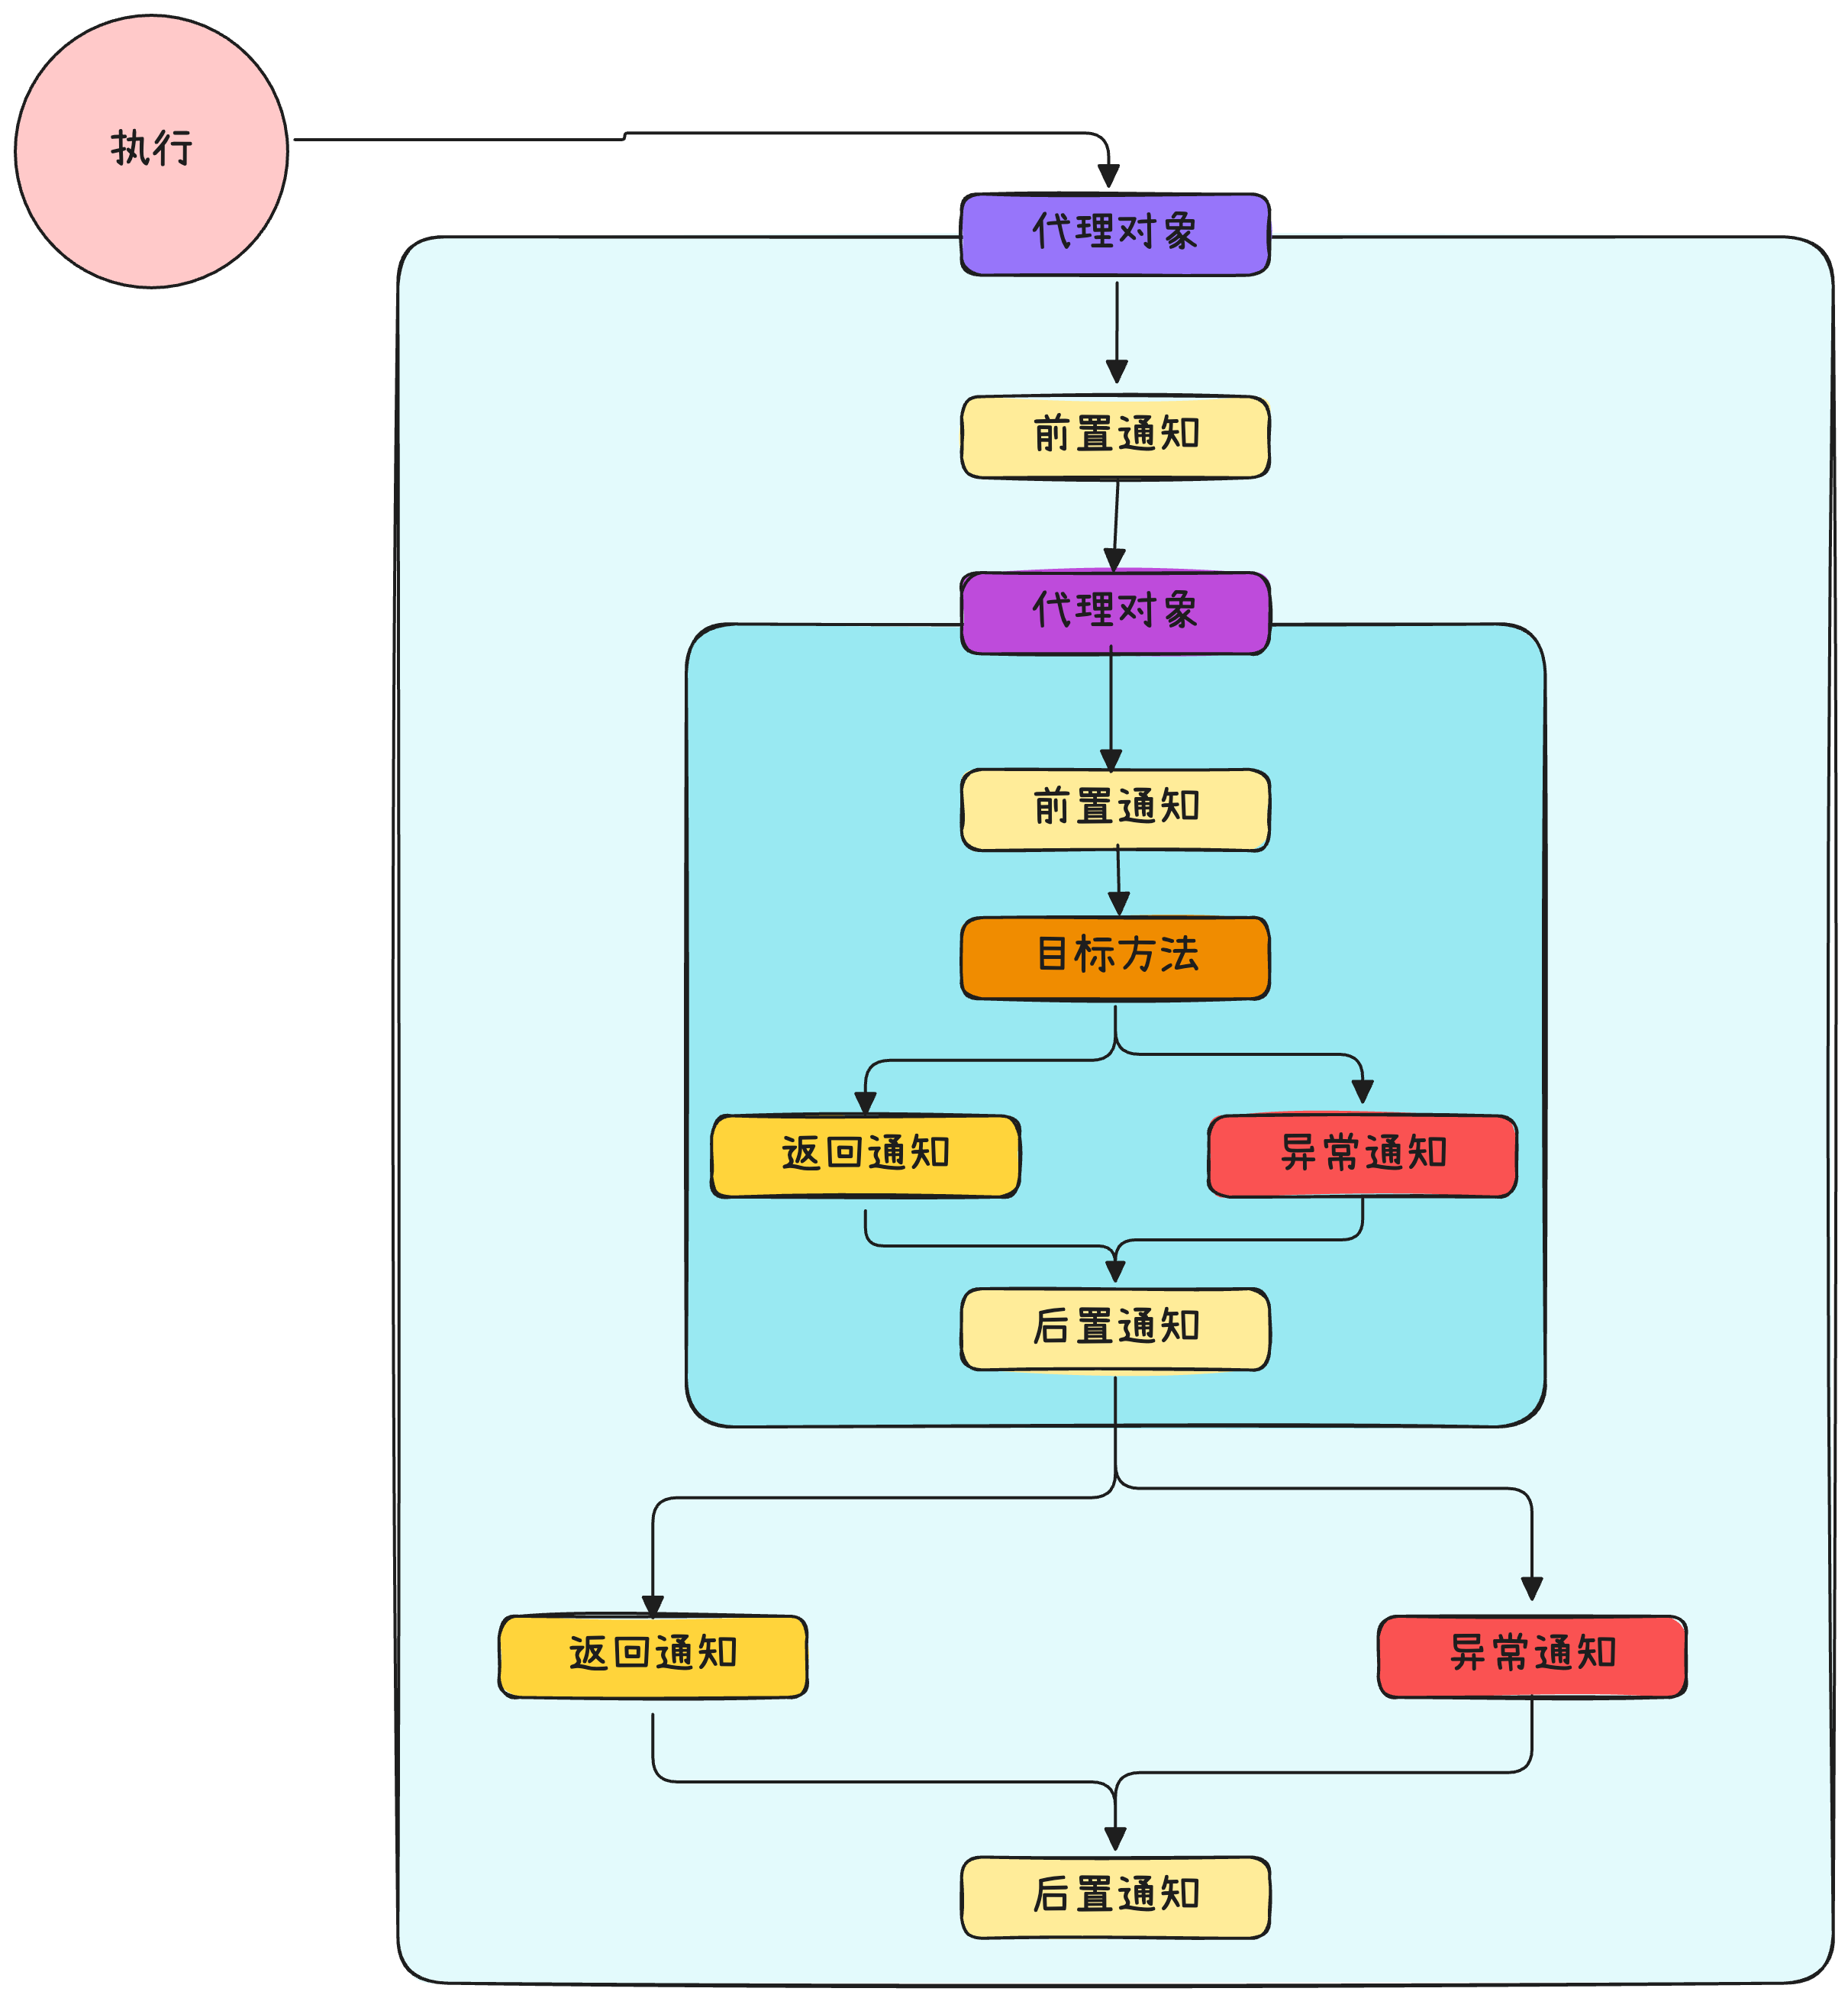
3.2 环绕通知
1 |
|
4. Spring 声明式事务
通过注解等方式配置事务管理器
1 |
|
1 | // 对方法进行事务管理 |
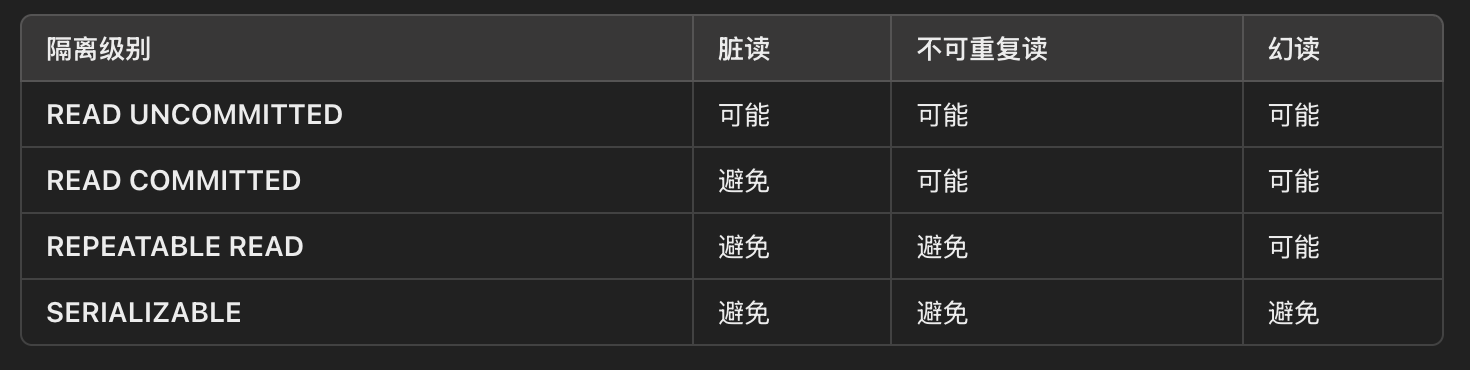
4.1 隔离级别
- 读未提交: 事务可以读取其他事务未被提交到数据, 易产生脏读和幻读等问题
- 读已提交: 事务只能读取到其他事务已经提交的数据, 不能读取到未提交的数据, 读取期间可以修改添加
- 可重复读: 事务可以读取到其他事务已经提交的数据, 且读取期间不能修改, 可以添加
- 串行化: 事务只能读取到其他事务已经提交的数据, 且读取期间不能修改, 不能添加
前三种隔离级别导致的问题:
- 脏读:读取到未提交的数据。
- 不可重复读:两次读取同一数据,结果不一致(数据被修改)。
- 幻读:两次读取同样条件的记录,结果集条数发生变化(记录被插入或删除)。
4.2 事务的传播行为
事务的传播行为,即一个事务方法被另一个事务方法调用时,该调用事务方法的事务行为。
- REQUIRED(默认): 如果当前没有事务,就新建一个事务,如果已经存在一个事务中,加入到这个事务中,这是最常见的选择。 (常用)
- SUPPORTS: 支持当前事务,如果当前没有事务,就以非事务方式执行。
- MANDATORY: 必须存在事务,如果当前没有事务,就抛出异常。
- REQUIRES_NEW: 无论是否有事务, 都新建一个事务。 (常用)
- NOT_SUPPORTED: 以非事务方式执行,如果当前存在事务,就把当前事务挂起。
- NEVER: 以非事务方式执行,如果当前存在事务,则抛出异常。 (常用)
- NESTED: 新建事务,如果当前存在事务,则把当前事务挂起。
子事务会继承父事务的隔离级别,以及除了传播行为的外的其他属性。
5. SpringMVC
Web应用的核心就是处理HTTP请求和HTTP响应。
1 | <dependency> |
如果是前后分离的开发方式, 对于Controller, 统一使用@RestController注解
1 | /** |
5.1 HTTP请求与响应
HTTP请求会携带各种数据:
- 请求首行: (请求方式、请求路径、 请求协议)
- 请求头: 键值对信息 K:V (请求头信息、请求参数、Cookie、Session等)
- 请求体: 特定格式的请求数据
而响应会携带响应头和响应体。
5.2 三种请求的处理
- 普通参数请求
1 |
|
- Json参数请求
1 |
|
- 文件请求
1 |
|
1 | server: |
5.3 两种返回数据格式
- 返回JSON数据
1 |
|
- 下载文件
因为是文件,需要设置响应头,告诉浏览器下载文件. 所以既要修改响应头,还需要修改响应体
Spring框架因此提供了ResponseEntity对象,用来封装响应头和响应体, 多用于文件的下载操作
1 |
|
5.4 RestFul
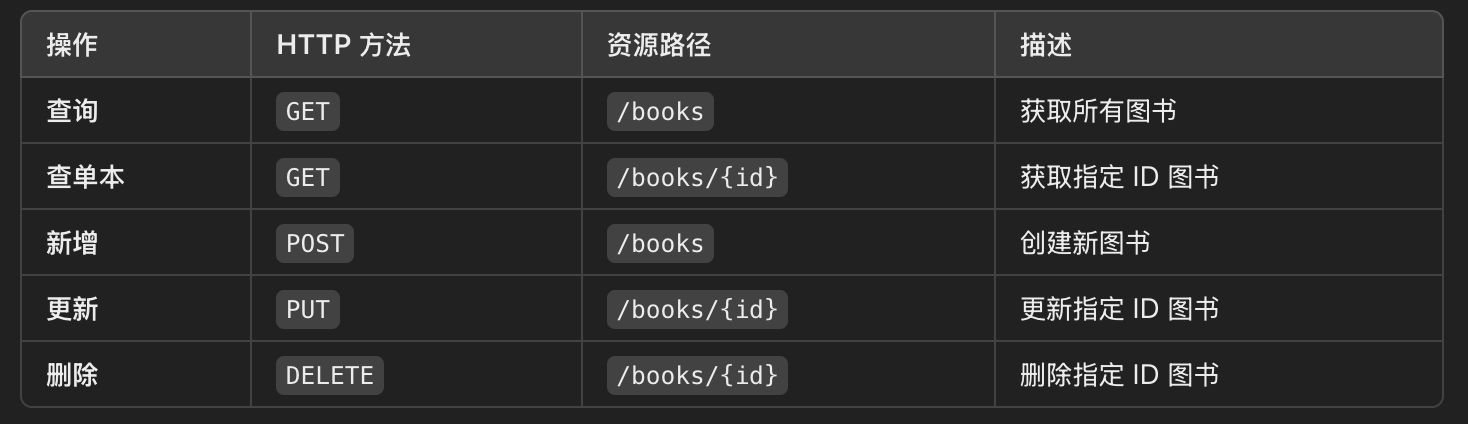
调用别人的功能的方式:
- API: 给第三方发送请求, 获取响应数据
- SDK: 导入jar包
5.5 后端允许前端跨域
原理: 服务器给浏览器的响应头中添加字段, Access-Control-Allow-Origin: *
跨域访问过程:
- 浏览器发送OPTIONS预检请求–> 请求到服务器
- 服务器返回响应头Access-Control-Allow-Origin: *
- 浏览器收到响应头后, 允许跨域访问, 发送真正的请求
1 | // 默认允许所有源跨域访问, value 指定允许的源, 例如 "http://localhost:80" |
5.4 @PathVariable 路径变量
/resource/{id}: {}中的值封装到id变量中- /resource/
1
- /resource/
/resource/{*path}: {}中的值封装到path变量中, {}中可以是多重路径- /resource/
a.png - /resource/
a/b/c.png
- /resource/
/resource/{filename:\\w+}.png: {}中的值封装到filename变量中, 正则表达式匹配- /resource/
a.png - /resource/
a_b.png
- /resource/
1 |
|
5.5 拦截器
过滤器(Filter):它的作用范围更广,通常用于处理整个请求和响应流。它不仅可以作用于 Spring MVC 的请求,也可以处理其他非 Spring 的请求(例如:静态资源、外部 API 请求等)。因此,如果你的需求是对整个应用层面的请求进行处理,应该选择过滤器。
拦截器(Interceptor):拦截器是 Spring MVC 专用的,主要用于控制器方法的调用过程。如果你只需要在控制器级别进行操作(例如:权限校验、日志记录、方法执行的前后处理),那么拦截器更加合适。
一般情况, 只要使用Spring, 优先使用拦截器。
创建拦截器
1
2
3
4
5
6
7
8
9
10
11
12
13
14
15
public class MyInterceptor implements HandlerInterceptor {
public boolean preHandle(HttpServletRequest request, HttpServletResponse response, Object handler) throws Exception {
System.out.println("preHandle.......");
return HandlerInterceptor.super.preHandle(request, response, handler);
}
public void postHandle(HttpServletRequest request, HttpServletResponse response, Object handler, ModelAndView modelAndView) throws Exception {
System.out.println("postHandle.......");
HandlerInterceptor.super.postHandle(request, response, handler, modelAndView);
}
}配置拦截器
1 |
|
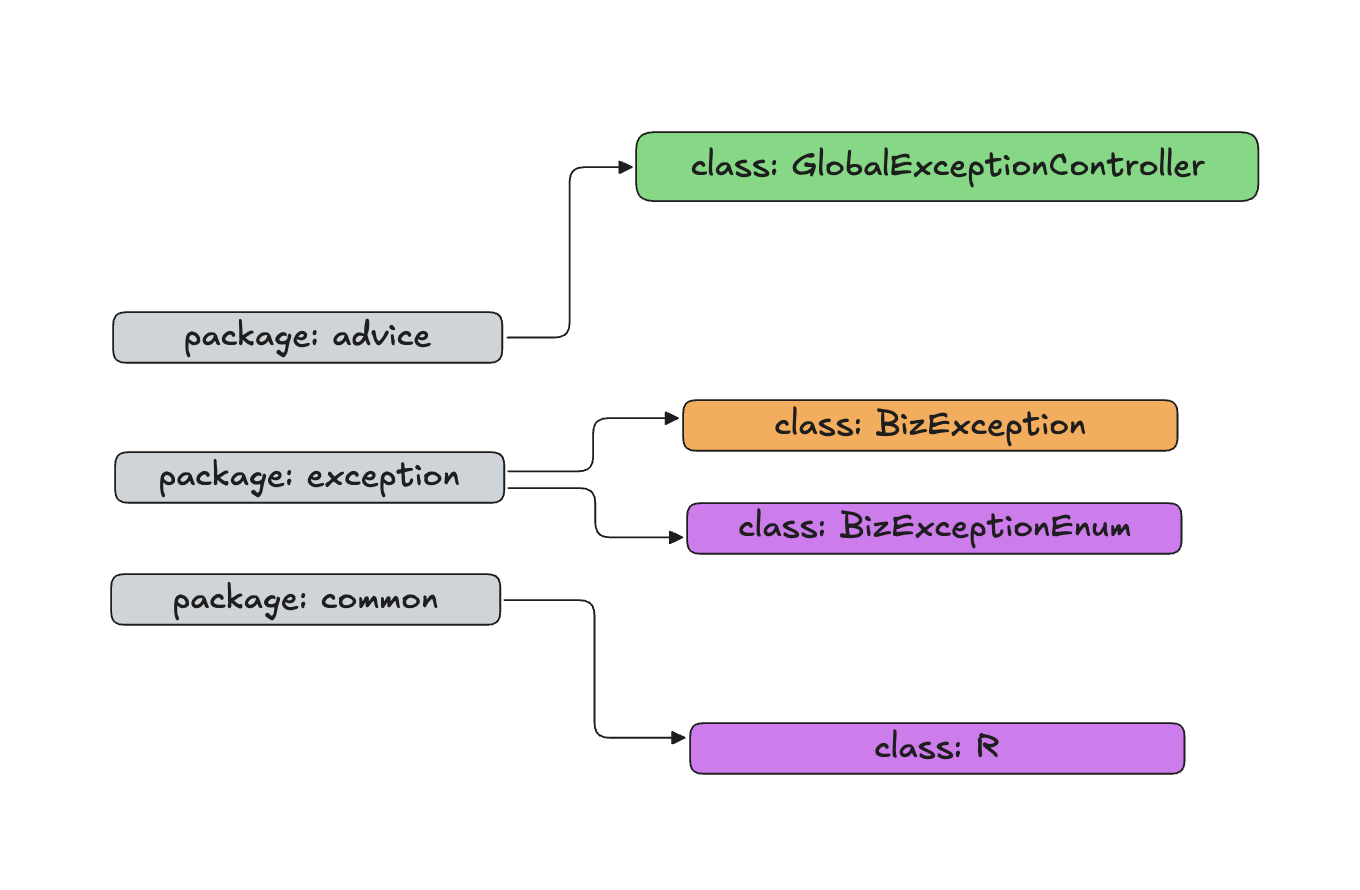
5.6 异常处理
两种异常处理方式:
- 编程式异常处理: try-catch、throw exception
- 声明式异常处理: @ControllerAdvice + @ExceptionHandler
测试
1 |
|
5.7 数据校验
后端的简单数据校验可以使用JSR303规范, JSR303是java为Bean数据合法性提供的标准框架, 它已经包含在JavaEE6标准中.
JSR303通过Bean属性上标注类似于@NotBlank/@NotNull/@Size/@Min/@Max/@Pattern等注解, 来声明属性的合法性.
校验流程:
- 引入校验依赖: spring-boot-starter-validation
- 定义封装的数据Bean
- 给Bean的字段添加校验注解, 并指定校验错误的消息提示
- 在Controller上添加@Valid注解,@Validated 激活校验
- 编写一个全局异常处理器, 拦截MethodArgumentNotValidException异常, 返回校验失败的错误信息
- 使用自定义校验注解 + 校验器(implements ConstraintValidator)完成自定义校验
- 结合校验注解message属性于i18n文件, 实现错误消息国际化
编写校验规则
1 |
|
激活校验
1 |
|
校验失败的异常处理
1 |
|
使用正则表达式
1 |
|
自定义校验
- 定义自定义验证器
1 | public class GenderValidator implements ConstraintValidator<Gender, String> { |
- 定义校验注解
1 |
|
定义国际化文件
1
2
3
4
5
6
7
8# messages.properties
validator.gender=只能为男性或女性
# messages_en_US.properties
validator.gender=only can be male or female!
# messages_zh_CN.properties
validator.gender=只能为男性或女性测试-Controller
1
2
3
4
public R VE( User user) {
return R.ok(user);
}测试-Postman
1
2
3
4
5
6
7
8
9
10curl --location --request GET 'http://localhost:8080/validateGlobalException' \
--header 'Accept-Language: en-US' \
--header 'Content-Type: application/json' \
--data '{
"name": "jack",
"id": 32,
"password": "",
"gender": "mafle"
}'结果
1
2
3
4
5
6
7
8{
"code": 400,
"msg": "校验失败",
"data": {
"password": "密码不能为空",
"gender": "only can be male or female!"
}
}
虽然通过以上方式可以实现数据的校验, 但是实际在生产当中, 为了准守单一职责的设计模式, 我们不会使用上述方式进行数据校验
各种xxO:
- DAO: Data Access Object, 数据访问对象
- TO: Transfer Object, 传输对象
- BO: Business Object, 业务对象
- VO: View Object, 视图对象(用于与前端数据交互)
- DTO: Data Transfer Object, 数据传输对象
5.8 接口文档Swagger
Swagger可以快速生成接口文档,方便前后端开发人员协调沟通
Knife4j –> Swagger –> OpenAPI
- 添加依赖
1 | <dependency> |
- 配置
1 | # springdoc-openapi项目配置 |
- 访问
地址:http://localhost:8080/doc.html
5.9 SpringMVC运行流程
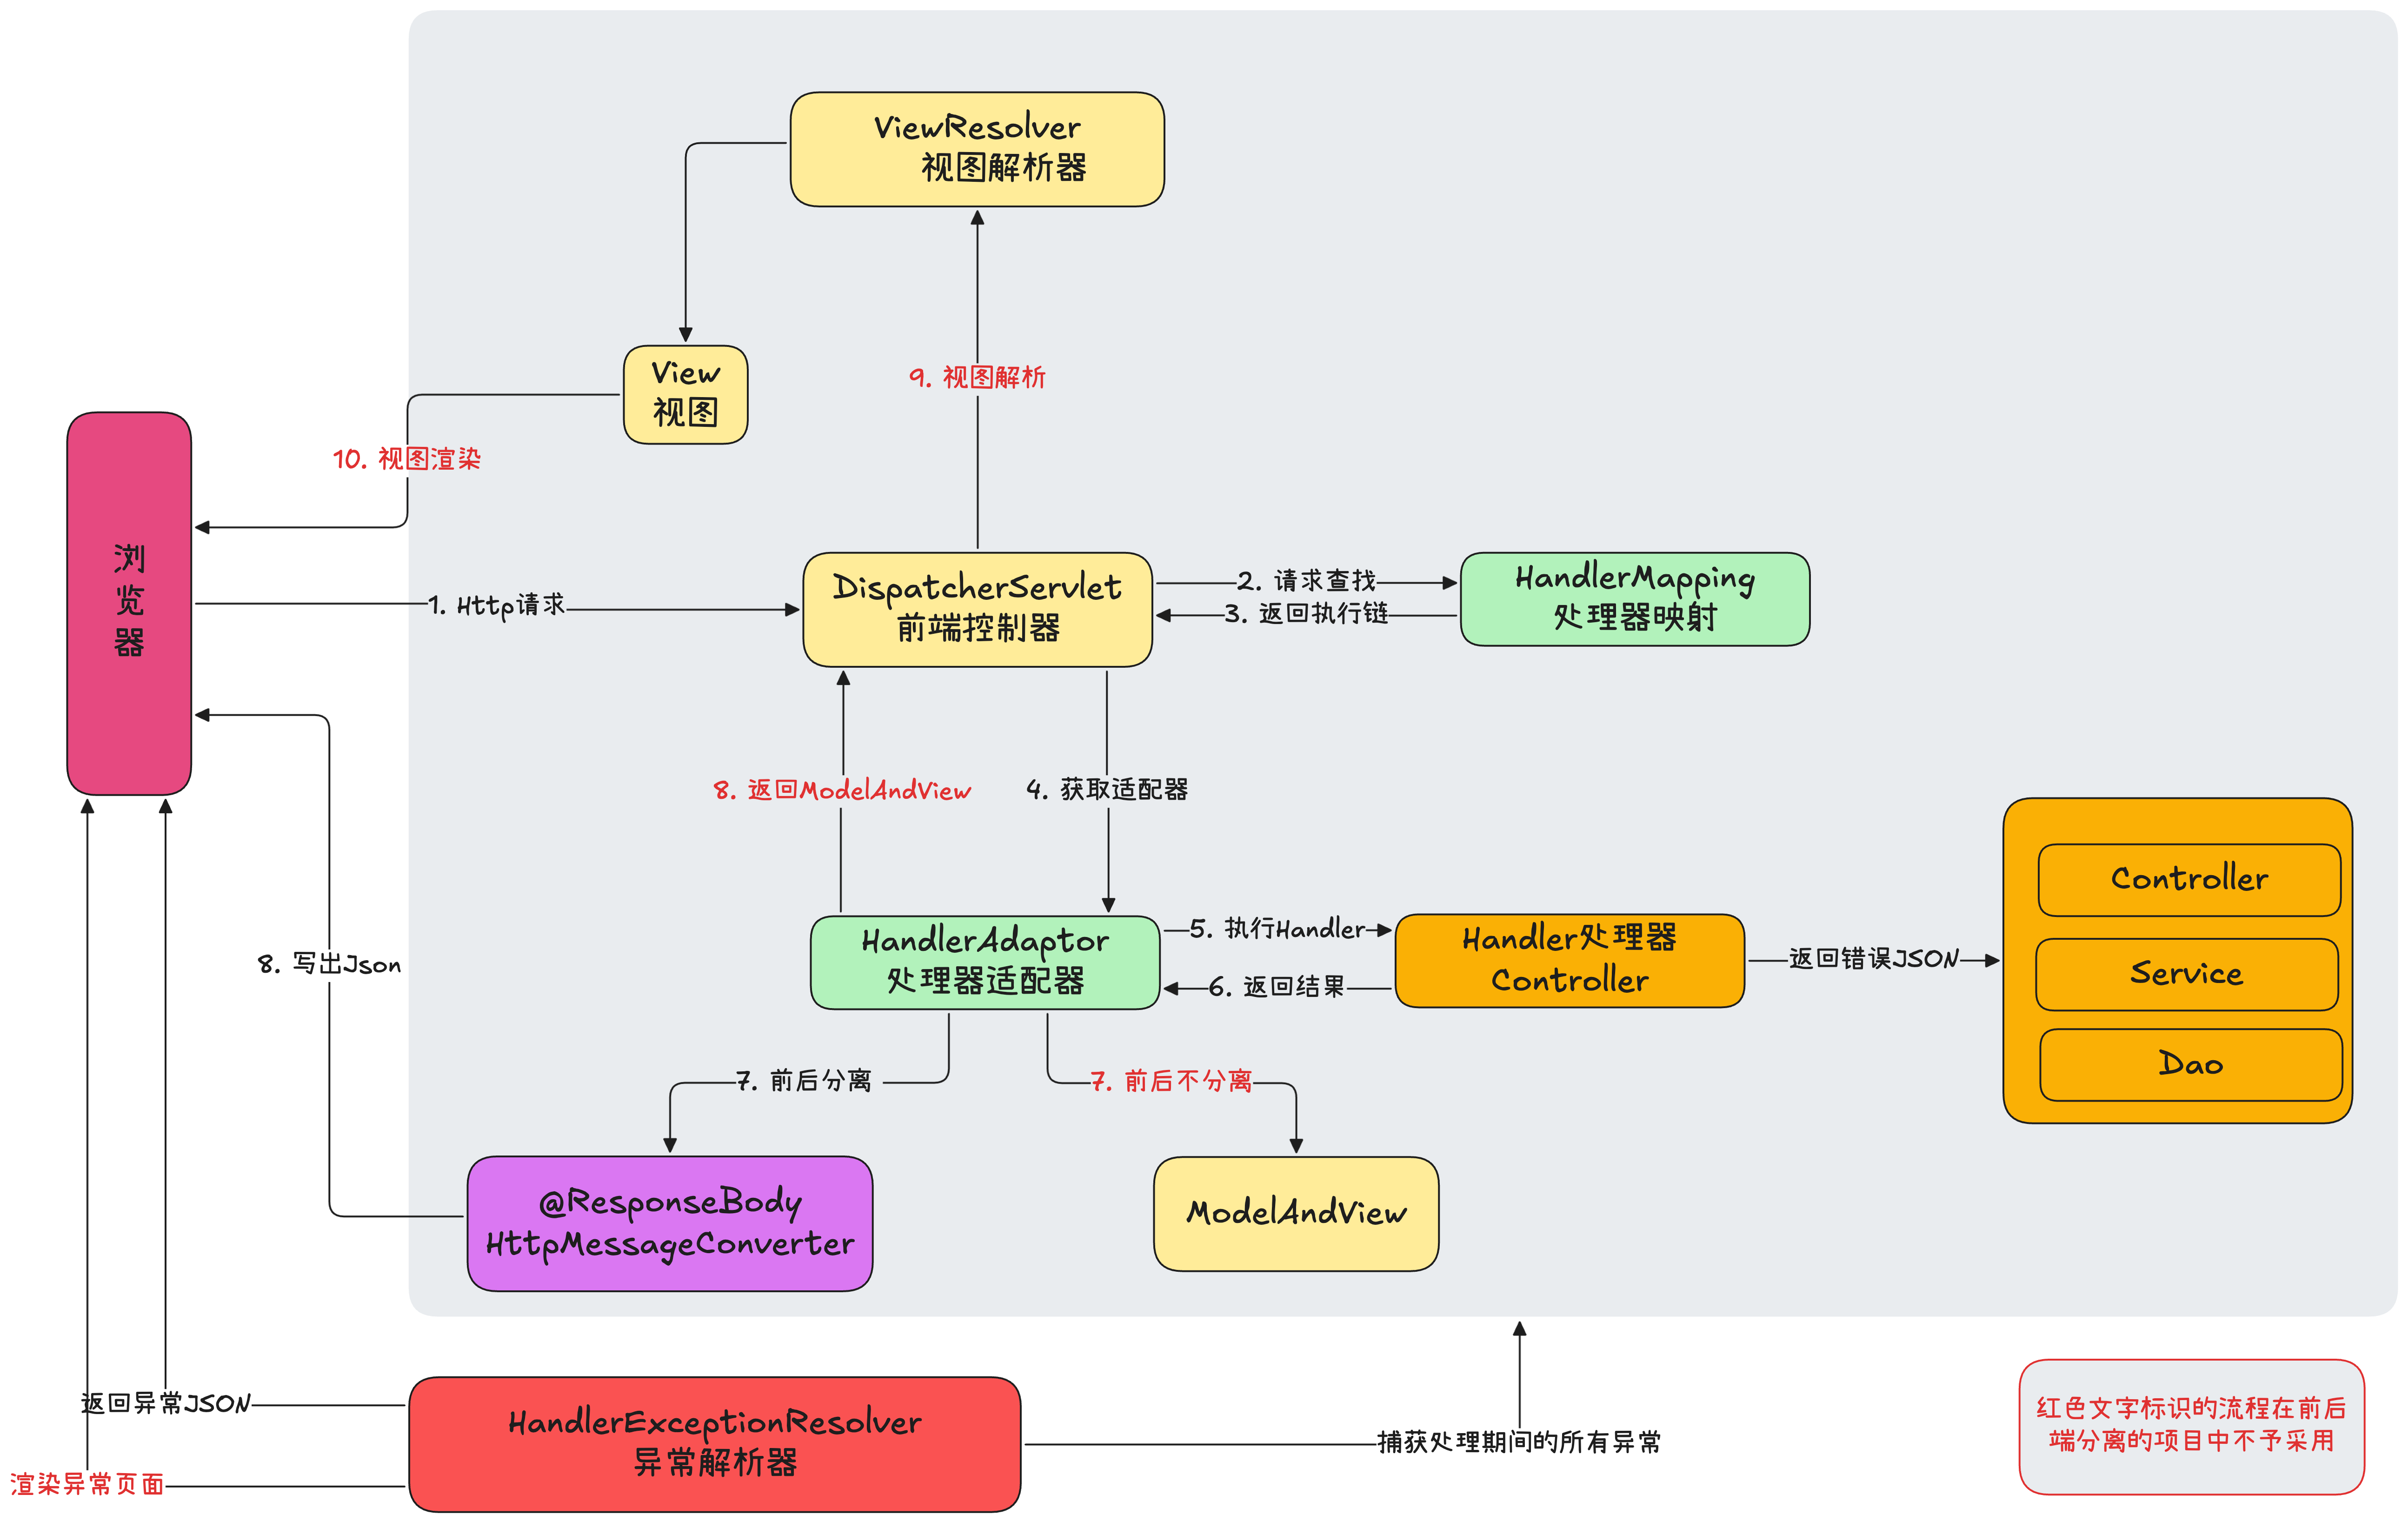
6. MyBatis
MyBatis 是一款优秀的持久层框架
开发工具准备: 在IDEA中安装插件MyBatisX
使用MyBatis流程:
配置数据库连接池
1
2
3
4
5
6
7
8spring:
application:
name: mybatis-01-helloworld
datasource:
url: jdbc:mysql://localhost:3306/mybatis-example
username: root
password: root
driver-class-name: com.mysql.jdbc.Driver编写Dao层接口(Mapper)
1
2
3
4//告诉Spring, 这是Mybatis操作的接口
public interface empMapper {
Emp getEmpById(int id);
}编写Mapper.xml文件(位于
resource/mapper文件夹下)
可以通过MyBatisX插件生成1
2
3
4
5
6
7
8
9
<mapper namespace="com.learning.ssm.mybatis.dao.empMapper">
<!--namespace代表这个mapper接口和此xml文件进行绑定-->
<!-- select标签代表查询, id绑定方法名 -->
<select id="getEmpById" resultType="com.learning.ssm.mybatis.bean.Emp">
select id, emp_name empName, age, emp_salary empSalary from t_tmp where id = #{id};
</select>
</mapper>通知MyBatis各个Mapper接口对应的Mapper.xml文件地址
1
2
3
4
5
6
7
8
9
10
11
12
13
14
15
16spring:
application:
name: mybatis-01-helloworld
datasource:
url: jdbc:mysql://localhost:3306/mybatis-example
username: root
password: root
driver-class-name: com.mysql.jdbc.Driver
mybatis:
mapper-locations: classpath:mapper/**.xml # 配置mapper.xml文件的位置
configuration:
map-underscore-to-camel-case: true # 开启下划线自动转驼峰命名规则
logging:
level:
com.learning.ssm.mybatis.mapper: debug # 开启mybatis的日志级别为debug
6.1 两种取值方式的区别
#{id}: 占位符, 占位符的值是运行时从参数对象中取出对应的值${id}: 拼串, 拼串的值是运行时从参数对象中取出对应的值, 但是拼串的值会被直接拼在sql中, 有sql注入的风险
对于表名, 可以使用${tableName}传入表名, 但是不能使用#{tableName}
6.2 自定义返回结果集
- id标签: id标签用于定义主键
- result标签: result标签用于定义普通值
- association标签: association标签用于定义对象
- collection标签: collection标签用于定义集合
1 | <resultMap id="resultRM" type="com.learning.ssm.mybatis.bean.Emp"> |