[TOC]
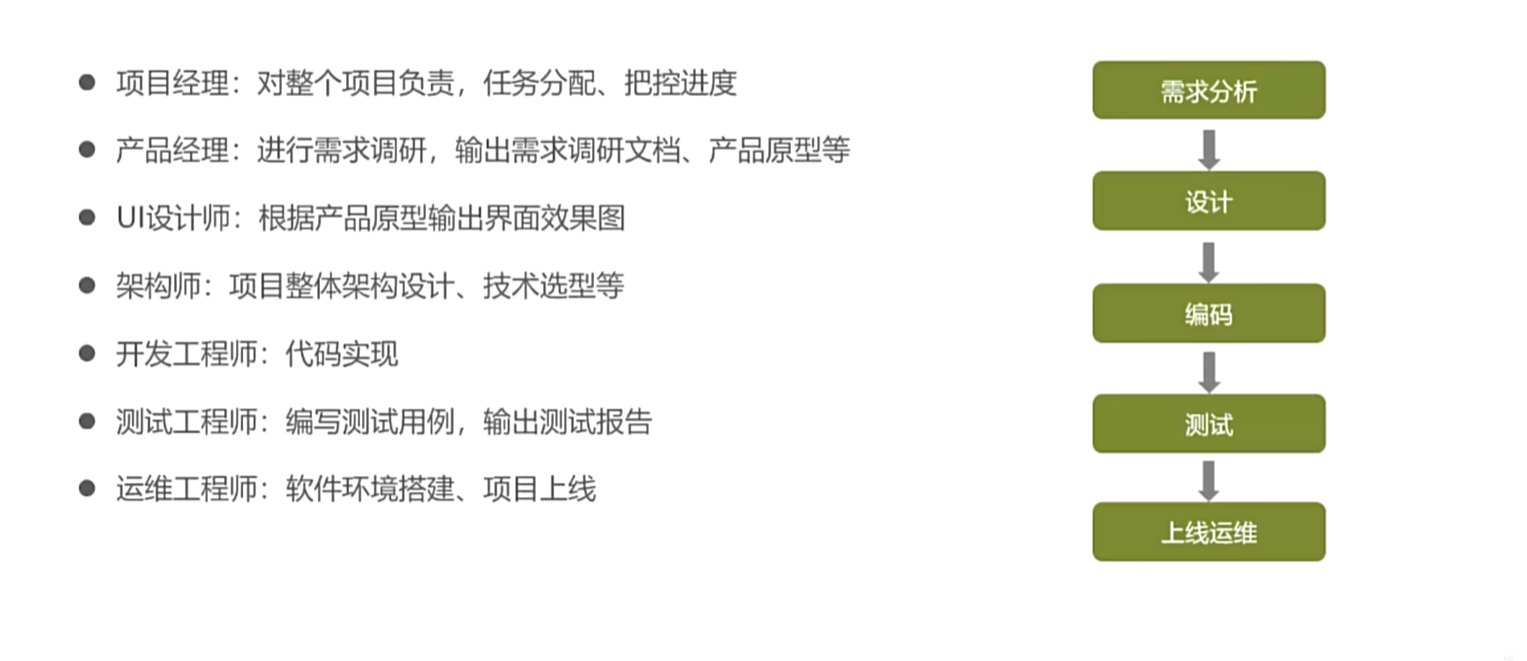
1. 项目概述和环境搭建 1.1 软件开发整体介绍 1.1.1 软件开发流程
1.1.2 角色分工
1.1.3 软件环境
开发环境: 开发人员在开发阶段使用的环境,一般对外部用户无法访问
测试环境: 专门给测试人员使用的环境,用于测试项目,一般对外部用户无法访问
生产环境: 即线上环境,正式提供对外服务的环境
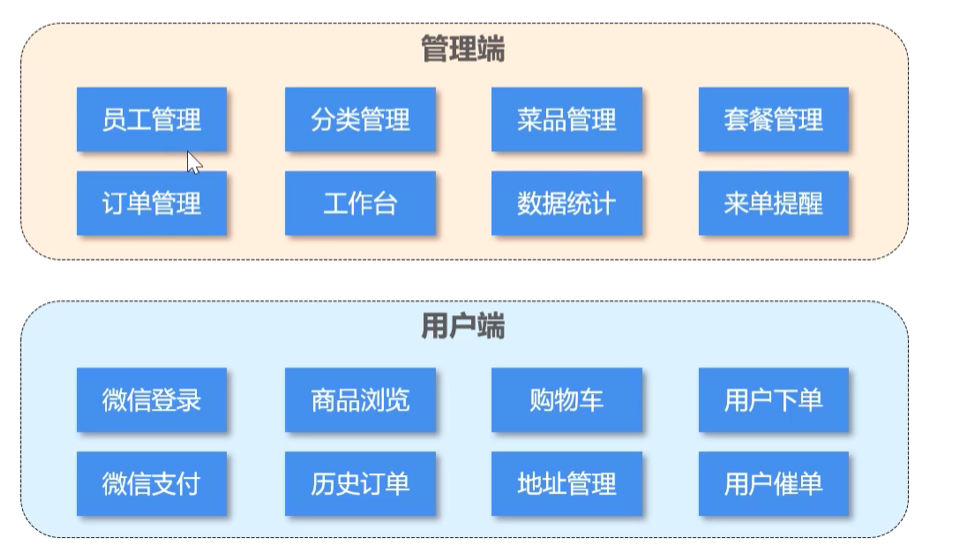
1.2 苍穹外卖项目介绍 1.2.1 项目介绍
定位: 专门为餐饮企业定制的一款软件产品
结构
功能架构: 体现项目中业务功能模块
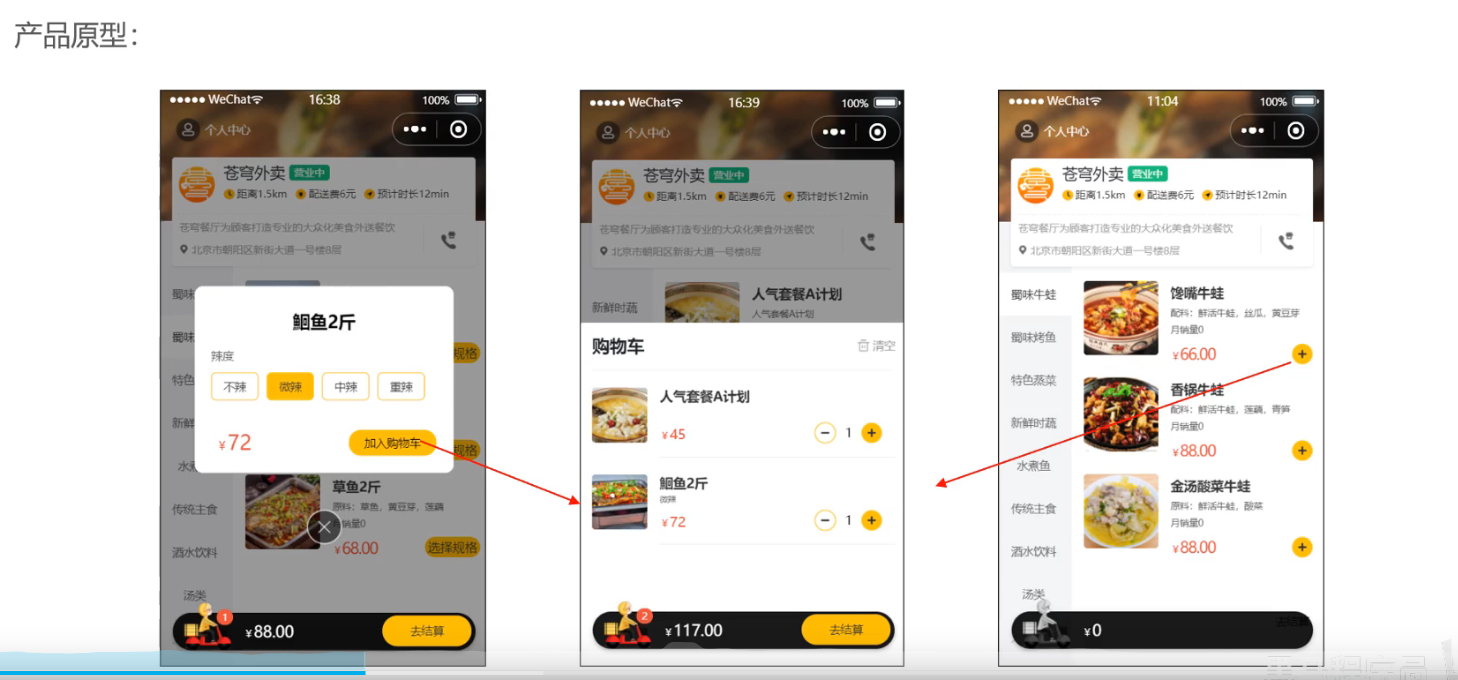
1.2.2 产品原型 静态的HTML页面,用于展示业务功能
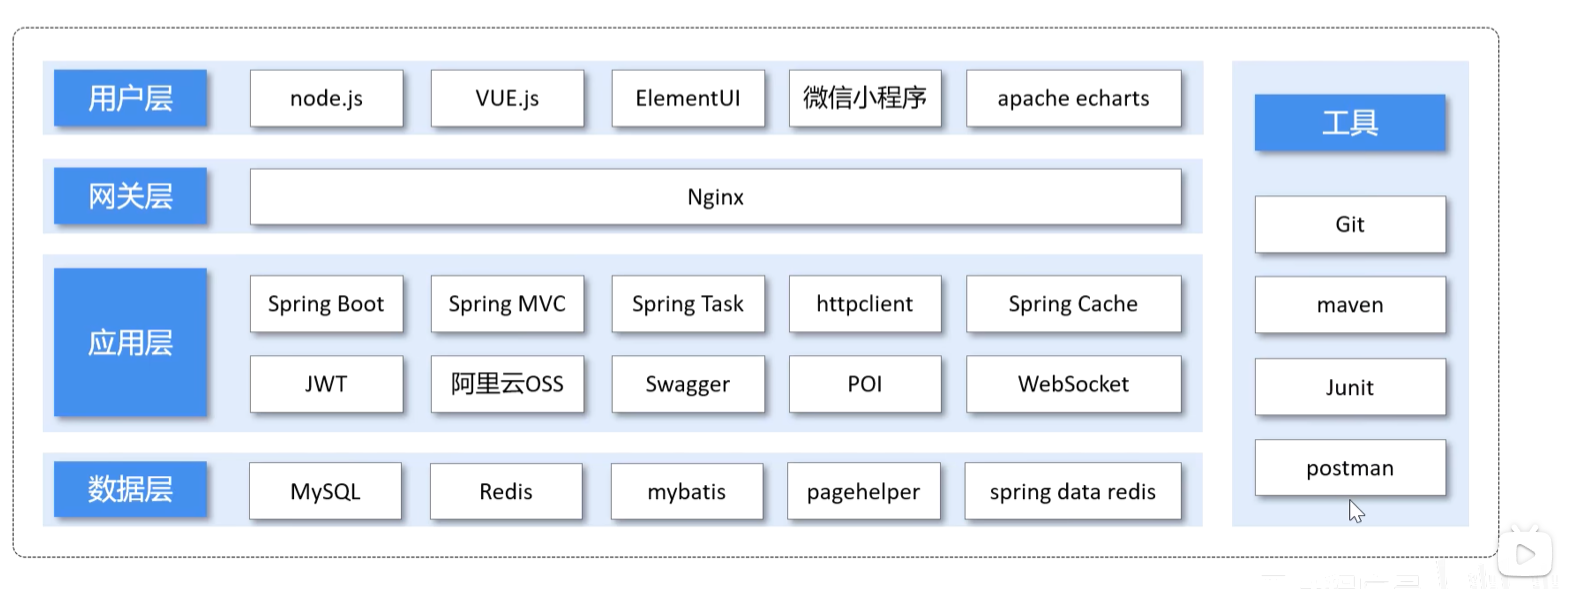
1.2.3 技术选型 技术选型: 展示项目中使用到的技术框架和中间件等
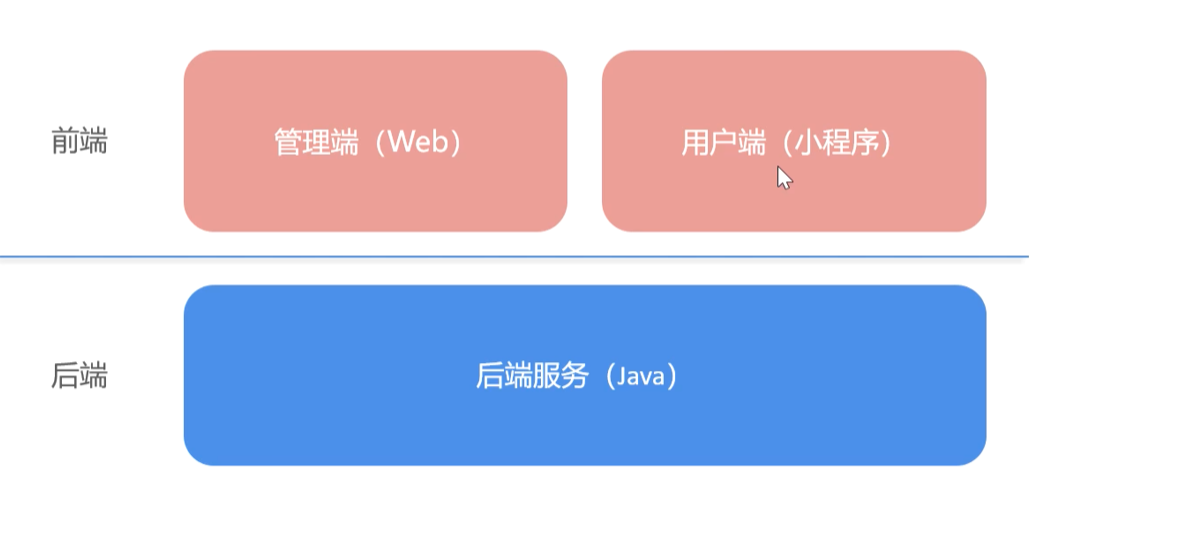
1.3 开发环境搭建 整体结构
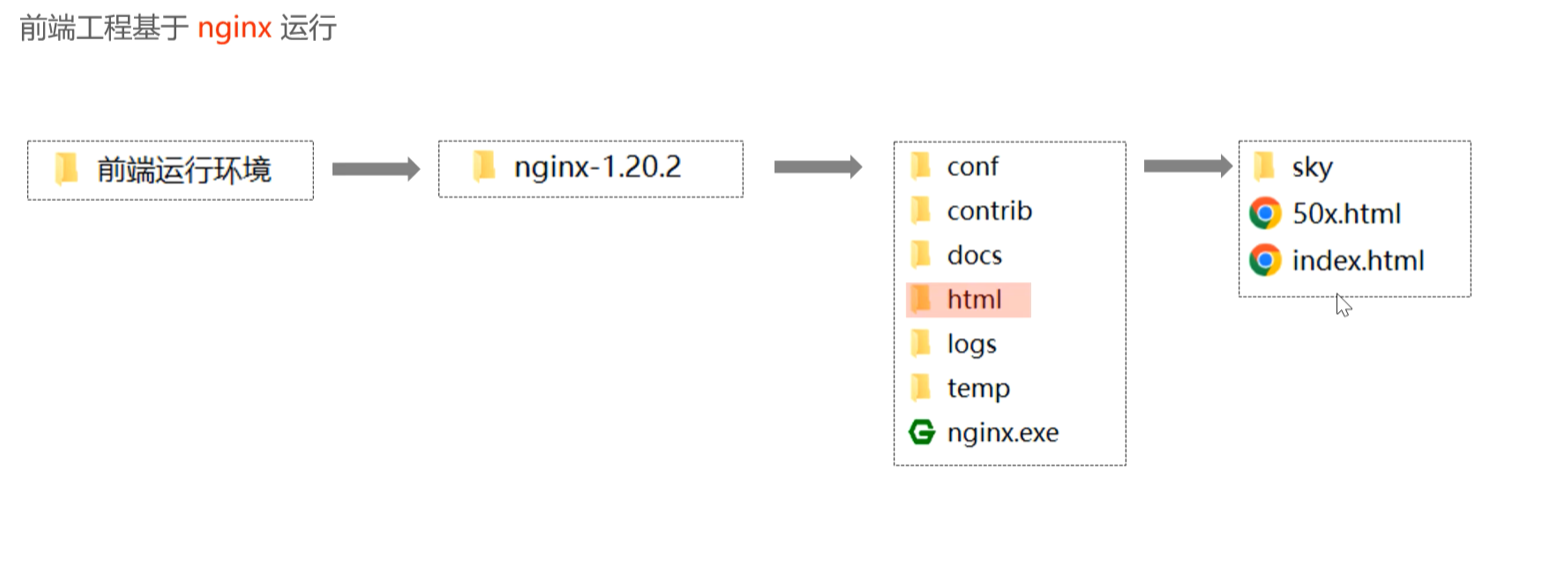
1.3.1 前端环境搭建
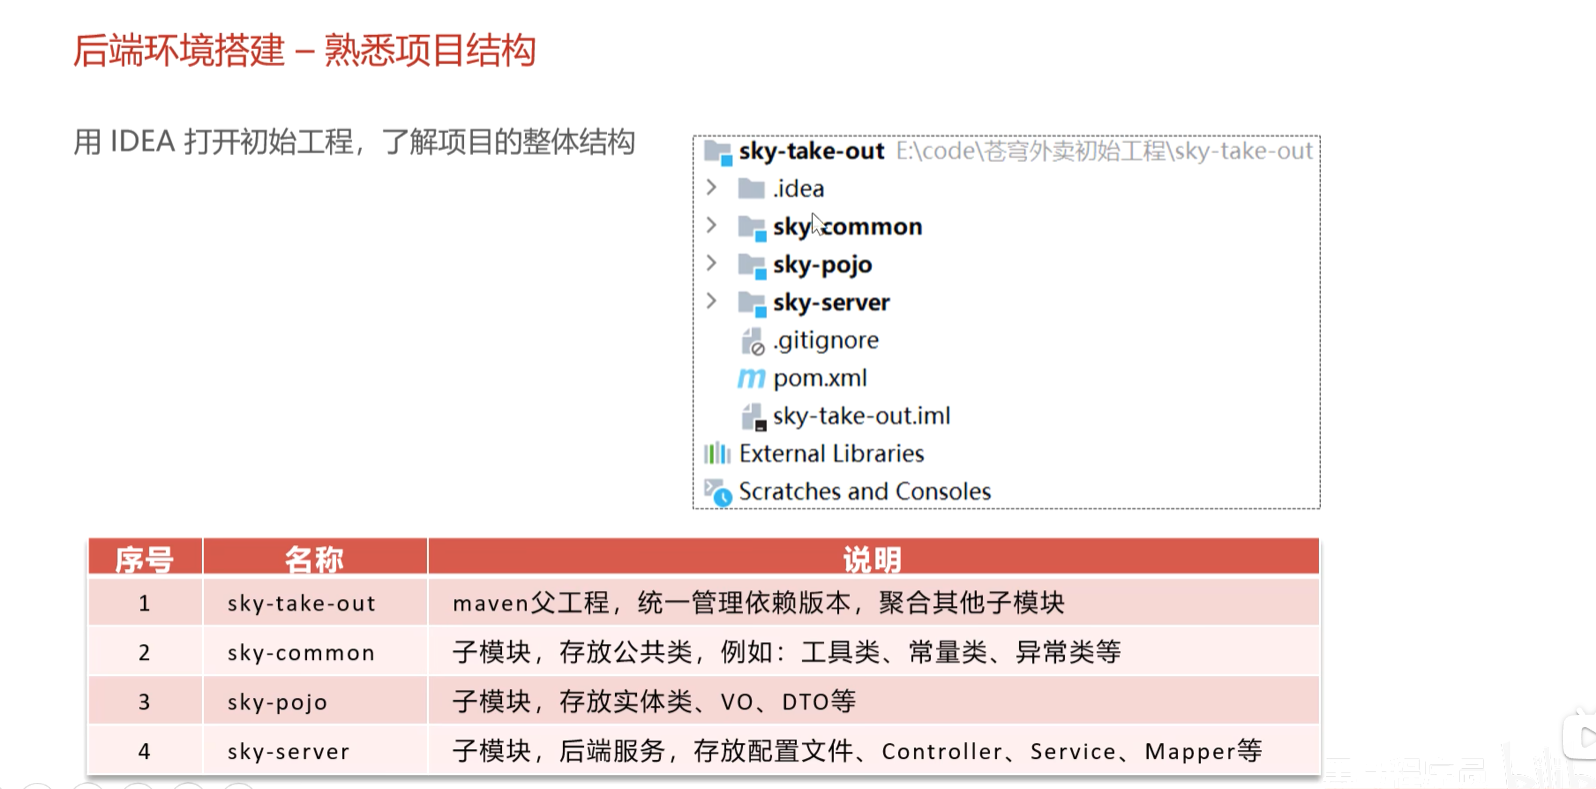
1.3.2 后端环境搭建 后端工程基于maven进行项目构建,并进行分模块开发
entity:实体,通常和数据库中的表对应
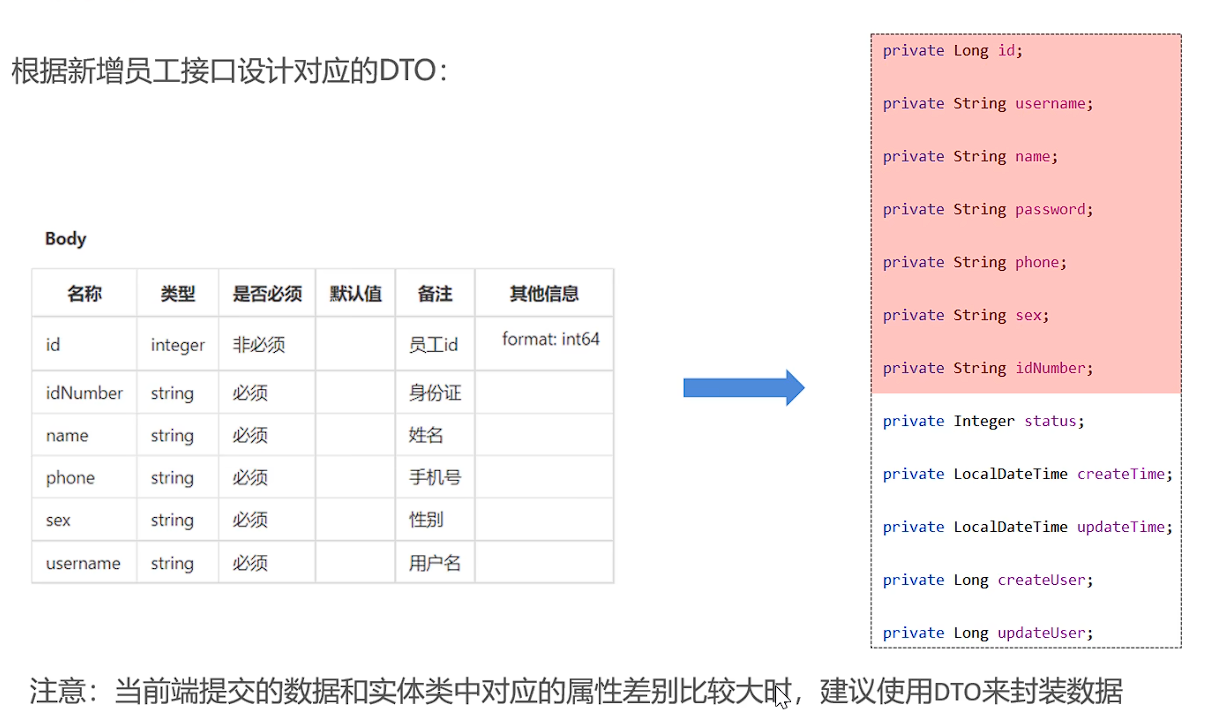
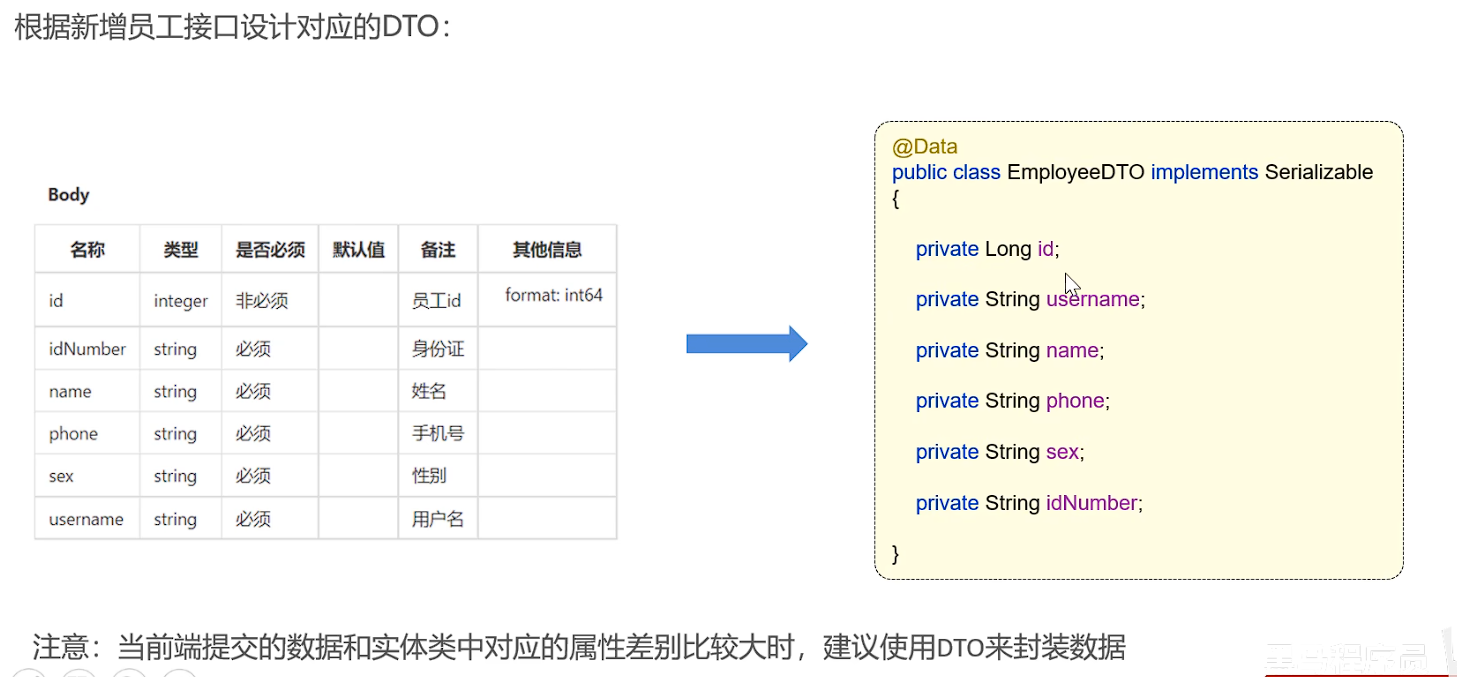
DTO: 数据传输对象,通常用于程序中各层之间传递数据
VO:视图对象,为前端展示数据提供的对象
POJO:普通Java对象,只有属性和对应的getter和setter
使用Git进行版本控制:
创建git本地仓库
创建git远程仓库
将本地文件push到git远程仓库
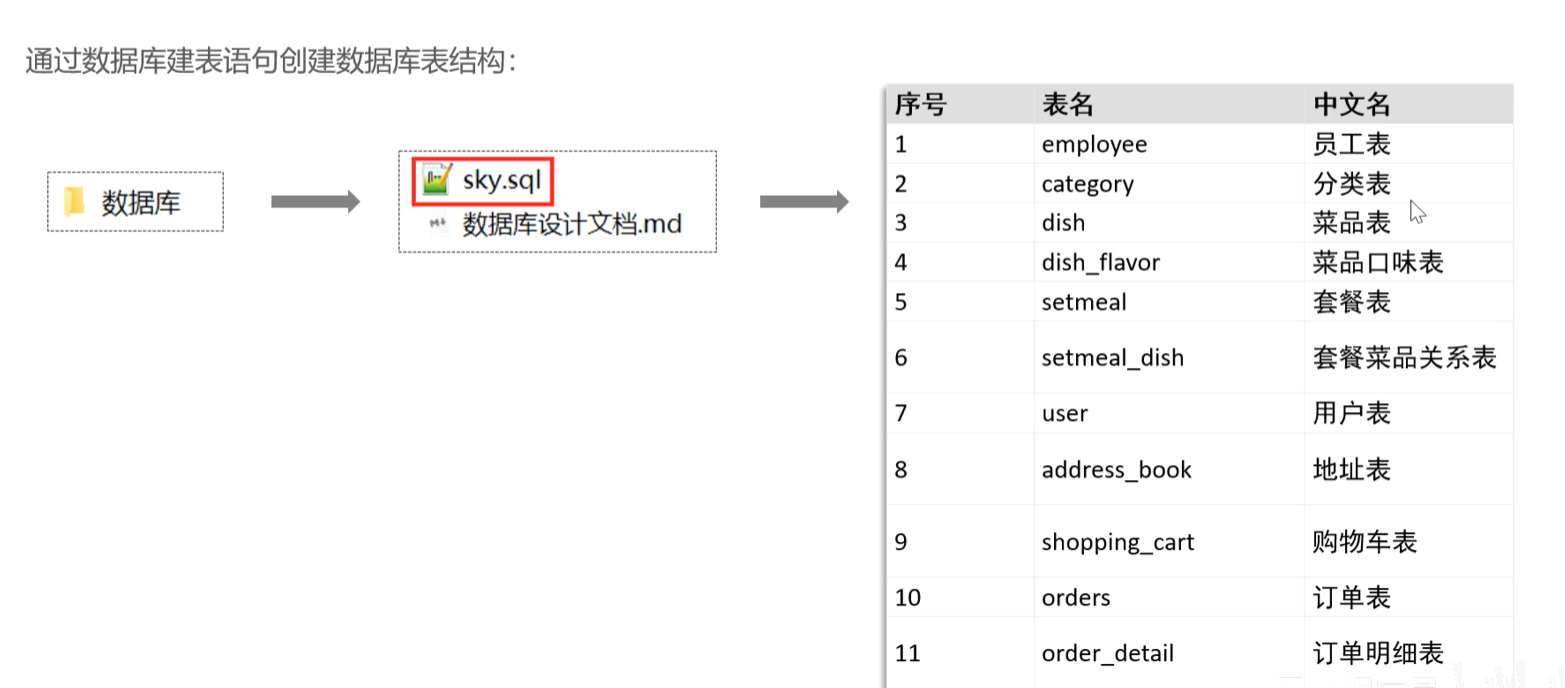
数据库环境搭建:
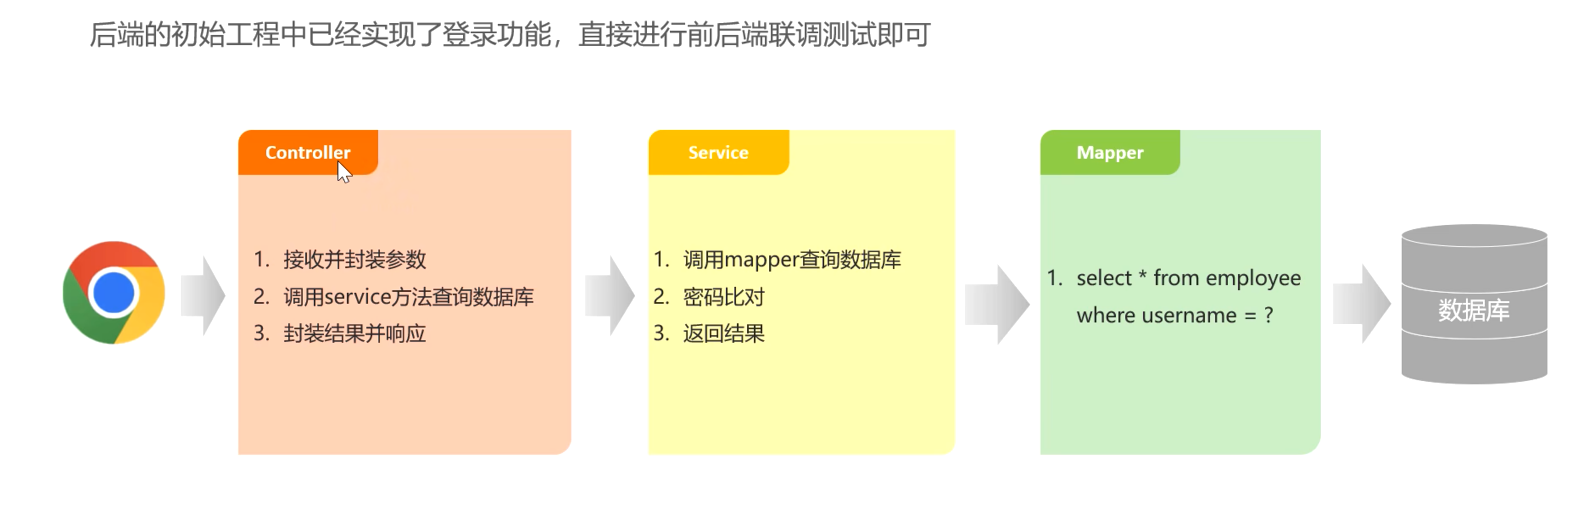
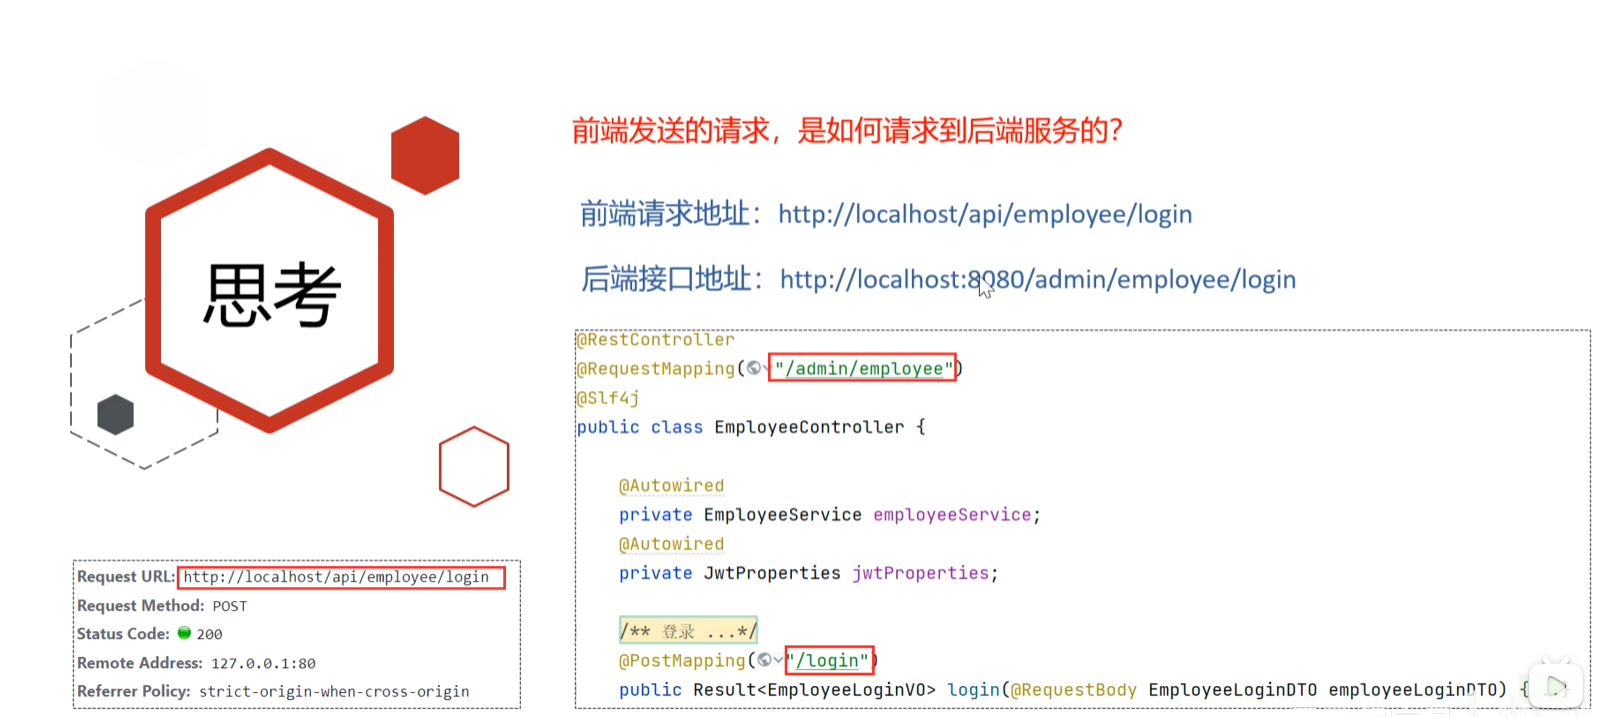
前后端联调
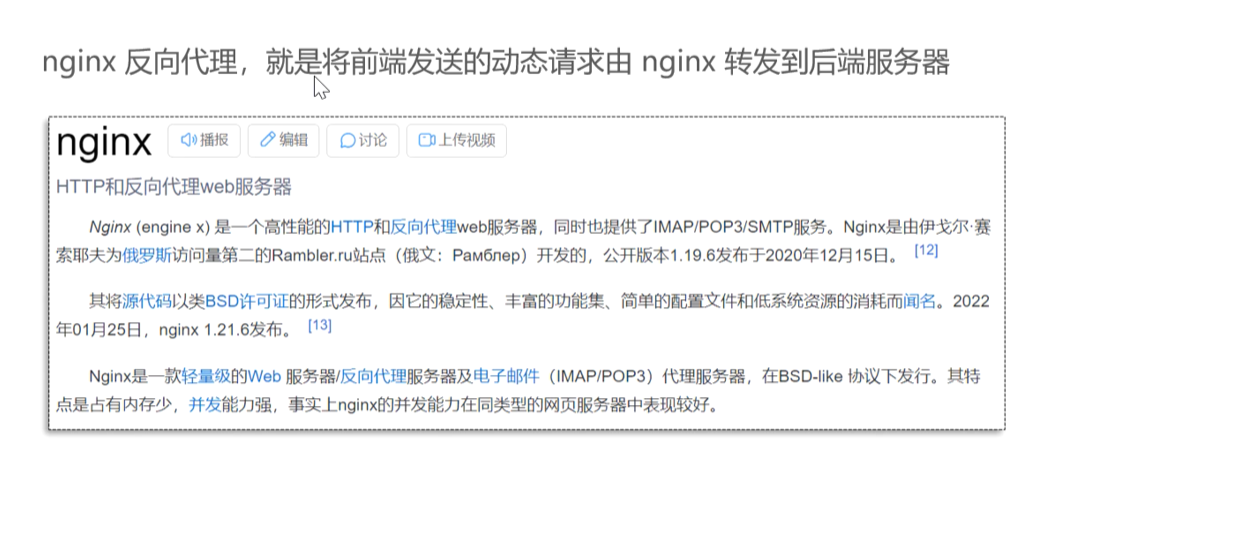
浏览器 –> Nginx–> 后端服务器
正向代理: 隐藏了客户端的真实地址(VPN)
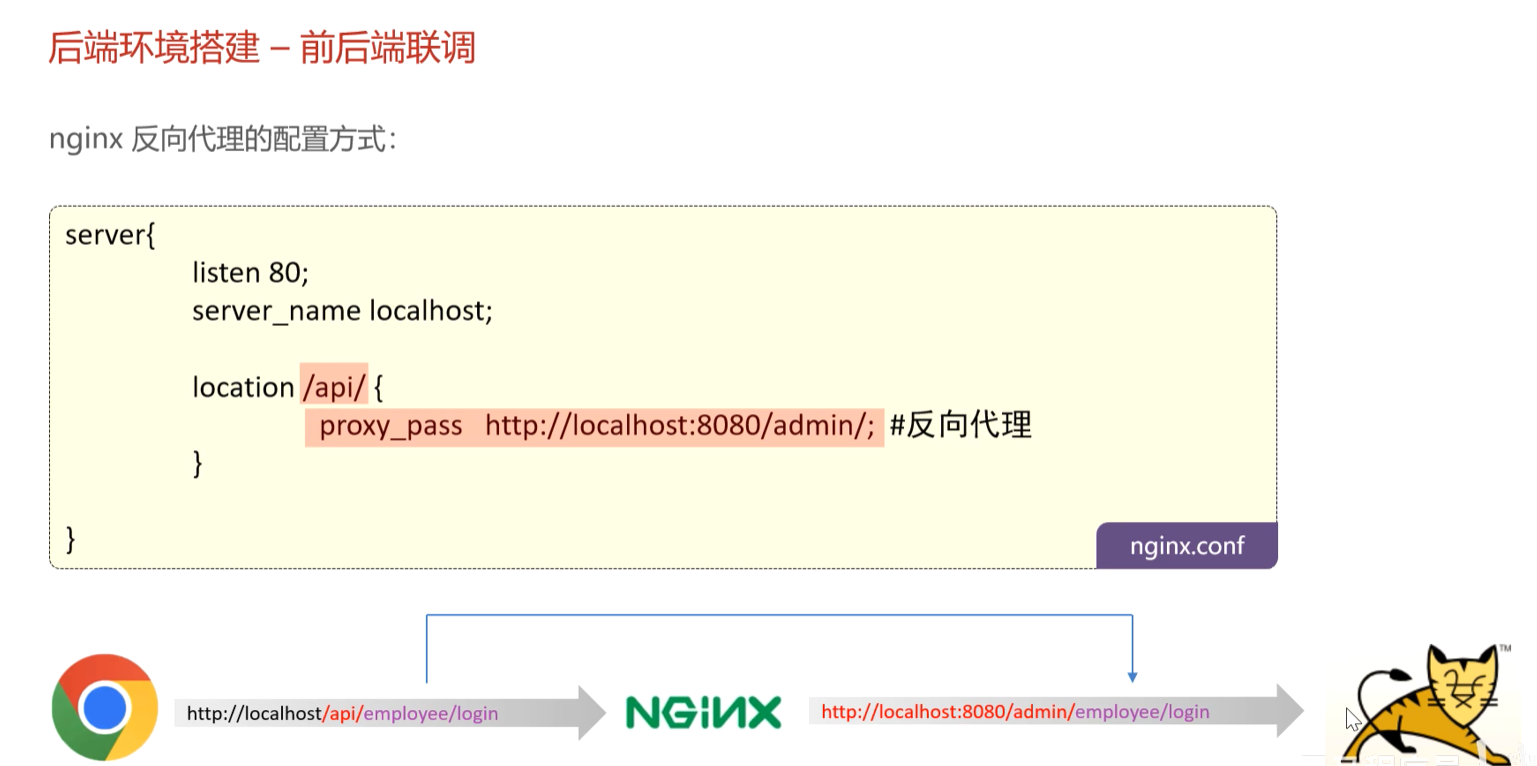
反向代理:隐藏了服务端的真实地址
Nginx反向代理的好处:
提高访问速度:客户端访问nginx时,nginx中可以做缓存,如果是请求的同一个地址,就不用真正的去请求后端服务,而是直接请求nginx,nginx可以直接返回所需缓存数据
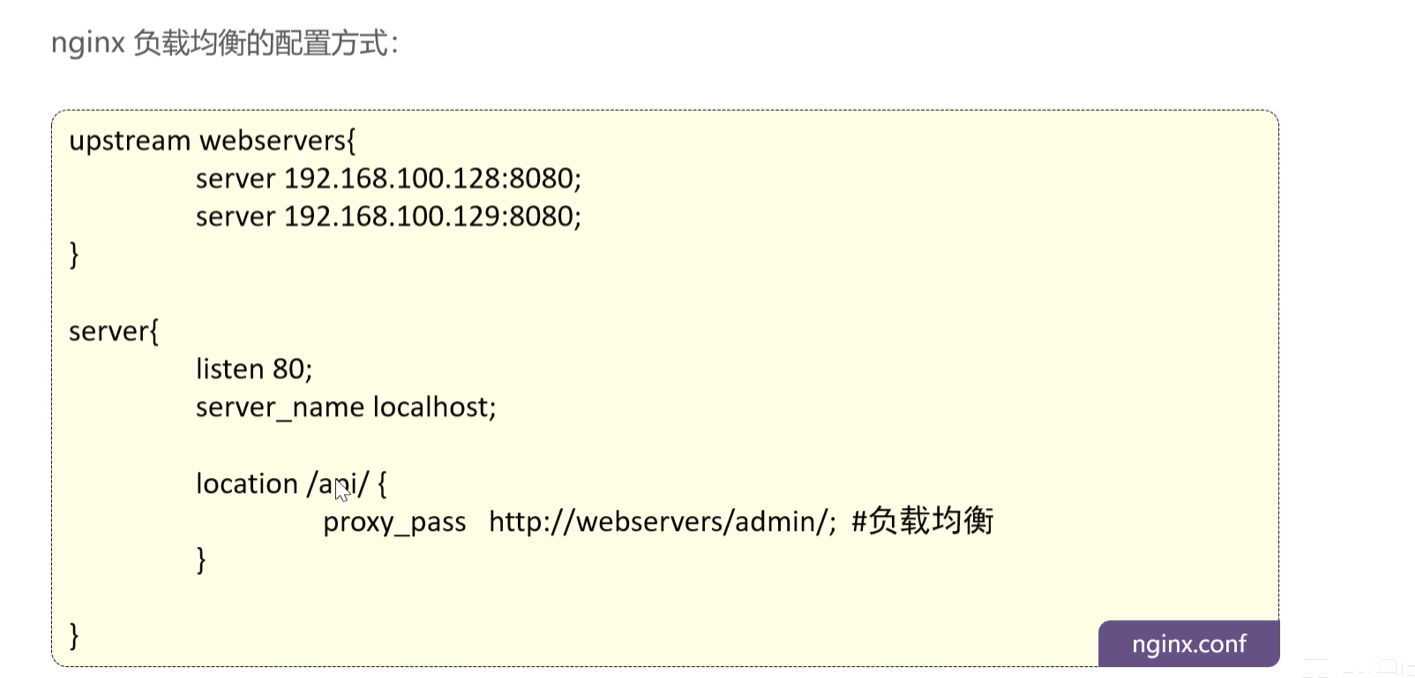
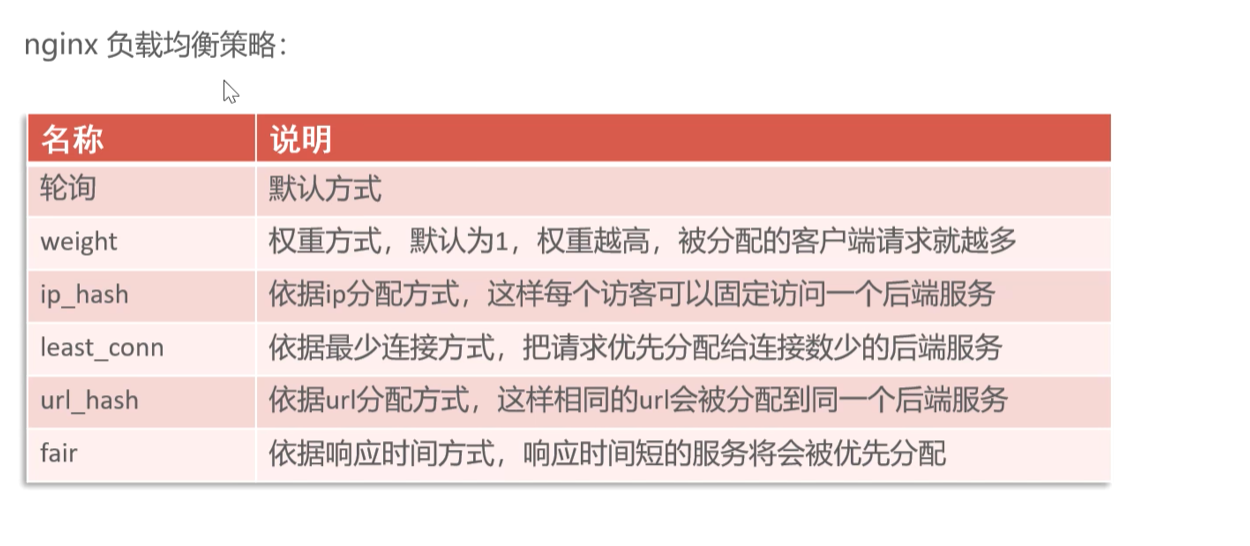
进行负载均衡:按照指定的方式分发给不同的服务器
保证后端服务器安全
反向代理:
负载均衡:
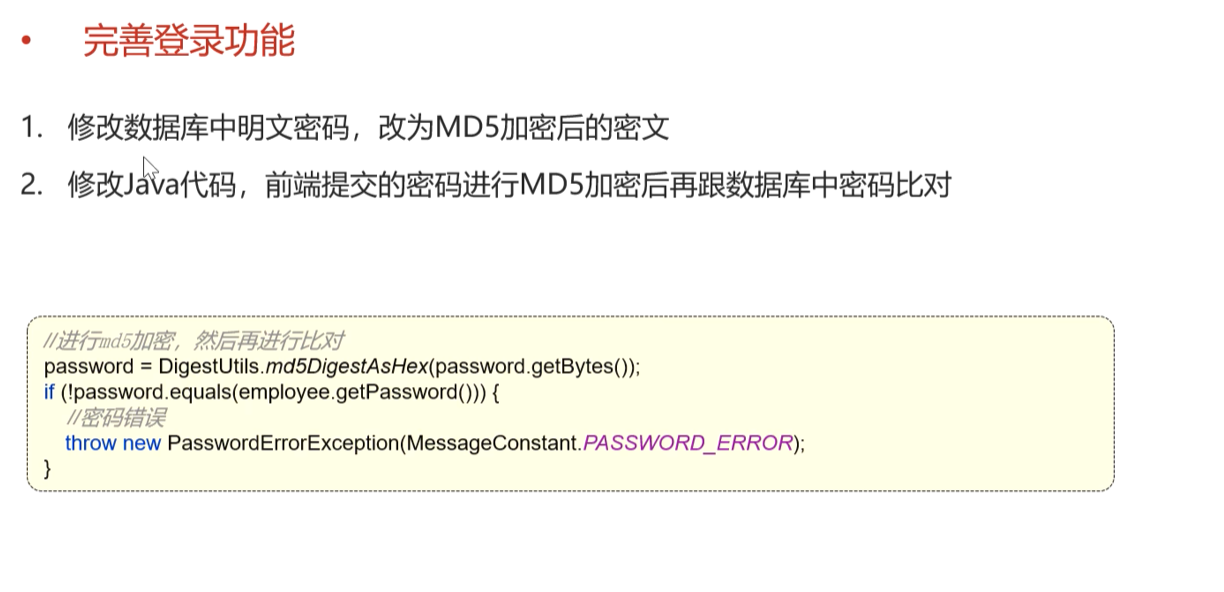
1.3.3 完善登录功能 问题:员工表中的密码是明文存储的,安全性太低
步骤:
将密码加密后进行存储,提高安全性
使用MD5加密方式对明文密码加密
修改数据库中的明文密码,改为MD5加密后的密文
修改java代码,前端提交的密码进行MD5加密后再与数据库中的密码比对
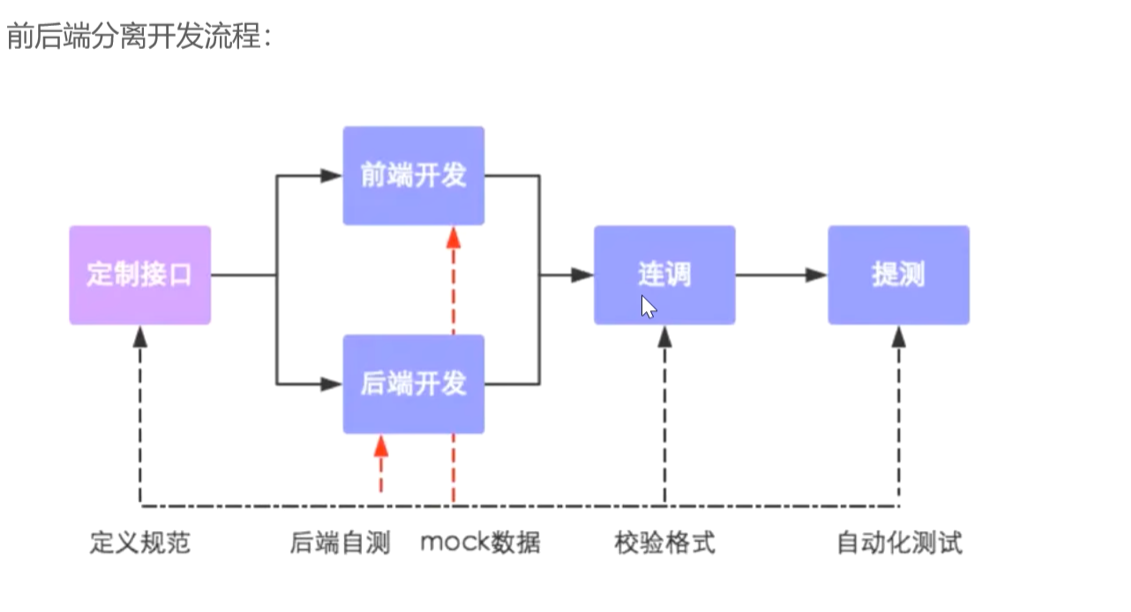
1.4 导入接口文档 1.4.1 前后端分离开发流程
1.4.2 操作步骤 本项目使用API fox
将接口的json文件导入APIFOX
1.5 Swagger 1.5.1 介绍 使用Swagger只需要按照它的规范去定义接口及接口相关的信息,就可以做到生成接口文档,以及在线接口调试界面。
Knife4j是为Java MVC框架集成Swagger生成API文档的增强解决方案
1 2 3 4 5 <dependency > <groupId > com.github.xiaoymin</groupId > <artifactId > knife4j-spring-boot-starter</artifactId > <version > 3.0.2</version > </dependency >
1.5.2 使用方式
导入knife4j的maven坐标
在配置类中加入knife4j相关配置
1 2 3 4 5 6 7 8 9 10 11 12 13 14 15 16 17 18 19 @Bean public Docket docket () { ApiInfo apiInfo = new ApiInfoBuilder () .title("苍穹外卖项目接口文档" ) .version("2.0" ) .description("苍穹外卖项目接口文档" ) .build(); Docket docket = new Docket (DocumentationType.SWAGGER_2) .apiInfo(apiInfo) .select() .apis(RequestHandlerSelectors.basePackage("com.sky.controller" )) .paths(PathSelectors.any()) .build(); return docket; }
设置静态资源映射,否则接口文档页面无法访问
1 2 3 4 5 6 7 8 protected void addResourceHandlers (ResourceHandlerRegistry registry) { registry.addResourceHandler("/doc.html" ).addResourceLocations("classpath:/META-INF/resources/" ); registry.addResourceHandler("/webjars/**" ).addResourceLocations("classpath:/META-INF/resources/webjars/" ); }
ApiFox导入的接口文档是设计阶段产出的,用于管理和维护接口
Swagger是在开发阶段使用的框架,帮助开发人员做后端的接口测试
1.5.3 Swagger常用注解
@Api:用在类上,例如Controller,表示对类的说明
@ApiModel:用在类上,例如entity,DTO,VO
@ApiModelProperty:用在属性上,描述属性信息
@ApiOperation:用在方法上,例如Controller的方法,说明方法的用途,作用
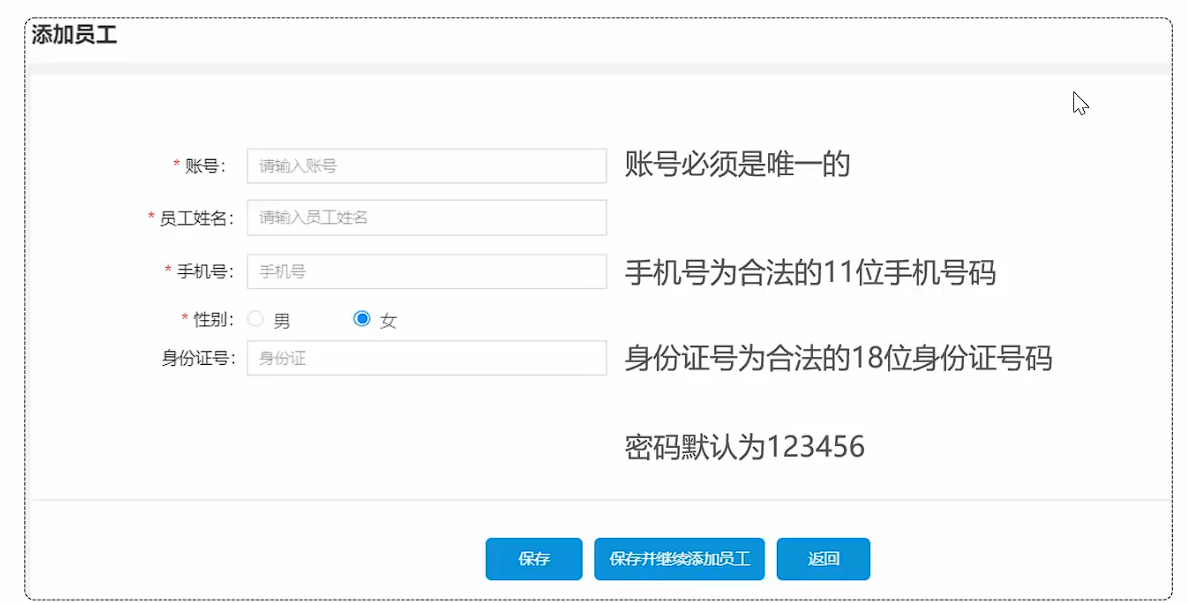
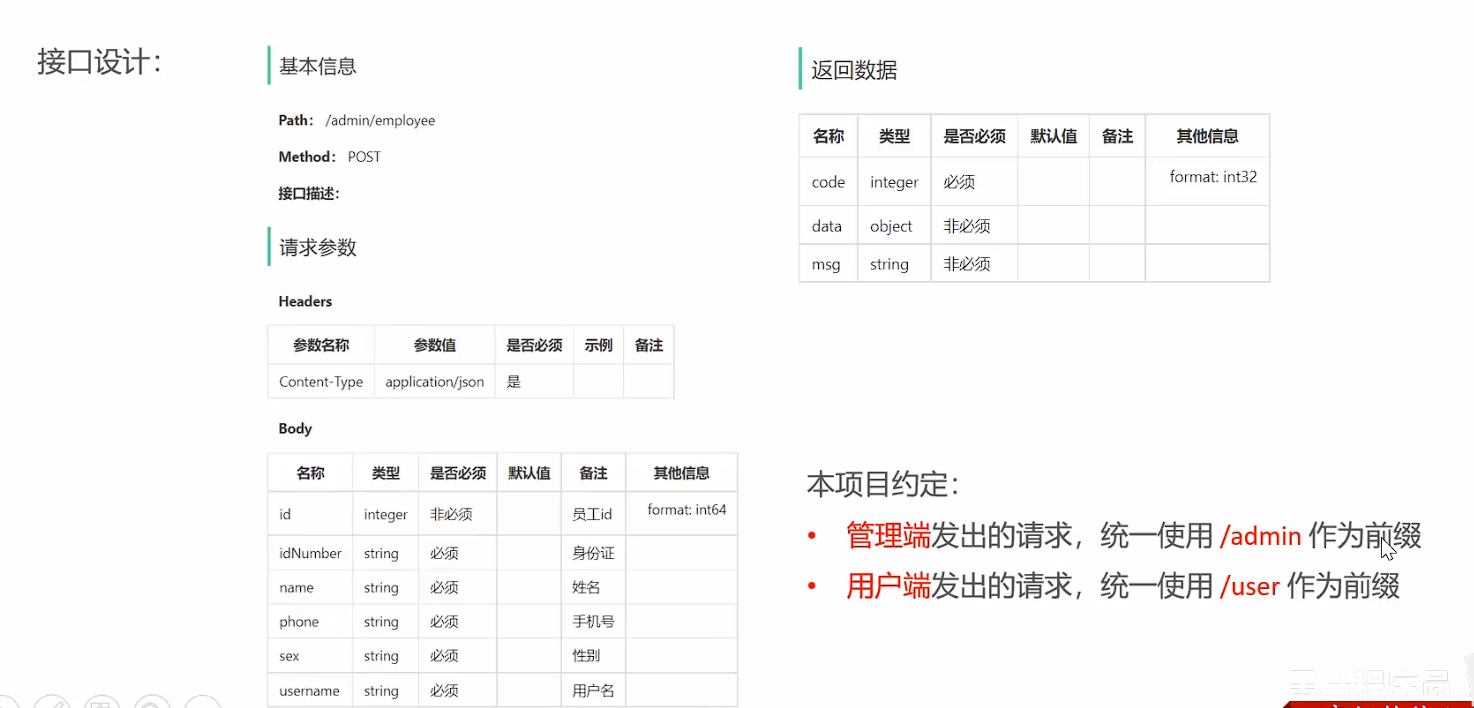
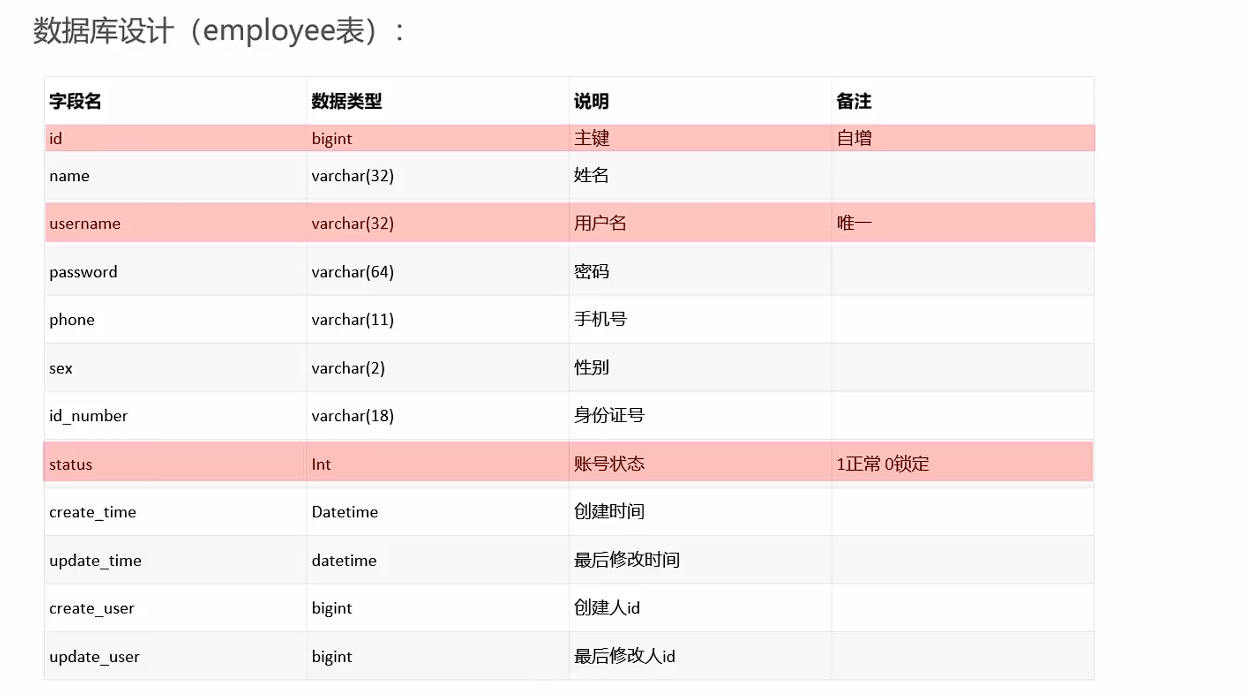
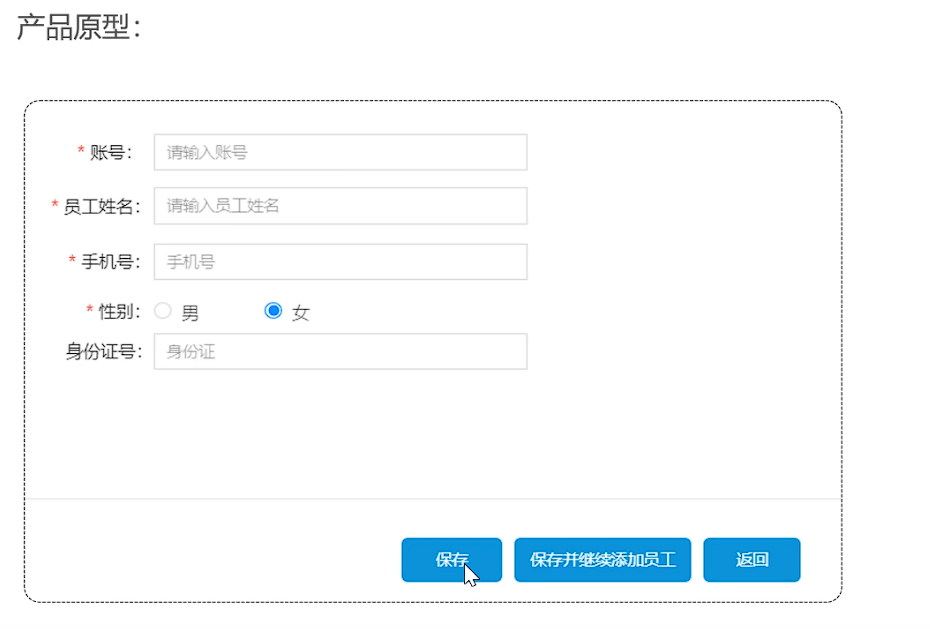
2. 员工管理和分类管理 2.1 新增员工 2.1.1 需求分析和设计
产品原型
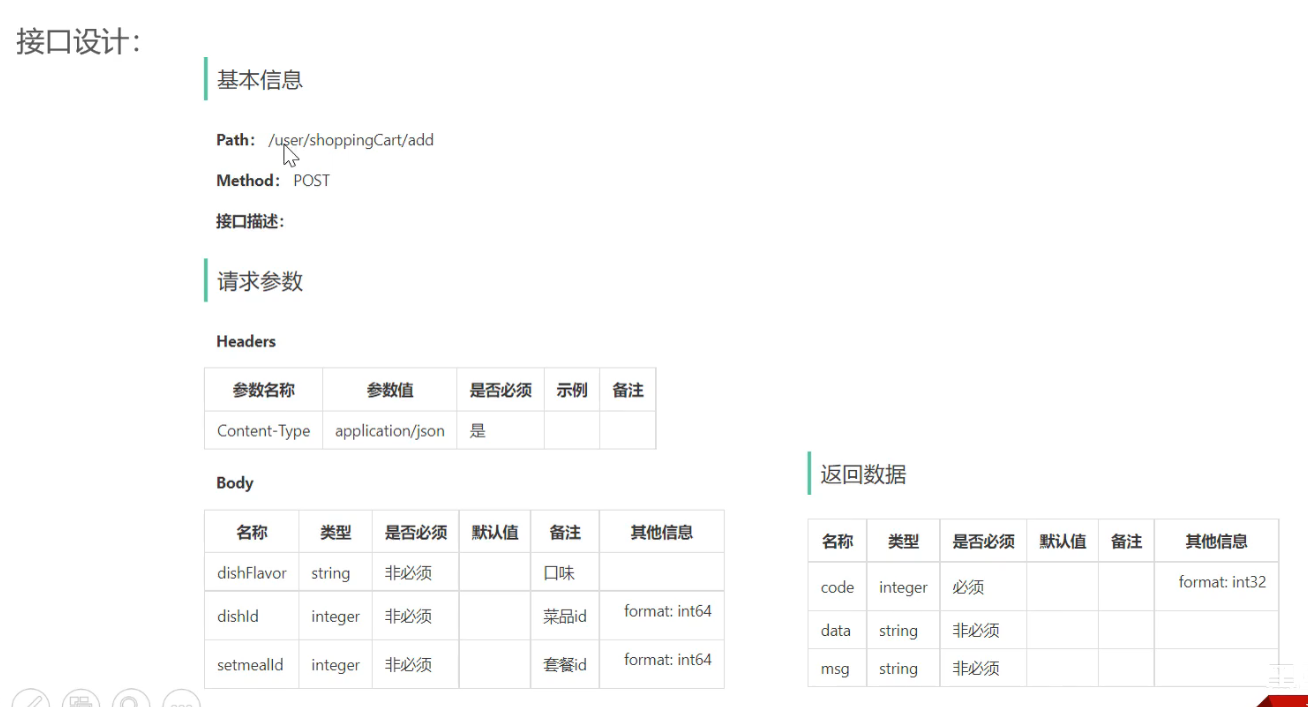
接口设计
1
2
3
4
5
6
7
8
9
10
11
12
13
14
15
16
17
DROP TABLE IF EXISTS `employee`; CREATE TABLE `employee` ( `id` bigint NOT NULL AUTO_INCREMENT COMMENT '主键', `name` varchar(32) COLLATE utf8_bin NOT NULL COMMENT '姓名', `username` varchar(32) COLLATE utf8_bin NOT NULL COMMENT '用户名', `password` varchar(64) COLLATE utf8_bin NOT NULL COMMENT '密码', `phone` varchar(11) COLLATE utf8_bin NOT NULL COMMENT '手机号', `sex` varchar(2) COLLATE utf8_bin NOT NULL COMMENT '性别', `id_number` varchar(18) COLLATE utf8_bin NOT NULL COMMENT '身份证号', `status` int NOT NULL DEFAULT '1' COMMENT '状态 0:禁用,1:启用', `create_time` datetime DEFAULT NULL COMMENT '创建时间', `update_time` datetime DEFAULT NULL COMMENT '更新时间', `create_user` bigint DEFAULT NULL COMMENT '创建人', `update_user` bigint DEFAULT NULL COMMENT '修改人', PRIMARY KEY (`id`), UNIQUE KEY `idx_username` (`username`) ) ENGINE=InnoDB AUTO_INCREMENT=2 DEFAULT CHARSET=utf8mb3 COLLATE=utf8_bin COMMENT='员工信息';
AUTO_INCREMENT=2: 从2开始自增
2.1.2 代码开发
2.1.3 功能测试 功能测试方法
注意: 由于开发阶段前端和后端是并行开发的,后端完成某个功能之后,此时前端对应的功能可能还没有完成,导致无法进行前后端联调测试。所以在开发阶段,后端测试主要以接口文档测试为主
2.1.4 代码完善 程序存在的问题:
录入的用户名如果已经存在,抛出的异常没有处理
1 2 3 4 5 6 7 8 9 10 11 12 13 14 15 16 17 18 19 @ExceptionHandler public Result exceptionHandler (SQLIntegrityConstraintViolationException ex) { String message = ex.getMessage(); if (message.contains("Duplicate entry" )){ String[] s = message.split(" " ); String username = s[2 ]; String msg = username + MessageConstant.ALREADY_EXISTS; return Result.error(msg); }else { return Result.error(MessageConstant.UNKNOWN_ERROR); } }
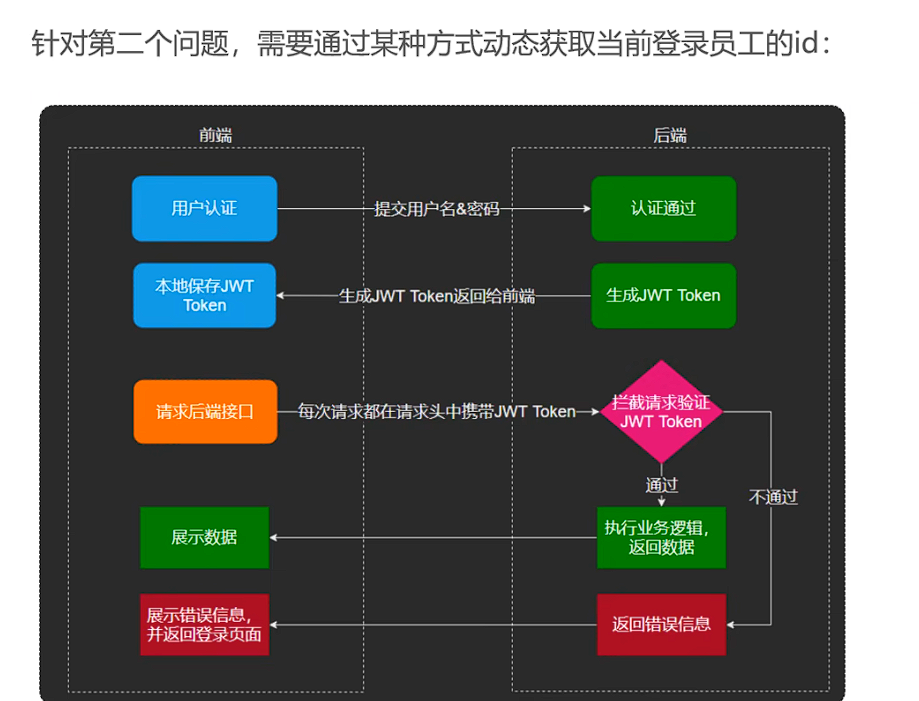
新增员工时,创建人id和修改人id设置了固定值
可以通过JWT令牌解析出当前用户的id,在interceptor解析的id传递到Service的save方法
使用ThreadLocal进行id值的传递
ThreadLocal并不是一个Thread,而是Thread的局部变量
ThreadLocal为每一个线程提供单独一份的存储空间,具有线程隔离的效果,只有在线程内才能获取到对应的值,线程外则不能访问
ThreadLocal常用的方法:
public void set(T value)
public T get()
public void remove()
1 2 3 4 5 6 7 8 9 10 11 12 13 14 15 16 17 18 19 20 21 22 23 24 25 26 27 28 29 30 31 32 33 34 35 36 37 38 39 40 41 42 43 44 45 package com.sky.context;public class BaseContext { public static ThreadLocal<Long> threadLocal = new ThreadLocal <>(); public static void setCurrentId (Long id) { threadLocal.set(id); } public static Long getCurrentId () { return threadLocal.get(); } public static void removeCurrentId () { threadLocal.remove(); } } String token = request.getHeader(jwtProperties.getAdminTokenName()); try { log.info("jwt校验:{}" , token); Claims claims = JwtUtil.parseJWT(jwtProperties.getAdminSecretKey(), token); Long empId = Long.valueOf(claims.get(JwtClaimsConstant.EMP_ID).toString()); log.info("当前员工id:" , empId); BaseContext.setCurrentId(empId); return true ; } catch (Exception ex) { response.setStatus(401 ); return false ; } employee.setCreateUser(BaseContext.getCurrentId()); employee.setUpdateUser(BaseContext.getCurrentId());
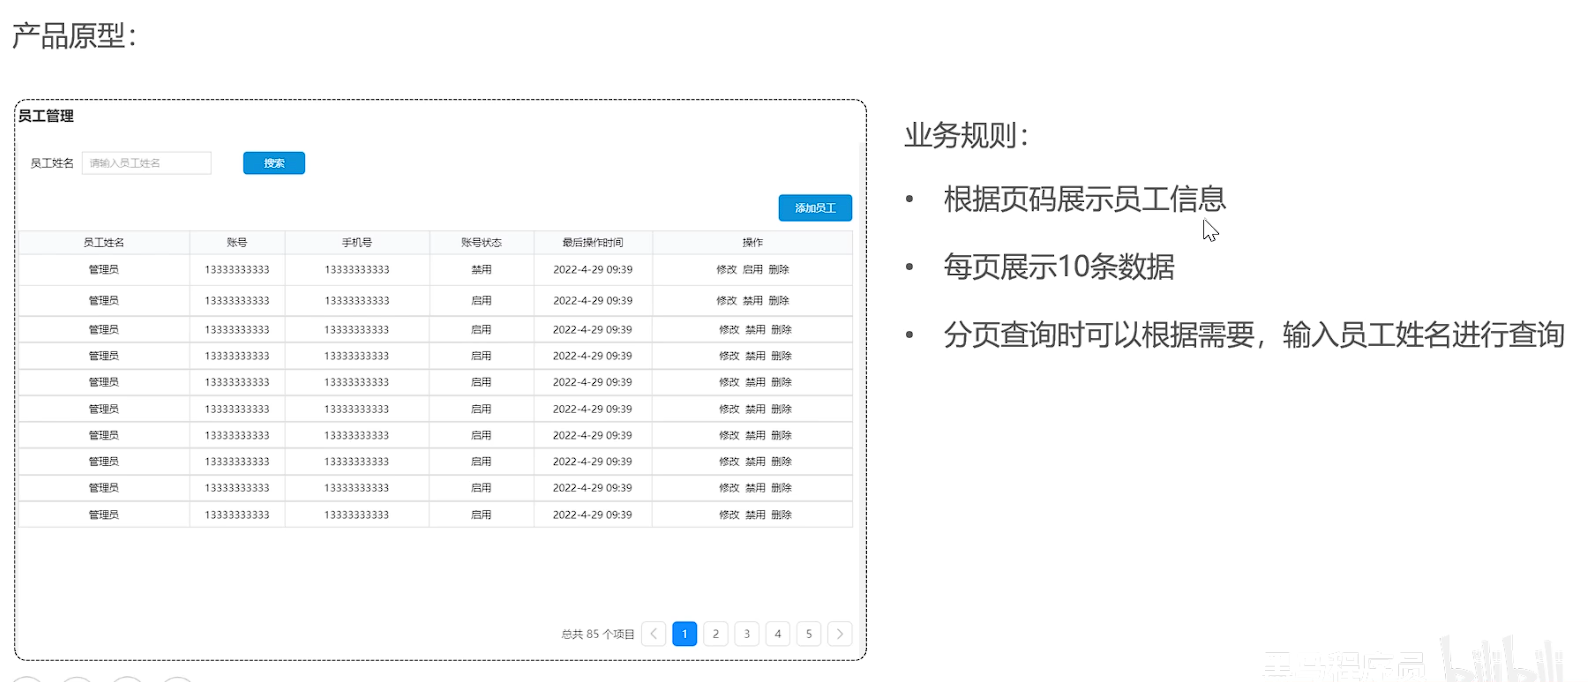
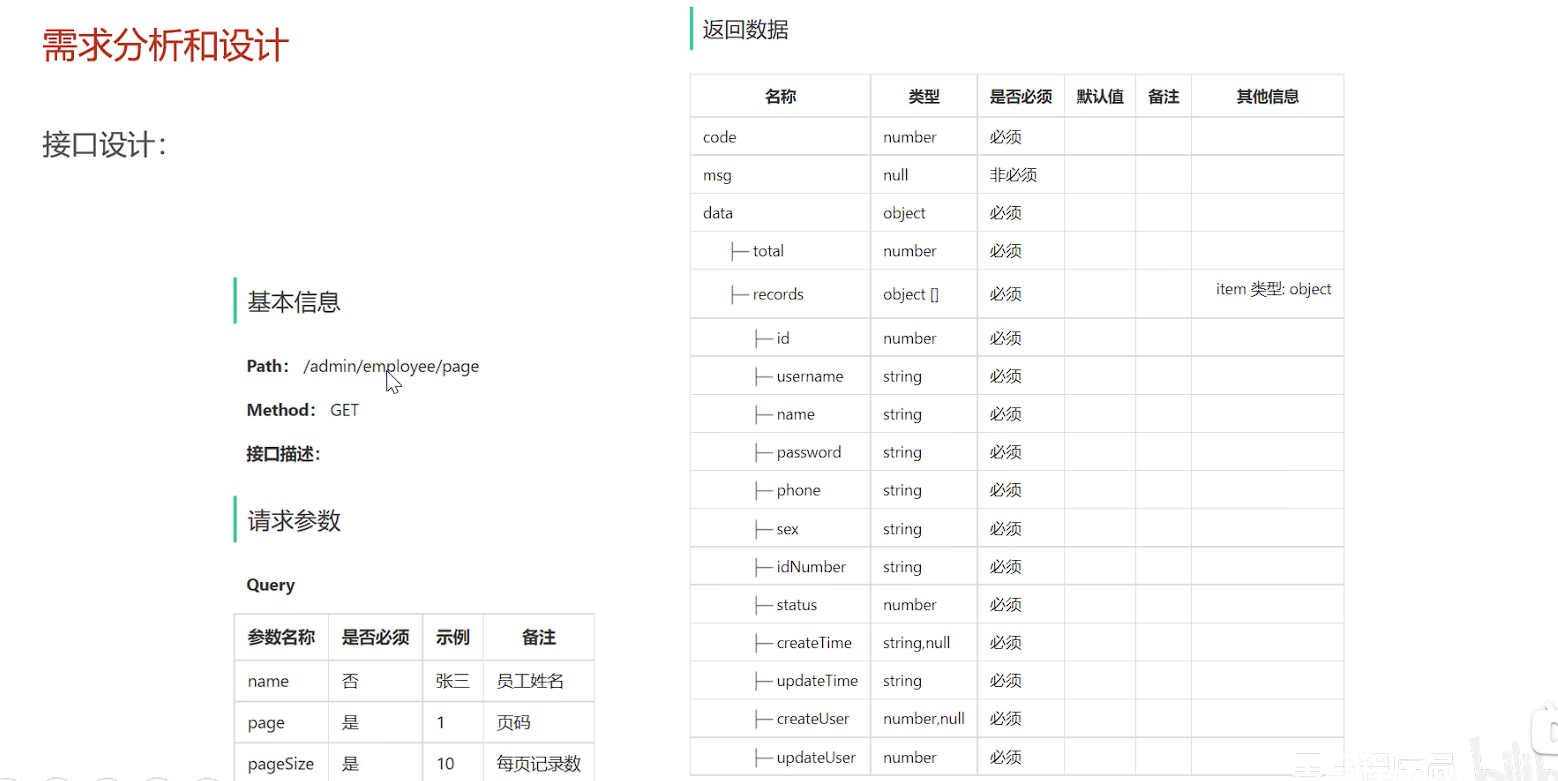
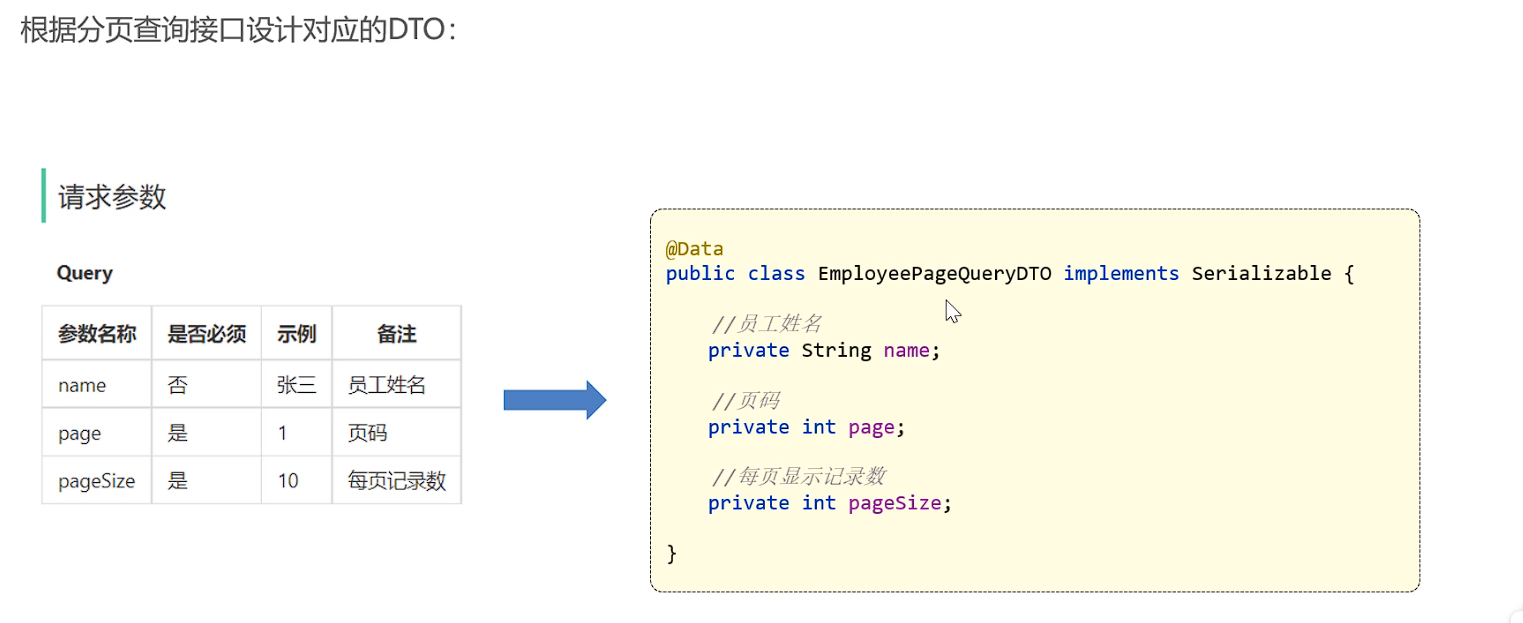
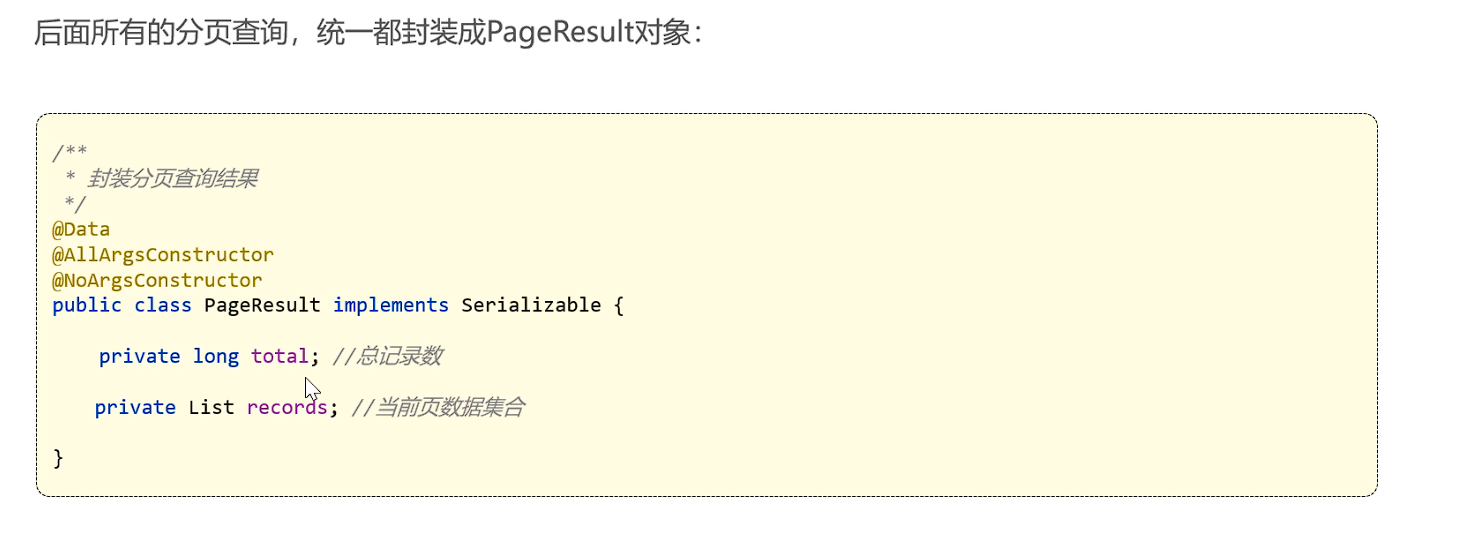
2.2 员工分页查询 2.2.1 需求分析和设计
2.2.2 代码开发
导入分页查询框架,方便使用
1 2 3 4 <dependency > <groupId > com.github.pagehelper</groupId > <artifactId > pagehelper-spring-boot-starter</artifactId > </dependency >
2.2.3 功能测试 查询
1
2
3
name = "" page = 1 # 从1开始 pageSize = 10
2.2.4 代码完善
1
2
3
4
5
6
7
8
9
10
11
12
13
14
15
16
17
18
19
20
21
22
23
24
25
26
27
28
29
30
31
32
33
34
35
36
37
38
39
40
41
42
43
44
45
46
47
48
49
50
51
52
53
54
55
56
57
58
59
60
61
62
63
64
65
{ "code" : 1 , "msg" : null , "data" : { "total" : 3 , "records" : [ { "id" : 1 , "username" : "admin" , "name" : "管理员" , "password" : "e10adc3949ba59abbe56e057f20f883e" , "phone" : "13812312312" , "sex" : "1" , "idNumber" : "110101199001010047" , "status" : 1 , "createTime" : [ 2022 , 2 , 15 , 15 , 51 , 20 ] , "updateTime" : [ 2022 , 2 , 17 , 9 , 16 , 20 ] , "createUser" : 10 , "updateUser" : 1 } , { "id" : 2 , "username" : "fff" , "name" : "FE" , "password" : "e10adc3949ba59abbe56e057f20f883e" , "phone" : "11122223333" , "sex" : "男" , "idNumber" : "232" , "status" : 1 , "createTime" : [ 2025 , 4 , 18 , 9 , 30 , 40 ] , "updateTime" : [ 2025 , 4 , 18 , 9 , 30 , 40 ] , "createUser" : 10 , "updateUser" : 10 } ] } }
问题:上述结果中的创建/更新日期格式不满足前端要求
方式一:在属性上加注解,对日期进行格式化
1
2
@JsonFormat(pattern = "yyyy-MM-dd hh:mm:ss") private LocalDataTime updateTime;
方式二:在WebMvcConfiguration中扩展Spring MVC的消息转换器,统一对日期类型进行格式化处理
1 2 3 4 5 6 7 8 9 10 11 12 13 14 15 protected void extendMessageConverters (List<HttpMessageConverter<?>> converters) { log.info("开始扩展消息转换器..." ); MappingJackson2HttpMessageConverter converter = new MappingJackson2HttpMessageConverter (); converter.setObjectMapper(new JacksonObjectMapper ()); converters.add(0 ,converter); }
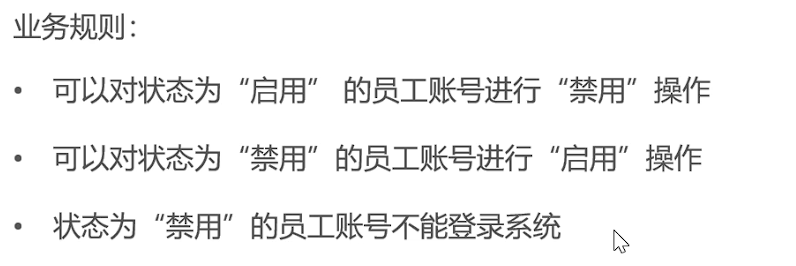
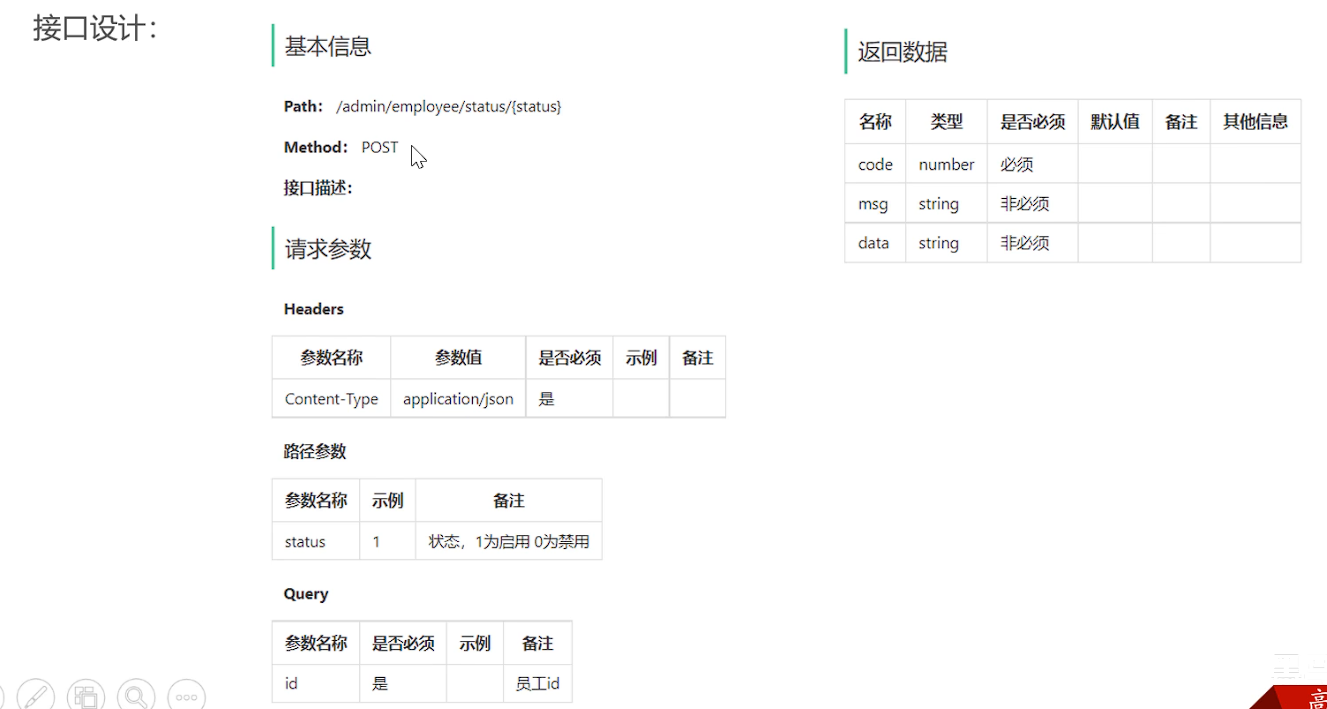
2.3 启用禁用员工账号 2.3.1 需求分析和设计
2.3.2 代码开发
1 2 3 4 5 6 7 8 9 @PostMapping("/status/{status}") @ApiOperation("员工状态禁用启用") public Result updateStatus (@PathVariable Integer status, Long id) { log.info("启用警用员工账号:{},{}" , status, id); employeeService.updateStatus(status,id); return Result.success(); }
1
2
3
4
5
6
7
8
9
10
11
12
13
14
15
@Override public void updateStatus (Integer status, Long id) { Employee employee = Employee .builder() .status(status) .id(id) .build(); employee.setUpdateTime(LocalDateTime.now()); employee.setUpdateUser(BaseContext.getCurrentId()); employeeMapper.update(employee); }
1 2 3 4 5 void update (Employee employee) ;
1 2 3 4 5 6 7 8 9 10 11 12 13 14 15 16 17 18 19 20 21 22 23 24 25 26 27 28 29 30 31 32 33 34 <update id ="update" parameterType ="Employee" > update employee <set > <if test ="name != null" > name = #{name}, </if > <if test ="username != null" > username = #{username}, </if > <if test ="password != null" > password = #{password}, </if > <if test ="phone != null" > phone = #{phone}, </if > <if test ="sex != null" > sex = #{sex}, </if > <if test ="idNumber != null" > id_number = #{idNumber}, </if > <if test ="status != null" > status = #{status}, </if > <if test ="updateUser != null" > update_user = #{updateUser}, </if > <if test ="updateTime != null" > update_time = #{updateTime} </if > </set > where id = #{id} </update >
xml中的parameterType没有使用全类名,是因为yaml配置文件中已经添加了mapper的类扫描路径(当然,如果使用全类名也可以让其生效)
1
2
3
mybatis: #mapper配置文件 mapper-locations: classpath:mapper/*.xml
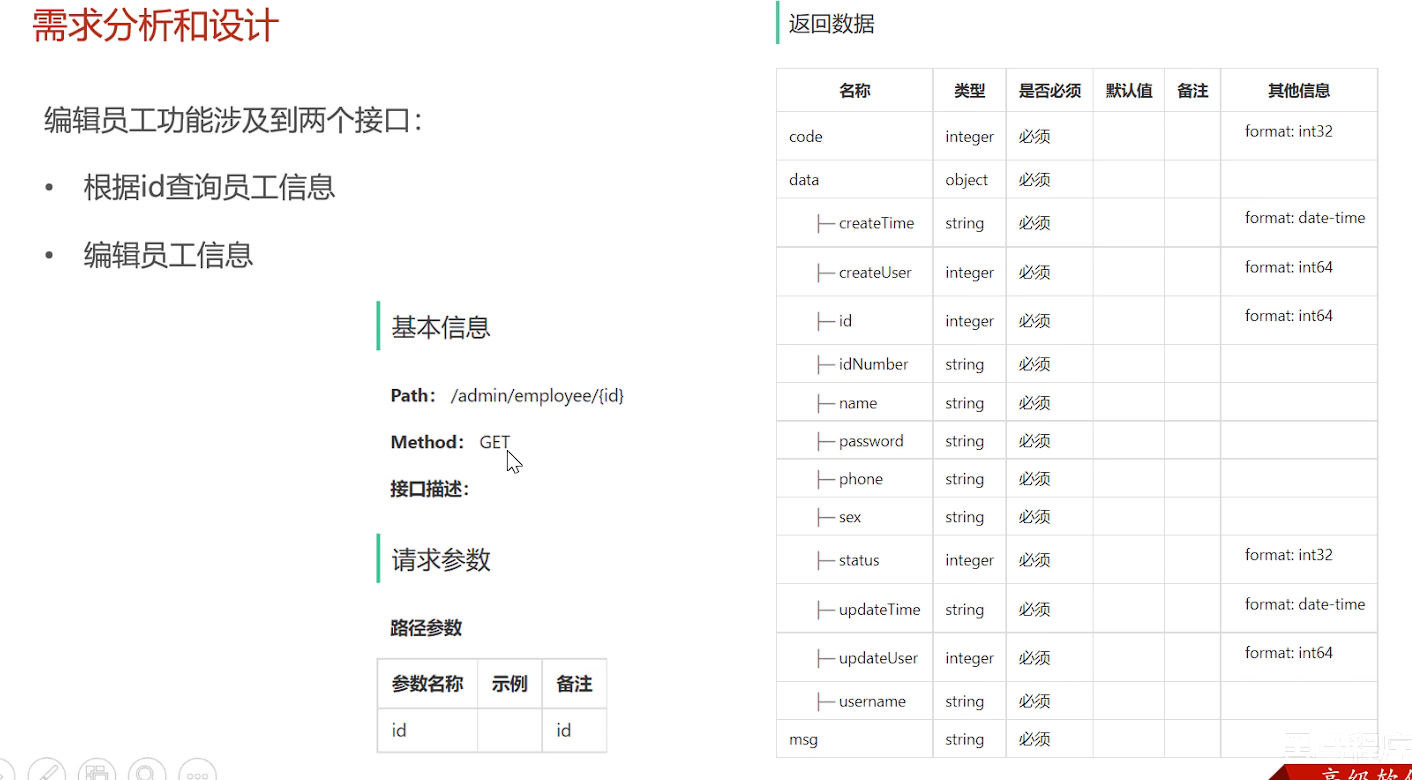
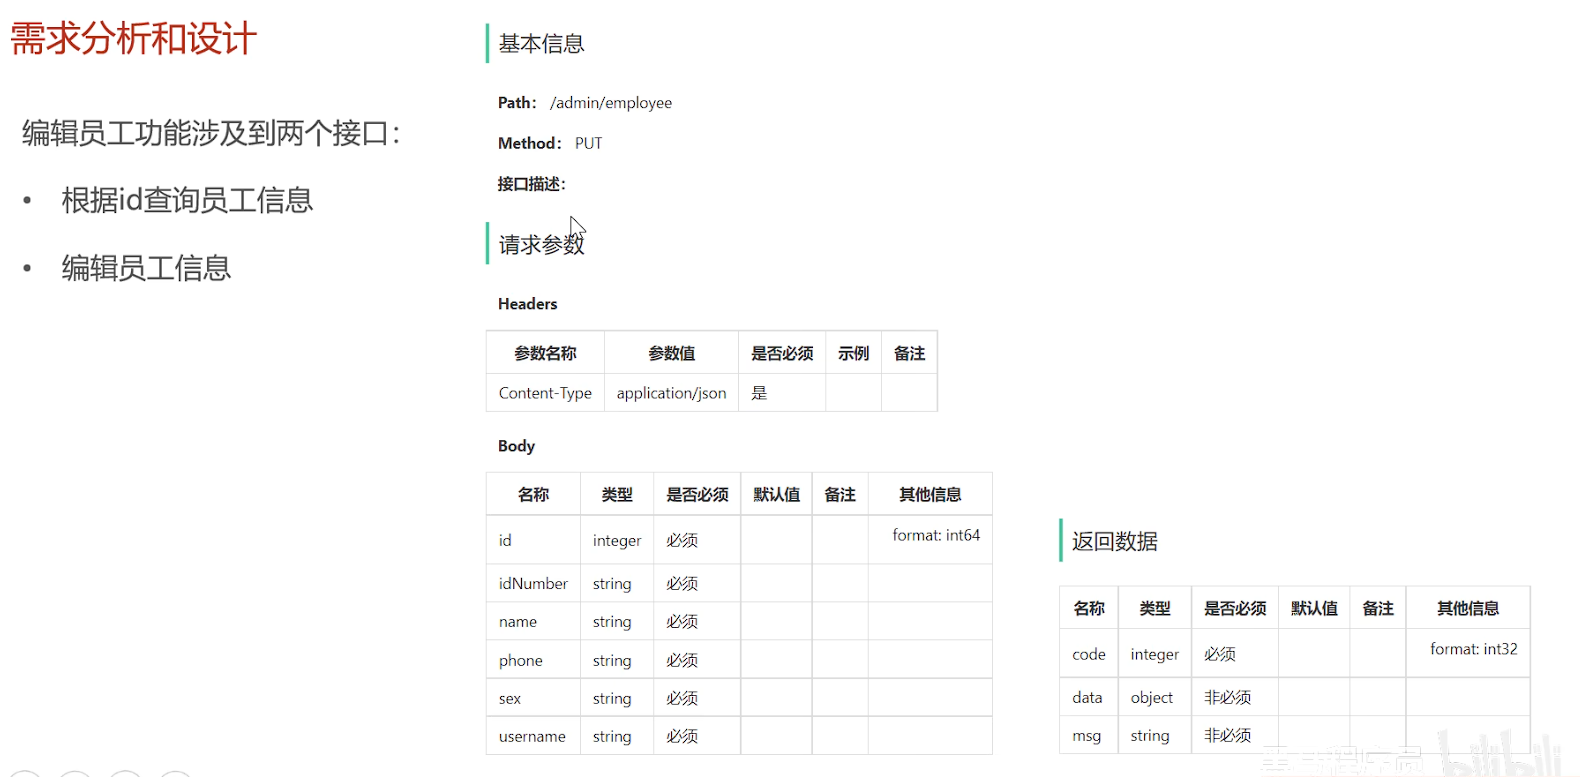
2.4 编辑员工 2.4.1 需求分析和设计
编辑员工功能涉及到两个接口:
2.4.2 代码开发
1
2
3
4
5
6
7
8
9
10
11
12
13
14
15
16
17
18
19
20
21
22
23
24
25
26
27
28
29
30
31
32
package com.sky.vo;import io.swagger.annotations.ApiModel;import lombok.AllArgsConstructor;import lombok.Builder;import lombok.Data;import lombok.NoArgsConstructor;import java.io.Serializable;import java.time.LocalDateTime;@Data @Builder @NoArgsConstructor @AllArgsConstructor @ApiModel(description = "员工回显数据格式") public class EmployeeVO implements Serializable { private Long id; private String username; private String name; private String phone; private String sex; private String idNumber; }
类型
目的
生命周期
是否含业务逻辑
典型应用层
Entity 持久化数据
整个业务处理过程
是
领域层
DTO 跨层/跨系统数据传输
单次请求过程
否
控制器↔服务层
VO 前端展示
单次响应过程
仅展示逻辑
控制器→前端
1
2
3
4
5
6
7
8
9
10
11
12
13
14
15
16
17
18
19
20
21
22
@GetMapping("/{id}") @ApiOperation("根据id查询员工信息") public Result<EmployeeVO> getById (@PathVariable Long id) { log.info("查询员工信息:{}" ,id); EmployeeVO employee = employeeService.getById(id); return Result.success(employee); } @PutMapping @ApiOperation("编辑员工信息") public Result updateUserInfo (@RequestBody EmployeeDTO employeeDTO) { log.info("编辑员工信息:{}" , employeeDTO); employeeService.updateUserInfo(employeeDTO); return Result.success(); }
1
2
3
4
5
6
7
8
9
10
11
12
13
14
15
16
17
18
19
20
@Override public EmployeeVO getById (Long id) { Employee employee = employeeMapper.getById(id); EmployeeVO employeeVO = new EmployeeVO (); BeanUtils.copyProperties(employee,employeeVO); return employeeVO; } @Override public void updateUserInfo (EmployeeDTO employeeDTO) { Employee employee = new Employee (); BeanUtils.copyProperties(employeeDTO,employee); employee.setUpdateTime(LocalDateTime.now()); employee.setUpdateUser(BaseContext.getCurrentId()); employee.setPassword(DigestUtils.md5DigestAsHex(PasswordConstant.DEFAULT_PASSWORD.getBytes())); employee.setStatus(StatusConstant.ENABLE); employeeMapper.update(employee); }
1 2 3 4 5 6 7 8 9 10 11 12 13 void update (Employee employee) ;@Select("select * from employee where id = #{id}") Employee getById (Long id) ;
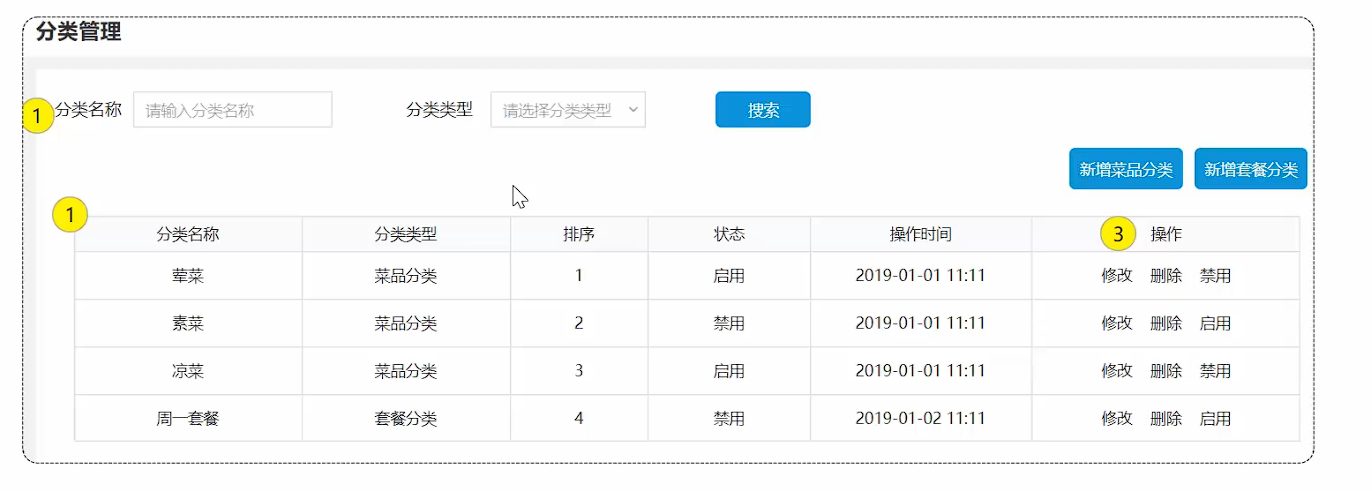
2.5 导入分类模块功能代码 2.5.1 需求分析和设计
业务规则
分类名称必须是唯一的
分类按照类型可以分为菜品分类和套餐分类
新添加的分类状态默认为“禁用”
接口设计
新增分类
分类分页查询
根据id删除分类
修改分类
启用禁用分类
根据类型查询分类
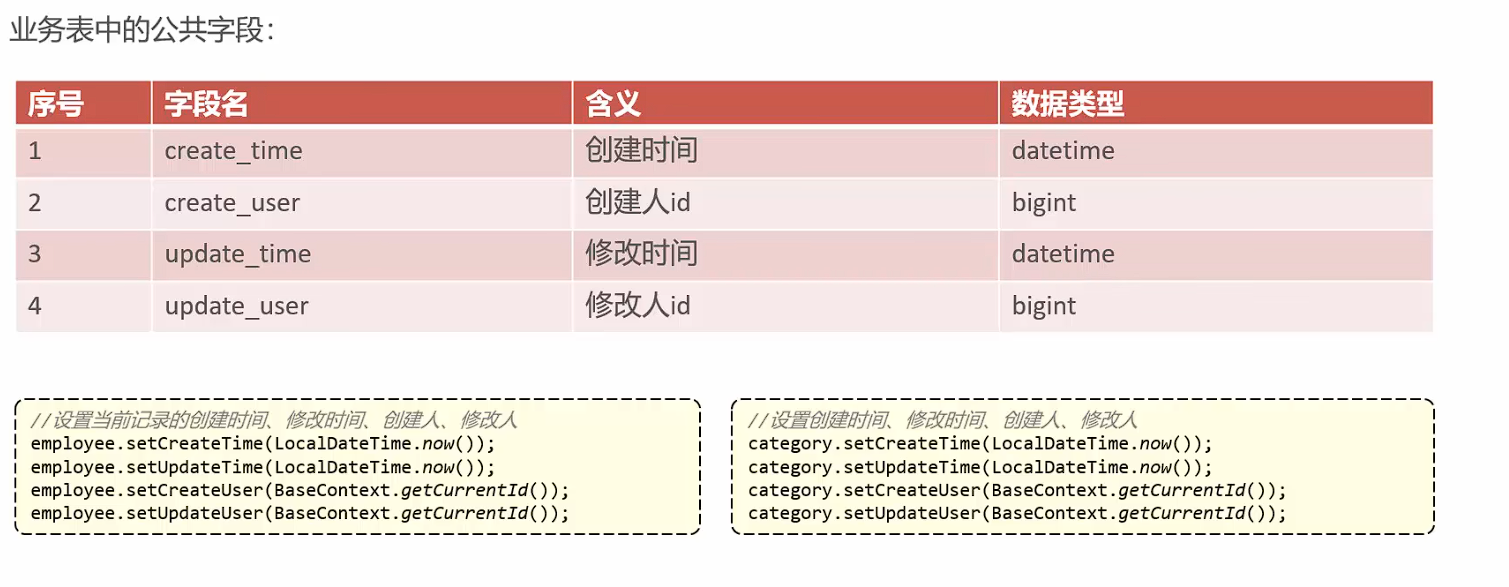
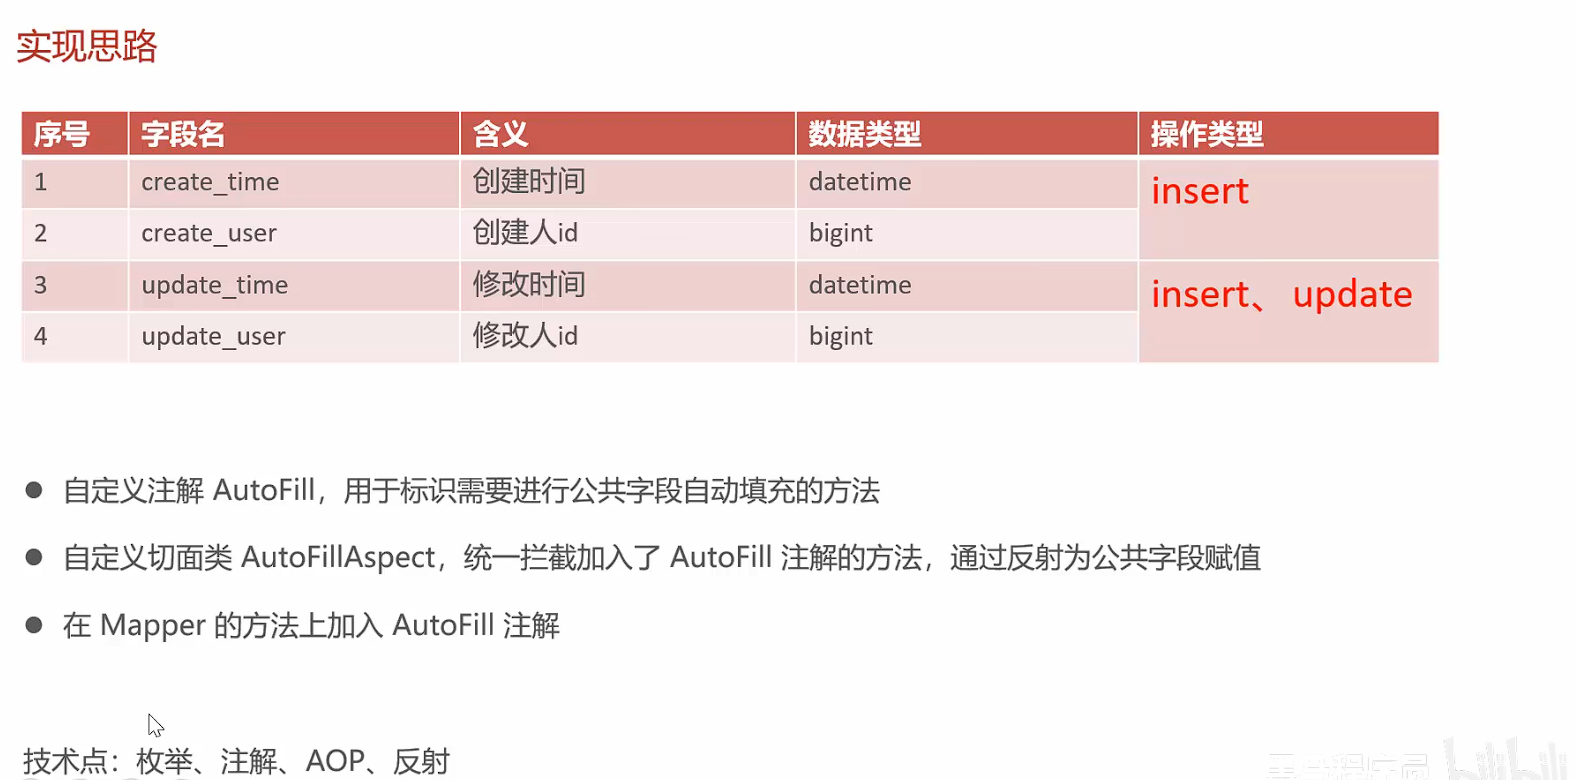
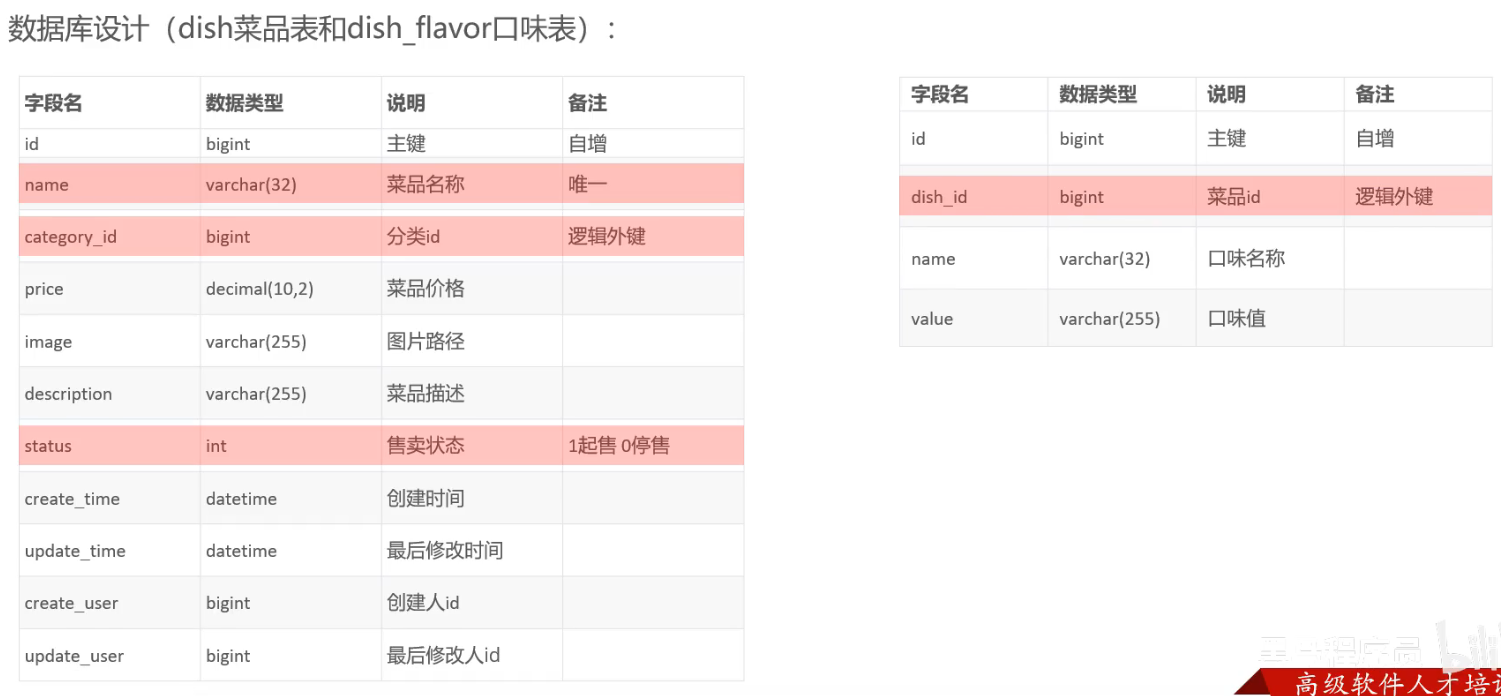
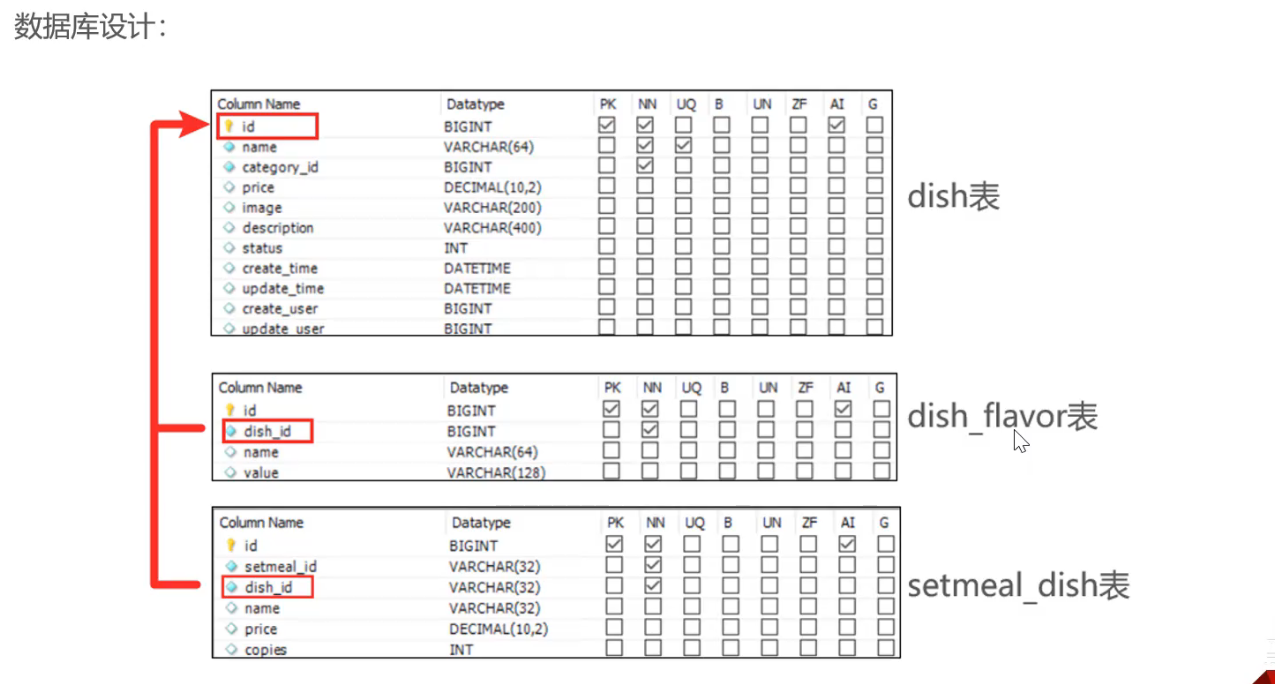
2.5.2 代码导入 3. 菜品管理 3.1 公共字段自动填充 3.1.1 问题分析 对于公共字段的赋值,存在许多冗余代码。后期对其修改维护,会有大量重复操作,不太方便。
3.1.2 实现思路
3.1.3 代码开发
自定义OperationType枚举类: 只有UPDATE和INSERT操作是因为对于公共字段而言,查询和删除操作基本不存在冗余。
1
2
3
4
5
6
7
8
9
10
11
12
13
14
15
16
17
18
19
package com.sky.enumeration;public enum OperationType { UPDATE, INSERT }
1
2
3
4
5
6
7
8
9
10
11
12
13
14
15
16
17
18
19
20
package com.sky.annotation;import com.sky.enumeration.OperationType;import java.lang.annotation.ElementType;import java.lang.annotation.Retention;import java.lang.annotation.RetentionPolicy;import java.lang.annotation.Target;@Target(ElementType.METHOD) @Retention(RetentionPolicy.RUNTIME) public @interface AutoFill { OperationType value () ; }
1
2
3
4
5
6
7
8
9
10
11
12
13
14
15
16
17
18
19
20
21
22
23
24
25
26
27
28
29
30
31
32
33
34
35
36
37
38
39
40
41
42
43
44
45
46
47
48
49
50
51
52
53
54
55
56
57
58
59
60
61
62
63
64
65
66
67
68
69
70
71
72
73
74
75
76
77
78
79
80
81
82
83
84
85
86
87
88
89
90
91
92
93
94
95
96
97
98
99
100
101
102
package com.sky.aspect;import com.sky.annotation.AutoFill;import com.sky.constant.AutoFillConstant;import com.sky.context.BaseContext;import com.sky.enumeration.OperationType;import lombok.extern.slf4j.Slf4j;import org.aspectj.lang.JoinPoint;import org.aspectj.lang.Signature;import org.aspectj.lang.annotation.Aspect;import org.aspectj.lang.annotation.Before;import org.aspectj.lang.annotation.Pointcut;import org.aspectj.lang.reflect.MemberSignature;import org.aspectj.lang.reflect.MethodSignature;import org.springframework.stereotype.Component;import java.lang.reflect.Method;import java.time.LocalDateTime;@Aspect @Component @Slf4j public class AutoFillAspect { @Pointcut("execution(* com.sky.mapper.*.*(..)) && @annotation(com.sky.annotation.AutoFill)") public void autoFillPointCut () { } @Before("autoFillPointCut()") public void autoFill (JoinPoint joinPoint) { log.info("开始进行公共字段的填充..." ); MethodSignature signature = (MethodSignature) joinPoint.getSignature(); AutoFill autoFill = signature.getMethod().getAnnotation(AutoFill.class); OperationType operationType = autoFill.value(); Object[] args = joinPoint.getArgs(); if (args == null || args.length == 0 ){ return ; } Object entity = args[0 ]; LocalDateTime now = LocalDateTime.now(); Long currentId = BaseContext.getCurrentId(); if ( operationType == OperationType.INSERT){ try { Method setCreateTime = entity.getClass().getDeclaredMethod(AutoFillConstant.SET_CREATE_TIME, LocalDateTime.class); Method setCreateUser = entity.getClass().getDeclaredMethod(AutoFillConstant.SET_CREATE_USER, Long.class); Method setUpdateTime = entity.getClass().getDeclaredMethod(AutoFillConstant.SET_UPDATE_TIME, LocalDateTime.class); Method setUpdateUser = entity.getClass().getDeclaredMethod(AutoFillConstant.SET_UPDATE_USER, Long.class); setCreateTime.invoke(entity,now); setUpdateTime.invoke(entity,now); setCreateUser.invoke(entity,currentId); setUpdateUser.invoke(entity,currentId); } catch (Exception e) { throw new RuntimeException (e); } }else if (operationType == OperationType.UPDATE){ try { Method setUpdateTime = entity.getClass().getDeclaredMethod(AutoFillConstant.SET_UPDATE_TIME, LocalDateTime.class); Method setUpdateUser = entity.getClass().getDeclaredMethod(AutoFillConstant.SET_UPDATE_USER, Long.class); setUpdateTime.invoke(entity,now); setUpdateUser.invoke(entity,currentId); } catch (Exception e) { throw new RuntimeException (e); } } } }
1 2 3 4 5 6 @AutoFill(OperationType.UPDATE) void update (Employee employee) ;
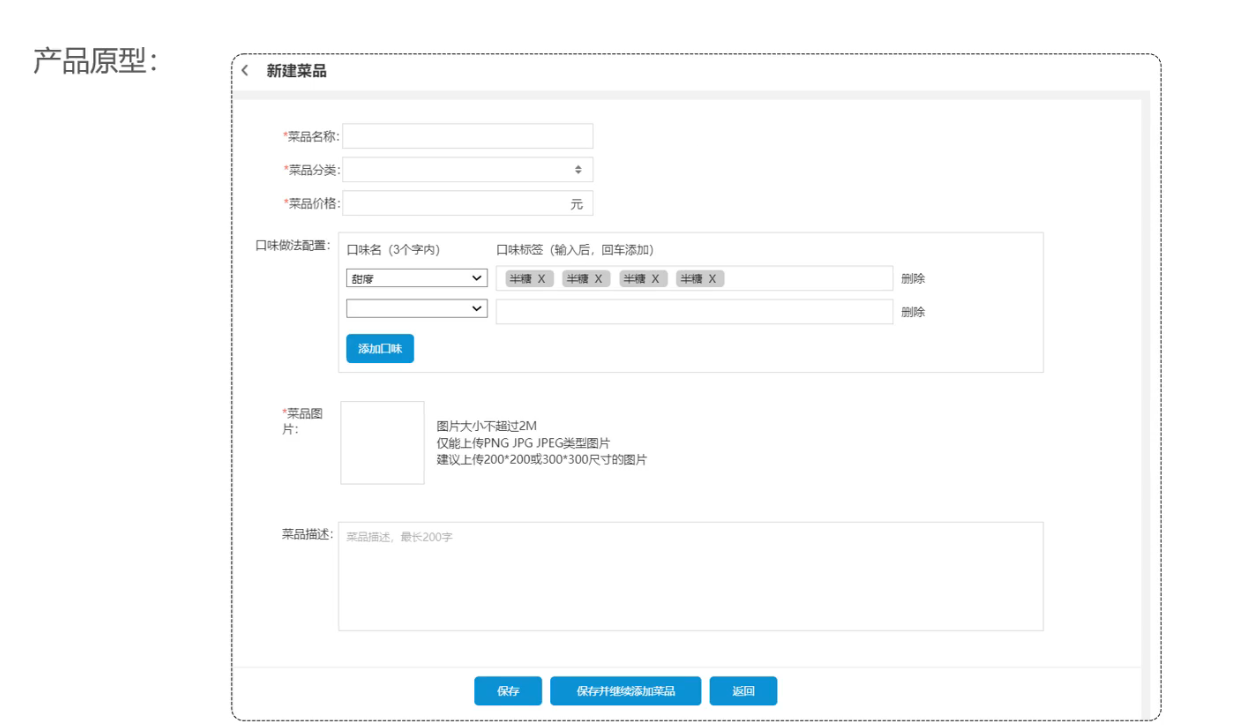
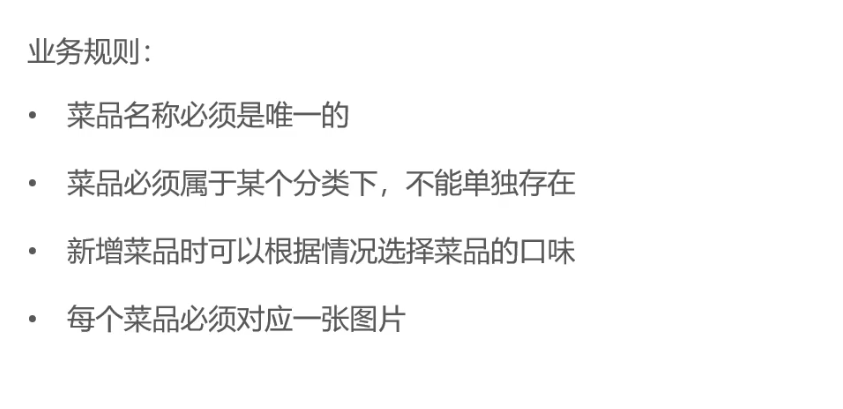
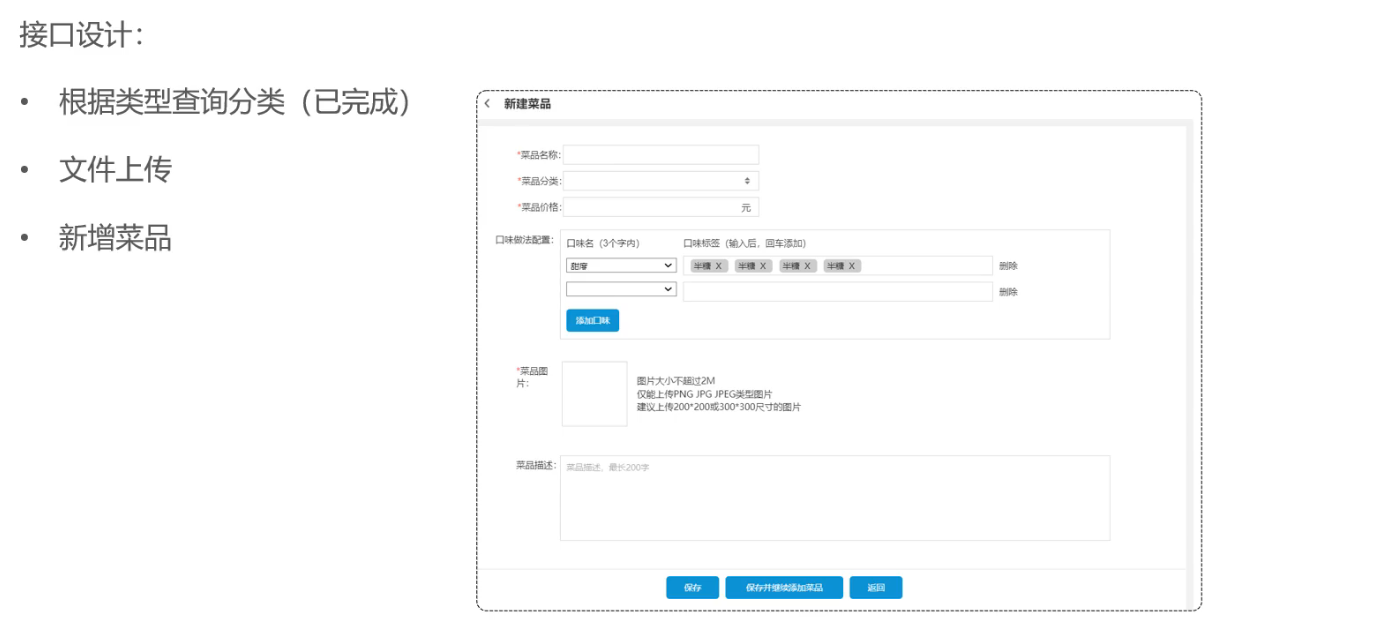
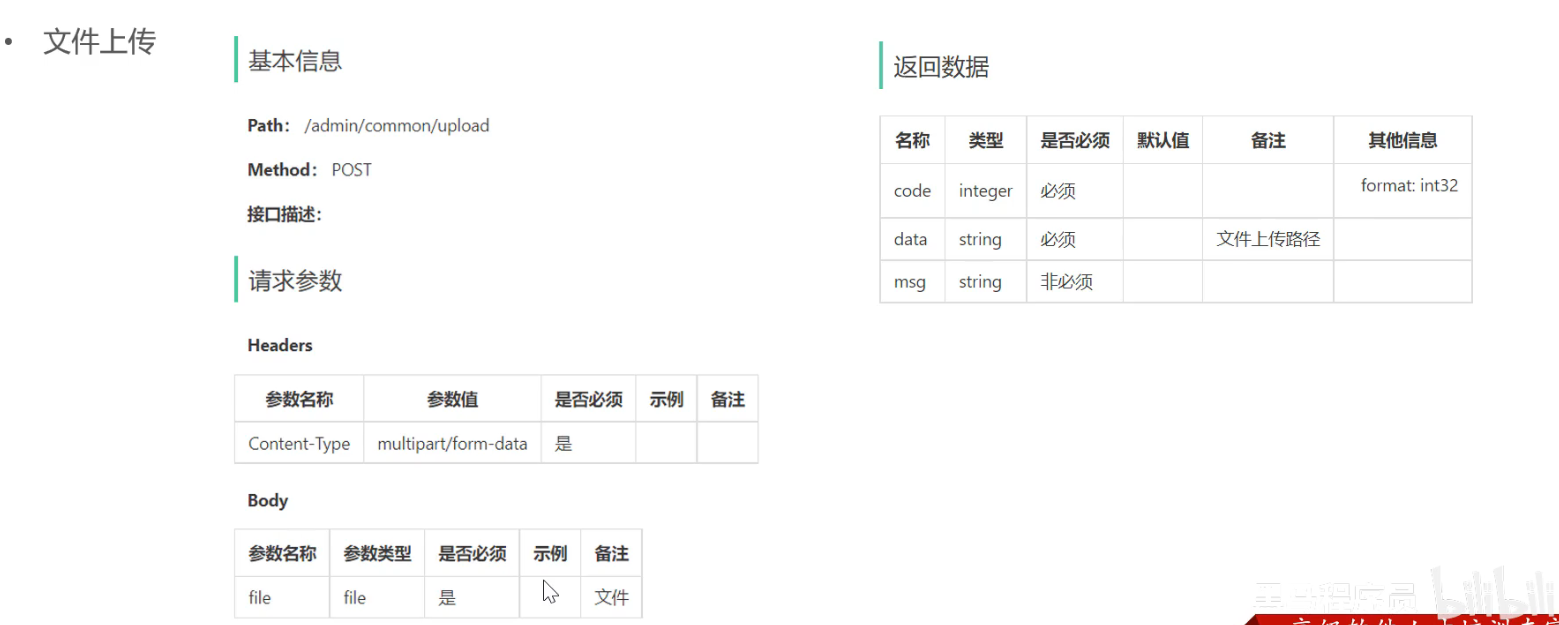
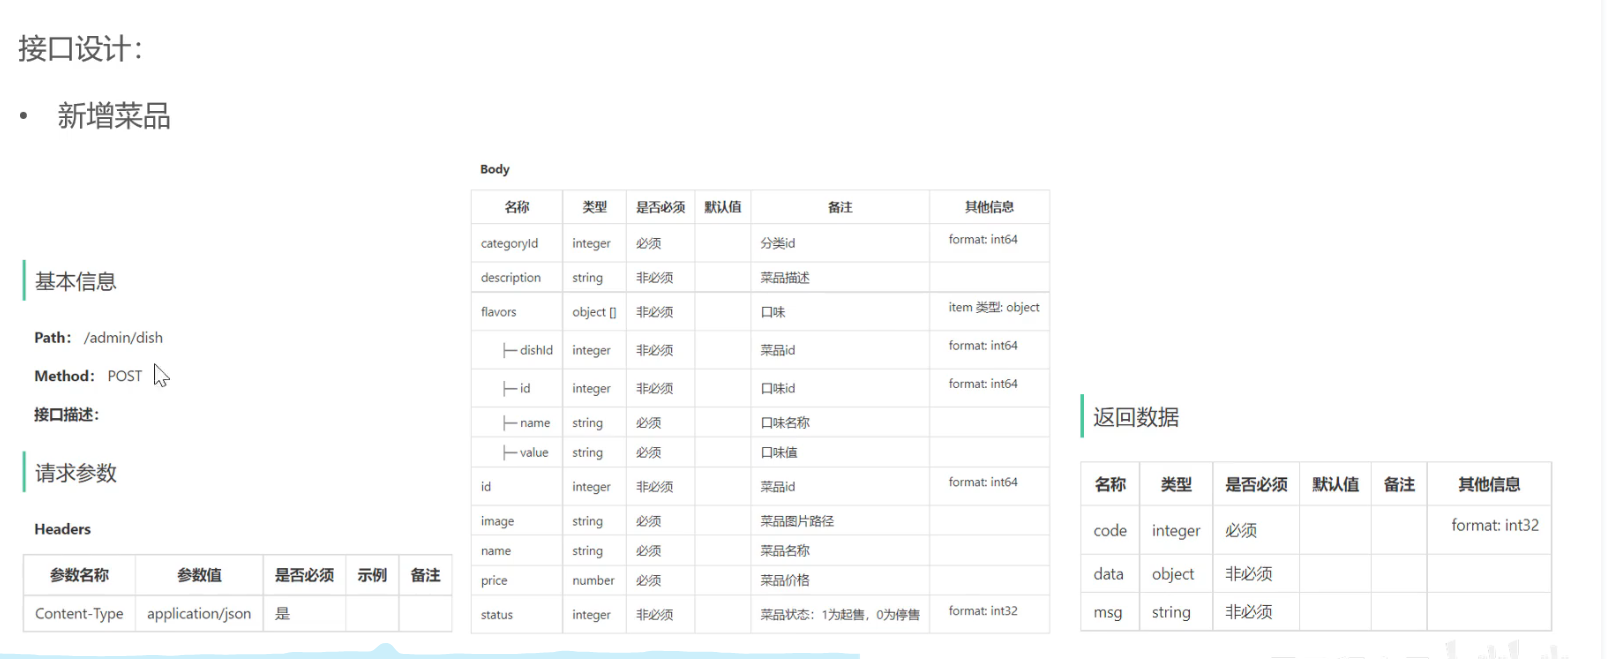
3.2 新增菜品 3.2.1 需求分析和设计
3.2.2 代码开发
图片 –> 浏览器 —> 后端服务 —> 对象存储服务器
1
2
3
4
5
6
7
8
9
10
11
12
13
14
15
16
17
18
19
20
21
22
23
24
25
26
27
28
29
30
31
32
33
34
35
36
37
38
39
40
41
42
43
44
45
46
47
48
49
50
51
52
package com.sky.controller.admin;import com.sky.constant.MessageConstant;import com.sky.result.Result;import com.sky.utils.AliOssUtil;import io.swagger.annotations.Api;import io.swagger.annotations.ApiOperation;import lombok.extern.slf4j.Slf4j;import org.springframework.beans.factory.annotation.Autowired;import org.springframework.web.bind.annotation.PostMapping;import org.springframework.web.bind.annotation.RequestMapping;import org.springframework.web.bind.annotation.RestController;import org.springframework.web.multipart.MultipartFile;import java.io.IOException;import java.util.UUID;@RestController @RequestMapping("/admin/common") @Slf4j @Api(tags = "通用接口") public class CommonController { @Autowired private AliOssUtil aliOssUtil; @ApiOperation("文件上传") @PostMapping("/upload") public Result<String> upload (MultipartFile file) { log.info("文件上传:{}" , file.getOriginalFilename()); try { String originalFilename = file.getOriginalFilename(); if (originalFilename == null || originalFilename.isEmpty() ){ return Result.error("文件名缺失" ); } String extension = originalFilename.substring(originalFilename.lastIndexOf("." ) ); String objectName = UUID.randomUUID().toString() + extension; String filePath = aliOssUtil.upload(file.getBytes(), objectName); return Result.success(filePath); } catch (IOException e) { log.error("文件上传失败:{}" , e.getMessage()) ; } return Result.error(MessageConstant.UPLOAD_FAILED); } }
1
2
3
4
5
6
7
8
9
10
11
12
13
14
15
16
17
18
19
20
21
22
23
24
25
26
27
28
29
30
31
32
33
34
35
36
37
38
39
40
41
42
43
44
45
46
47
package com.sky.controller.admin;import com.sky.dto.DishDTO;import com.sky.dto.DishPageQueryDTO;import com.sky.entity.Dish;import com.sky.result.PageResult;import com.sky.result.Result;import com.sky.service.DishService;import com.sky.vo.DishVO;import io.swagger.annotations.Api;import io.swagger.annotations.ApiOperation;import lombok.extern.slf4j.Slf4j;import org.springframework.beans.factory.annotation.Autowired;import org.springframework.stereotype.Controller;import org.springframework.web.bind.annotation.*;@RestController @RequestMapping("/admin/dish") @Api(tags = "菜品相关接口") @Slf4j public class DishController { @Autowired private DishService dishService; @PostMapping @ApiOperation("添加菜品") public Result addDish (@RequestBody DishDTO dishDTO) { dishService.addDish(dishDTO); return Result.success(); } @GetMapping("/page") @ApiOperation("菜品分页查询接口") public Result<PageResult> pageQuery (DishPageQueryDTO dishPageQueryDTO) { PageResult pageResult = dishService.pageQuery(dishPageQueryDTO); return Result.success(pageResult); } }
1
2
3
4
5
6
7
8
9
10
11
12
13
14
15
16
17
18
19
20
21
22
23
24
25
26
27
28
29
30
31
32
33
34
35
36
37
38
39
40
41
42
43
44
45
46
47
48
49
50
51
52
53
54
55
56
57
58
59
60
61
62
63
64
65
66
67
68
69
70
package com.sky.service.impl;import com.github.pagehelper.Page;import com.github.pagehelper.PageHelper;import com.sky.dto.DishDTO;import com.sky.dto.DishPageQueryDTO;import com.sky.entity.Dish;import com.sky.entity.DishFlavor;import com.sky.mapper.DishFlavorMapper;import com.sky.mapper.DishMapper;import com.sky.result.PageResult;import com.sky.service.DishService;import org.springframework.beans.BeanUtils;import org.springframework.beans.factory.annotation.Autowired;import org.springframework.stereotype.Service;import org.springframework.transaction.annotation.Transactional;import java.util.List;@Service public class DishServiceImpl implements DishService { @Autowired private DishMapper dishMapper; @Autowired private DishFlavorMapper dishFlavorMapper; @Transactional @Override public void addDish (DishDTO dishDTO) { Dish dish = new Dish (); BeanUtils.copyProperties(dishDTO, dish); dishMapper.insert(dish); List<DishFlavor> flavors = dishDTO.getFlavors(); if (flavors != null && !flavors.isEmpty()) { for (DishFlavor f : flavors) { f.setDishId(dish.getId()); } dishFlavorMapper.insertBatch(flavors); } } @Override public PageResult pageQuery (DishPageQueryDTO dishPageQueryDTO) { PageHelper.startPage(dishPageQueryDTO.getPage(),dishPageQueryDTO.getPageSize()); Page<Dish> page = dishMapper.pageQuery(dishPageQueryDTO); return new PageResult (page.getTotal(),page.getResult()); } }
1
2
3
4
5
6
7
8
9
10
11
12
13
14
15
16
17
18
19
20
21
22
23
24
25
26
27
28
29
package com.sky.mapper;import com.github.pagehelper.Page;import com.sky.annotation.AutoFill;import com.sky.dto.DishPageQueryDTO;import com.sky.entity.Dish;import com.sky.enumeration.OperationType;import org.apache.ibatis.annotations.Insert;import org.apache.ibatis.annotations.Mapper;import org.apache.ibatis.annotations.Select;@Mapper public interface DishMapper { @Select("select count(id) from dish where category_id = #{categoryId}") Integer countByCategoryId (Long categoryId) ; @AutoFill(OperationType.INSERT) void insert (Dish dish) ; Page<Dish> pageQuery (DishPageQueryDTO dishPageQueryDTO) ; }
1 2 3 4 5 <insert id ="insert" useGeneratedKeys ="true" keyProperty ="id" > /*userGenerateKeys: 使用本次插入数据后生成的主键, keyProperty: 将主键赋值给Mapper层参数里的属性id(如果是对象,则是对象中的属性)*/ insert into dish (name, category_id, price, image, description, status, create_time, update_time, create_user, update_user) VALUES (#{name},#{categoryId},#{price},#{image},#{description},#{status}, #{createTime}, #{updateTime}, #{createUser},#{updateUser}) </insert >
3.3 菜品分页查询 3.3.1 需求分析和设计
业务规则
根据页码显示菜品信息
每页展示10条数据
分页查询时,可以根据“菜品名称”,“菜品分类”,”售卖状态”进行查询
3.3.2 代码开发
controller、service、mapper同员工分页查询
xml
1
2
3
4
5
6
7
8
9
10
11
12
13
14
15
16
17
18
19
20
21
22
23
24
25
26
27
28
29
<?xml version="1.0" encoding="UTF-8" ?> <!DOCTYPE mapper PUBLIC "-//mybatis.org//DTD Mapper 3.0//EN" "http://mybatis.org/dtd/mybatis-3-mapper.dtd" > <mapper namespace ="com.sky.mapper.DishMapper" > <insert id ="insert" useGeneratedKeys ="true" keyProperty ="id" > /*userGenerateKeys: 使用本次插入数据后生成的主键, keyProperty: 将主键赋值给Mapper层参数里的属性id(如果是对象,则是对象中的属性)*/ insert into dish (name, category_id, price, image, description, status, create_time, update_time, create_user, update_user) VALUES (#{name},#{categoryId},#{price},#{image},#{description},#{status}, #{createTime}, #{updateTime}, #{createUser},#{updateUser}) </insert > <select id ="pageQuery" resultType ="com.sky.vo.DishVO" > select d.*, c.name as category_name from dish d left outer join category c on d.category_id = c.id <where > <if test ="name != null and name != '' " > and d.name like concat("%",#{name},"%") </if > <if test ="categoryId != null" > and d.category_id = #{categoryId} </if > <if test ="status != null" > and d.status = #{status} </if > </where > order by d.create_time desc </select > </mapper >
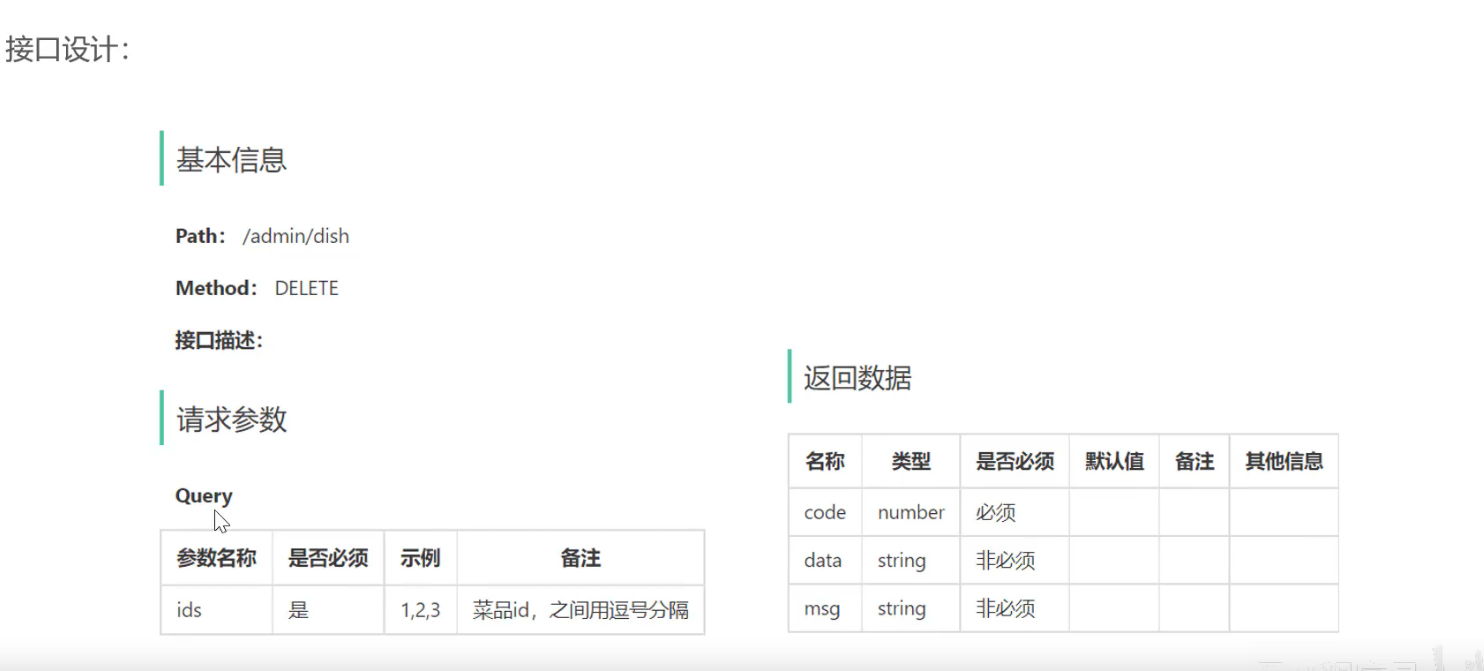
3.4 删除菜品 3.4.1 需求分析和设计
业务规则
可以一次删除一个菜品,也可以批量删除 (一个批量删除的接口即可)
启售中的菜品不能删除
被套餐关联的菜品不能删除
删除菜品后,关联的口味数据也需要删除掉
接口设计
3.4.2 代码开发
1 2 3 4 5 6 7 8 9 10 11 12 13 @DeleteMapping @ApiOperation("菜品批量删除") public Result deleteDish (@RequestParam List<Long> ids) { log.info("菜品批量删除:{}" , ids); dishService.deleteBatch(ids); return Result.success(); }
1
2
3
4
5
6
7
8
9
10
11
12
13
14
15
16
17
18
19
20
21
22
23
@Override @Transactional public void deleteBatch (List<Long> ids) { for (Long id : ids) { Dish dish = dishMapper.getById(id); if (dish.getStatus() == StatusConstant.ENABLE){ throw new DeletionNotAllowedException (MessageConstant.DISH_ON_SALE); } } List<Long> setMealIds = setmealDishMapper.getSetmealDishIdsBySetmealIds(ids); if (setMealIds != null && !setMealIds.isEmpty()) { throw new DeletionNotAllowedException (MessageConstant.DISH_BE_RELATED_BY_SETMEAL); } dishMapper.deleteByIds(ids); dishFlavorMapper.deleteByDishIds(ids); }
1 void deleteByIds (List<Long> ids) ;
1 2 3 4 5 6 7 8 9 <delete id ="deleteByIds" > delete from dish where id in /* open="(" close=")"*/ ( <foreach collection ="ids" item ="dishId" separator ="," > #{dishId} </foreach > ) </delete >
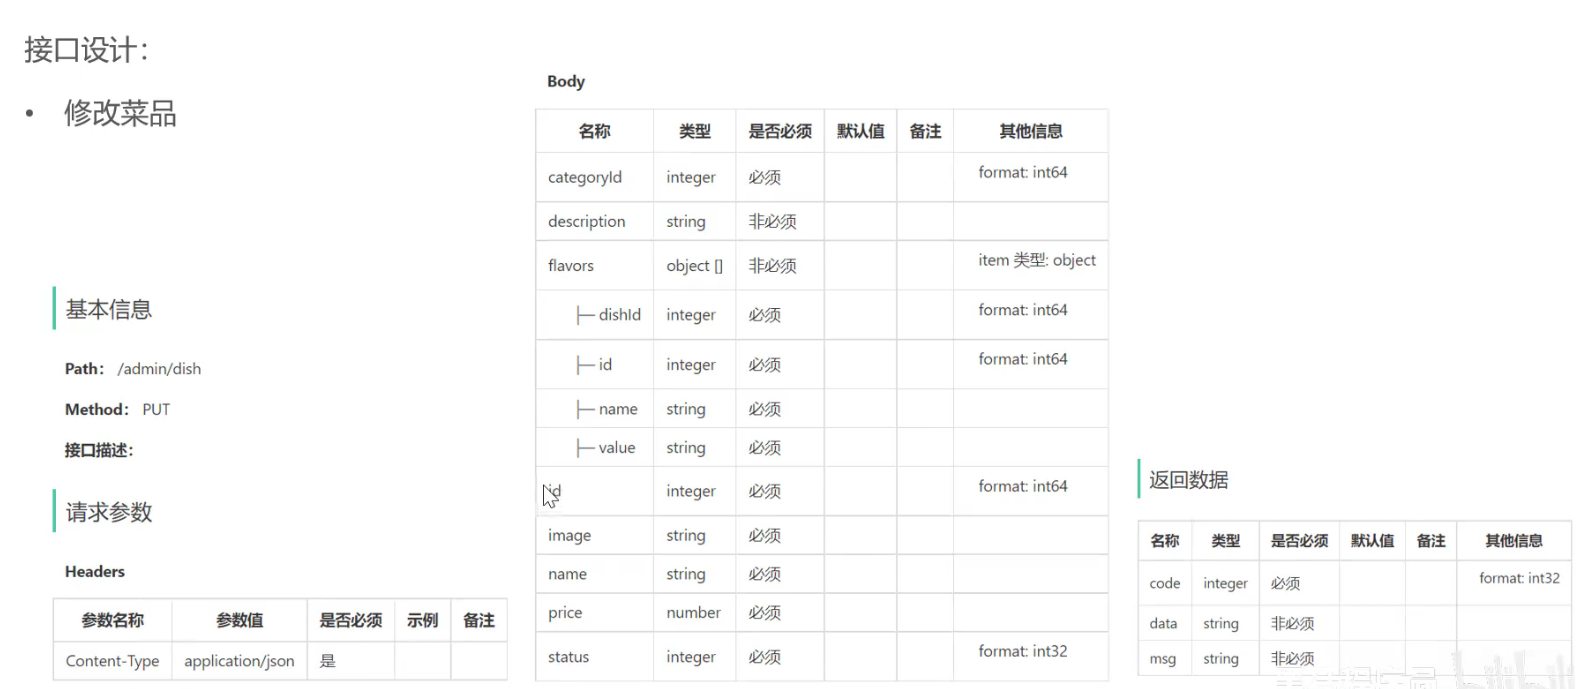
3.5 修改菜品
需求分析和设计
代码开发
controller
1
2
3
4
5
6
7
8
9
10
11
12
13
14
15
16
@PutMapping() @ApiOperation("更新菜品信息") public Result updateDish (@RequestBody DishDTO dishDTO) { log.info("更新菜品信息:{}" ,dishDTO); dishService.updateDish(dishDTO); return Result.success(); } @GetMapping("/{id}") @ApiOperation("根据菜品id查询菜品") public Result<DishVO> getDish (@PathVariable Long id) { log.info("当前菜品id:{}" ,id); DishVO dish = dishService.getDishById(id); return Result.success(dish); }
1
2
3
4
5
6
7
8
9
10
11
12
13
14
15
16
17
18
19
20
21
@Override @Transactional public void updateDish (DishDTO dishDTO) { Dish dish = new Dish (); BeanUtils.copyProperties(dishDTO, dish); dishMapper.update(dish); dishFlavorMapper.deleteByDishId(dish.getId()); if (dishDTO.getFlavors() != null && !dishDTO.getFlavors().isEmpty()){ dishFlavorMapper.insertBatch(dishDTO.getFlavors()); } } @Override public DishVO getDishById (Long id) { Dish byId = dishMapper.getById(id); DishVO dishVO = new DishVO (); BeanUtils.copyProperties(byId, dishVO); dishVO.setFlavors(dishFlavorMapper.getByDishId(id)); return dishVO; }
1
2
3
4
5
6
7
@Select("select * from dish where id = #{id}") Dish getById (Long id) ; void deleteByIds (List<Long> ids) ;@AutoFill(OperationType.UPDATE) void update (Dish dish) ;
1 2 3 4 5 6 @Delete("delete from dish_flavor where dish_id = #{dishId}") void deleteByDishId (Long dishId) ;@Select("select * from dish_flavor where dish_id = #{dishId}") List<DishFlavor> getByDishId (Long dishId) ;
1 2 3 4 5 6 7 8 9 10 11 12 13 14 15 16 17 18 19 20 21 22 23 24 25 26 27 28 29 30 31 <update id ="update" > update dish <set > <if test ="name != null and name != ''" > name = #{name}, </if > <if test ="categoryId != null" > category_id = #{categoryId}, </if > <if test ="price != null" > price = #{price}, </if > <if test ="image != null and image != ''" > image = #{image}, </if > <if test ="description != null and description !=''" > description = #{description}, </if > <if test ="status != null" > status = #{status}, </if > <if test ="updateUser != null" > update_user = #{updateUser}, </if > <if test ="updateTime != null" > update_time = #{updateTime} </if > </set > where id = #{id} </update >
1 2 3 4 5 6 7 8 9 10 11 12 13 14 <insert id ="insertBatch" > insert into dish_flavor (dish_id, name, value) VALUES <foreach collection ="flavors" item ="df" separator ="," > (#{df.dishId}, #{df.name},#{df.value}) </foreach > </insert > <delete id ="deleteByDishIds" > delete from dish_flavor where dish_id in <foreach collection ="dishIds" item ="dishId" separator ="," open ="(" close =")" > #{dishId} </foreach > </delete >
4. 店铺营业状态设置 4.1 Redis入门 4.1.1 Redis简介 Redis是一个基于内存 的key-value结构数据库
基于内存存储,读写性能高
适合存储热点数据(热点商品、咨询、新闻)
企业广泛应用
官网:https://redis.io
中文网:https://www.redis.net.cn
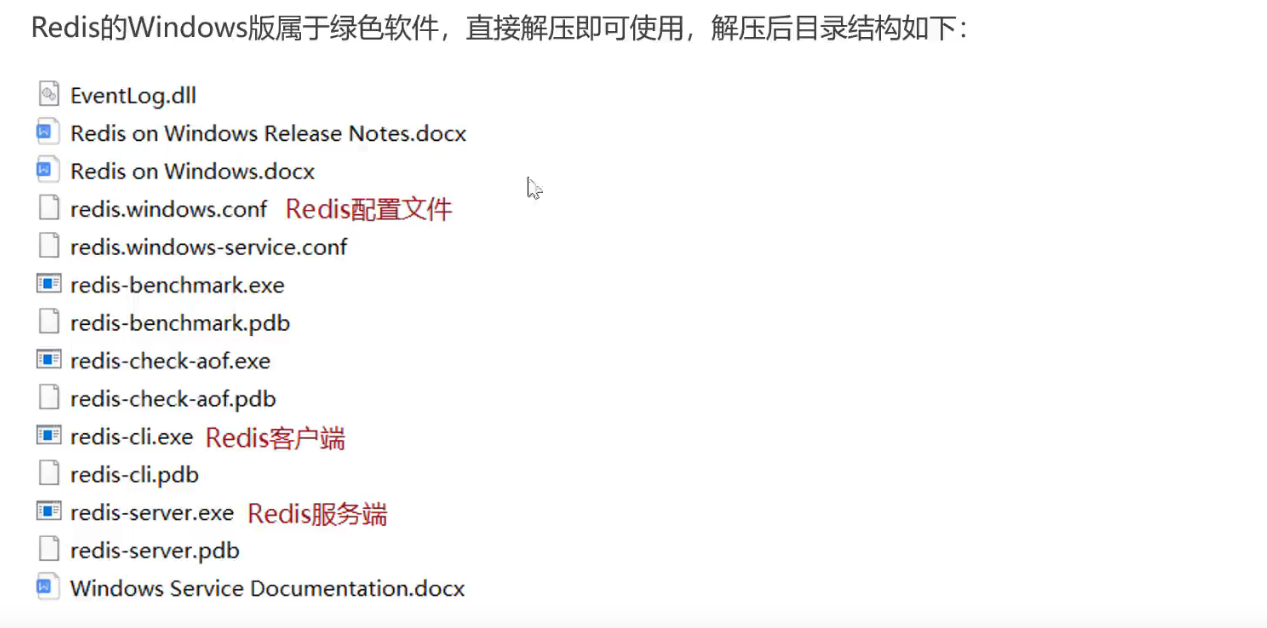
4.1.2 Redis下载与安装 Redis 安装包分为Windows版和Linux版
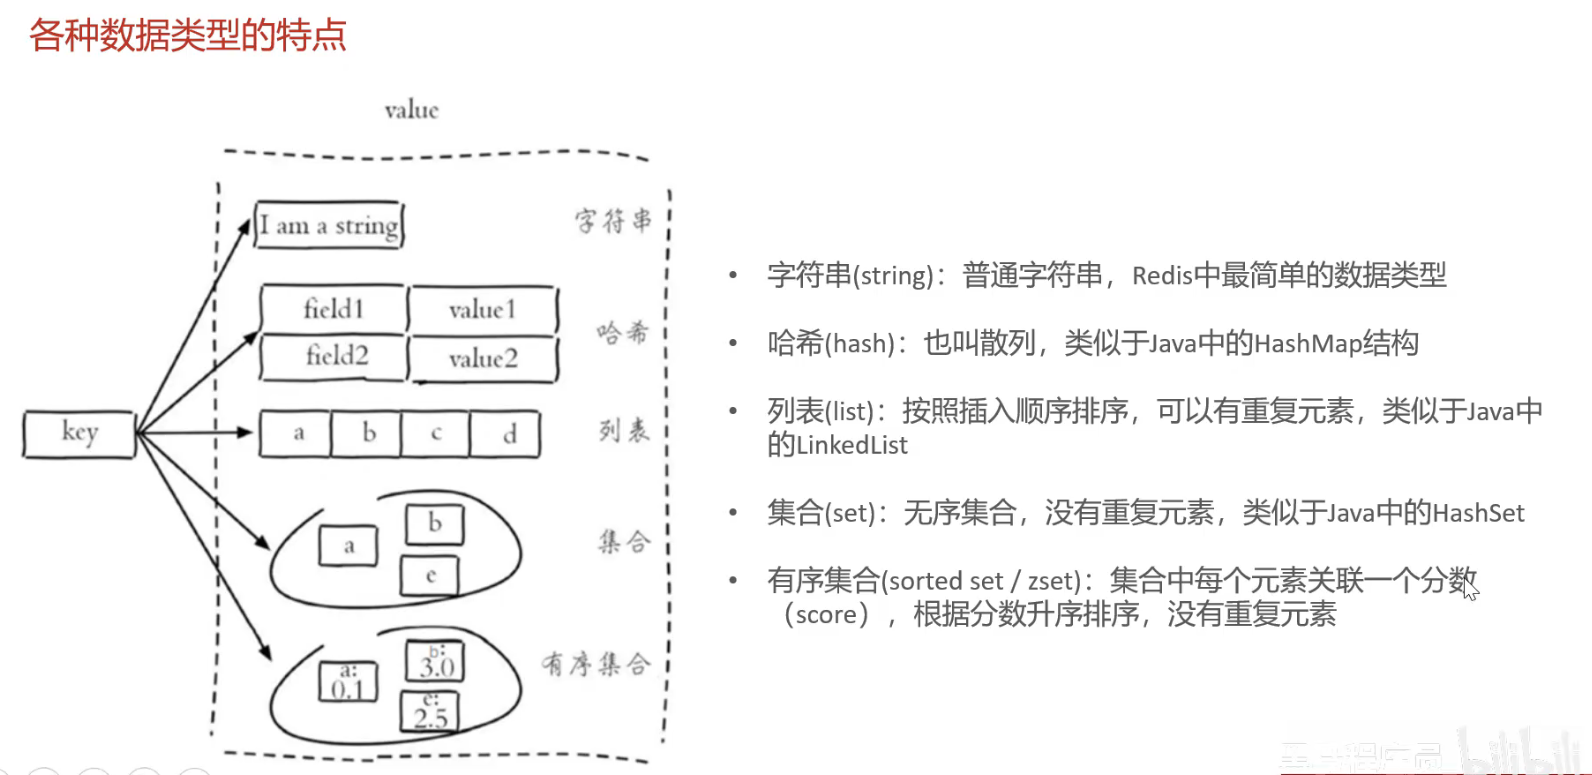
4.1.3 Redis服务启动与停止 4.2 Redis数据类型 Redis存储的是key-value结构的数据,其中key是字符串类型,value有5种常用的数据类型
字符串string
哈希hash
列表list
集合set
有序集合sorted set / zset
4.3 Redis常用命令
1
2
3
4
SET key value # 设置指定key的值GET key # 获取指定key的值SETEX key seconds value # 设置指定key的值,并把key的过期时间设置为seconds秒 SETNX key value # 只有在key不存在时设置key的值
Redis hash是一个string类型的field和value的映射表,hash特别适合用于存储对象
1
2
3
4
5
HSET key field value # 将哈希表key中的字段field的值设置为value HGET key field # 获取哈希表key中字段field的值 HDEL key field # 删除哈希表key中的field字段 HKEYS key # 获取哈希表key中的所有字段 HVALS key # 获取哈希表key中的所有字段的值
Redis列表是简单的字符串列表,安装插入顺序排序
1
2
3
4
LPUSH key value1 value2 value3 ... # 将一个或者多个值插入到列表头部 LRANGE key satrt stop # 获取列表指定范围内的元素 LRANGE key 0 -1 # get all RPOP key # 移除并获取列表最后一个元素 LLEN key # 获取列表长度
Redis set是string类型的无序集合。集合成员是唯一的,集合中不能出现重复的数据
1
2
3
4
5
6
SADD key member1 member2 ... # 向集合添加一个或多个成员 SMEMBERS key # 返回集合中的所有成员 SCARD key # 获取集合的成员数 SINTER key1 key2 ... # 返回给定集合的交集 SUNION key1 key2 ... # 返回给定集合的并集 SREM key member1 member2 # 删除集合中的一个或多个成员
Redis 有序集合是string类型元素的集合,且不允许有重复成员。每个元素都会关联一个double类型的分数
1
2
3
4
ZADD key score1 member1 score2 member2 ... # 向有序集合添加一个或多个成员 ZRANGE key start stop [WITHSCORES] # 通过索引区间返回有序集合中指定区间内的成员 ZINCRBT key increment member # 有序集合中对指定成员的分数加上增量increment ZREM key member [memeber...] # 移除有序集合中的一个或多个成员
1
2
3
4
KEYS pattern # 查找所有符合给定模式的key key * (查询所有) EXISTS key # 检查给定key是否存在TYPE key # 返回key所存储的值的类型 DEL key # 该命令用于在key存在时删除key
4.4 在Java中操作Redis 4.4.1 Redis的java客户端 Redis java客户端有很多,常用的有:
Jedis
Lettuce
Spring Data Redis
Spring Data Redis是Spring的一部分,对Redis底层开发包进行了高度封装
在Spring项目中,可以使用Spring Data Redis来简化操作
4.4.2 Spring Data Redis使用方式 操作步骤:
导入Spring Data Redis的maven坐标
配置Redis数据源
编写配置类,创建RedisTemplate对象
通过RedisTemplate对象操作Redis
导入Spring Data Redis的maven坐标
1 2 3 4 5 <dependency > <groupId > org.springframework.boot</groupId > <artifactId > spring-boot-starter-data-redis</artifactId > </dependency >
配置Redis数据源
1
2
3
4
5
6
7
8
sky: datasource: redis: host: localhost port: 6379 password: 123456 database: 0
1
2
3
4
5
6
7
8
9
10
11
12
13
14
对于 Spring Boot 2. x: spring.redis.database=0 spring.redis.host=localhost spring.redis.port=16379 spring.redis.password=mypass spring.redis.timeout=60000 对于 Spring Boot 3. x,我们需要设置以下属性: spring.data.redis.database=0 spring.data.redis.host=localhost spring.data.redis.port=16379 spring.data.redis.password=mypass spring.data.redis.timeout=60000
编写配置类,创建RedisTemplate对象
1 2 3 4 5 6 7 8 9 10 11 12 13 14 15 16 17 18 19 20 21 22 23 24 25 @Configuration @Slf4j public class RedisConfiguration { @Bean public RedisTemplate redisTemplate (RedisConnectionFactory redisConnectionFactory) { log.info("开始创建Redis Template 对象" ); RedisTemplate redisTemplate = new RedisTemplate (); redisTemplate.setConnectionFactory(redisConnectionFactory); redisTemplate.setKeySerializer(new StringRedisSerializer ()); return redisTemplate; } }
通过RedisTemplate对象操作Redis
1
2
3
4
5
6
7
8
9
10
11
@Test public void testRedisTemplate () { System.out.println(redisTemplate); ValueOperations valueOperations = redisTemplate.opsForValue(); valueOperations.set("spring" , "jjjaaavvvaaa" ); HashOperations hashOperations = redisTemplate.opsForHash(); ListOperations listOperations = redisTemplate.opsForList(); SetOperations setOperations = redisTemplate.opsForSet(); ZSetOperations zSetOperations = redisTemplate.opsForZSet(); }
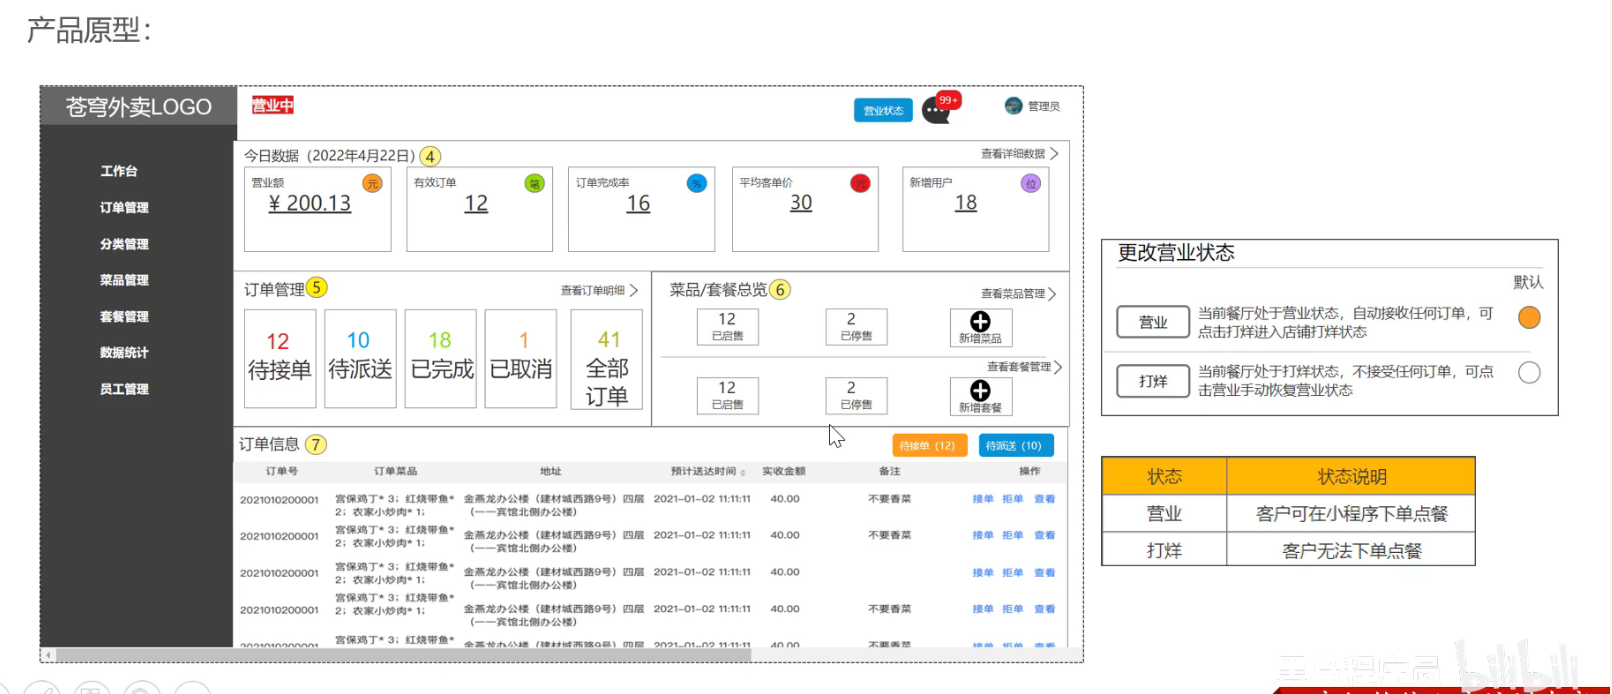
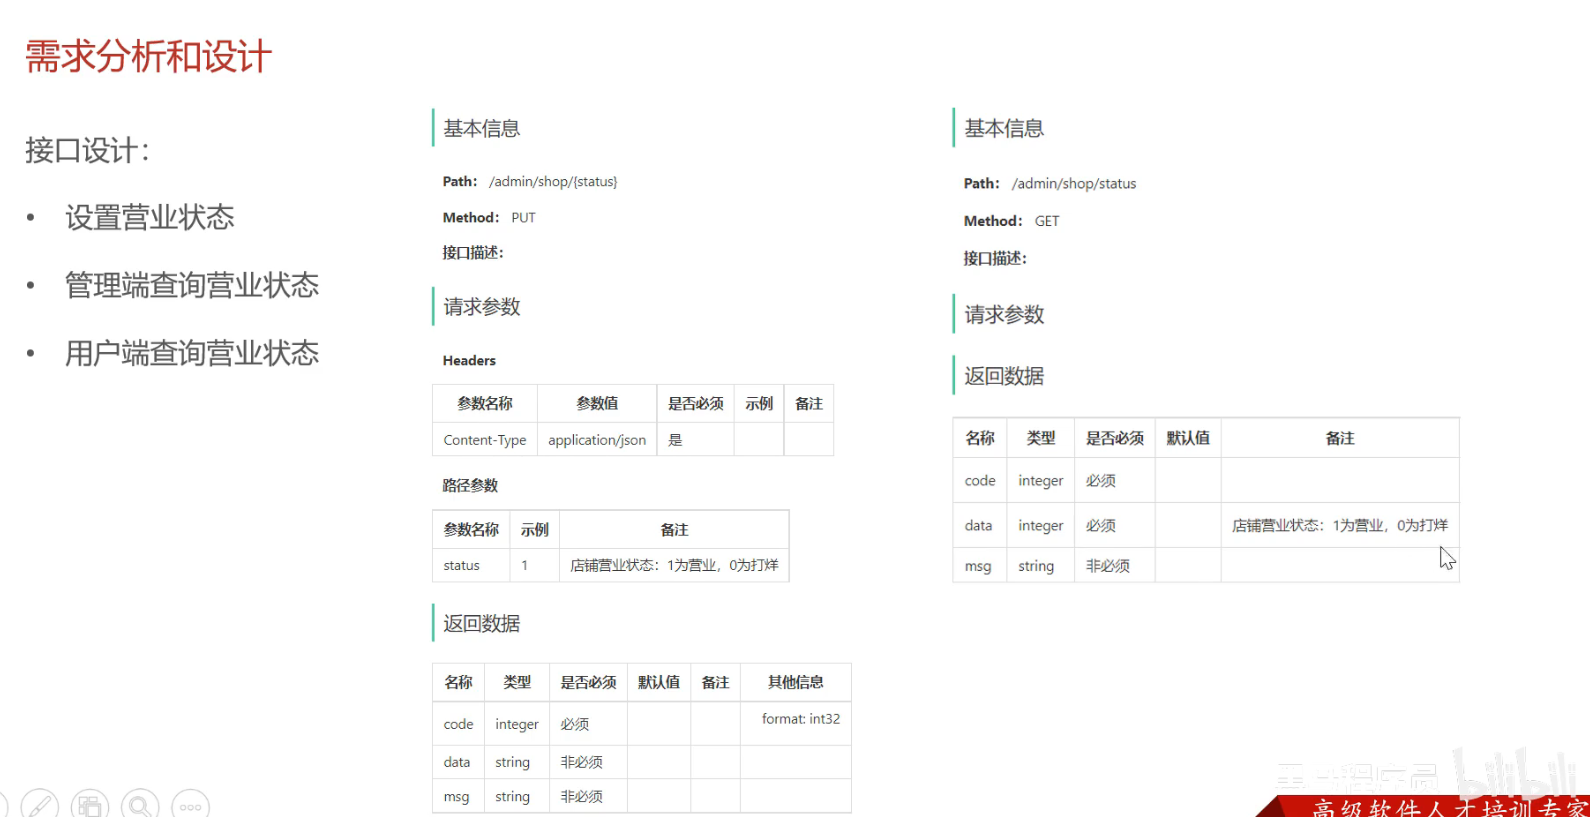
4.5 店铺营业状态设置 4.5.1 需求分析和设计
接口设计
设置营业状态
管理端查询营业状态 /admin
用户端查询营业状态 /user
营业状态数据的存储方式:基于Redis的字符串来进行存储
约定: 1表示营业,0表示打烊
4.5.2 代码开发
1
2
3
4
5
6
7
8
9
10
11
12
13
14
15
16
17
18
19
20
21
22
23
24
25
26
27
28
29
30
31
32
33
34
35
36
37
38
39
40
@Bean public Docket docketAdmin () { log.info("准备生成管理端接口文档..." ); ApiInfo apiInfo = new ApiInfoBuilder () .title("苍穹外卖项目管理端接口文档" ) .version("2.0" ) .description("这是苍穹外卖项目管理端接口文档" ) .build(); Docket docket = new Docket (DocumentationType.SWAGGER_2) .groupName("管理端接口" ) .apiInfo(apiInfo) .select() .apis(RequestHandlerSelectors.basePackage("com.sky.controller.admin" )) .paths(PathSelectors.any()) .build(); return docket; } @Bean public Docket docketUser () { log.info("准备生成接口文档..." ); ApiInfo apiInfo = new ApiInfoBuilder () .title("苍穹外卖项目用户端接口文档" ) .version("2.0" ) .description("这是苍穹外卖项目用户端接口文档" ) .build(); Docket docket = new Docket (DocumentationType.SWAGGER_2) .groupName("用户端接口" ) .apiInfo(apiInfo) .select() .apis(RequestHandlerSelectors.basePackage("com.sky.controller.user" )) .paths(PathSelectors.any()) .build(); return docket; }
1
2
3
4
5
6
7
8
9
10
11
12
13
14
15
16
17
18
19
20
21
22
23
24
25
26
27
28
29
30
31
32
33
34
35
36
37
38
39
package com.sky.controller.admin;import com.sky.constant.StatusConstant;import com.sky.result.Result;import io.swagger.annotations.Api;import io.swagger.annotations.ApiOperation;import lombok.extern.slf4j.Slf4j;import org.springframework.beans.factory.annotation.Autowired;import org.springframework.data.redis.core.RedisTemplate;import org.springframework.web.bind.annotation.*;@RestController("adminShopController") @RequestMapping("/admin/shop") @Slf4j @Api(tags = "店铺相关接口") public class ShopController { @Autowired private RedisTemplate redisTemplate; @PutMapping("/{status}") @ApiOperation("设置店铺营业状态") public Result setStatus (@PathVariable Integer status) { log.info("设置店铺营业状态:{}" ,status); redisTemplate.opsForValue().set(StatusConstant.SHOP_STATUS, status); return Result.success(); } @GetMapping("/status") @ApiOperation("管理端查询店铺营业状态") public Result<Integer> getStatus () { Integer status = (Integer) redisTemplate.opsForValue().get(StatusConstant.SHOP_STATUS); log.info("查询店铺营业状态:{}" ,StatusConstant.SHOP_STATUS); return Result.success(status); } }
5. 微信登陆、商品浏览 5.1 HttpClient 5.1.1 介绍 HttpClient是Apache Jakarta Common下的子项目,可以用来提供高效的、最新的、功能丰富的支持HTTP协议的客户端编程工具包,并且它支持HTTP协议最新的版本和建议。
1 2 3 4 5 <dependency > <groupId > org.apache.httpcomponents</groupId > <artifactId > httpclient</artifactId > <version > 4.5.13</version > </dependency >
核心API
HttpClient
HttpClients
CloseableHttpClient
HttpGet
HttpPost
发送请求步骤:
创建HttpClient对象
创建Http请求对象
调用HttpClient的excute方法发送请求
HttpClient作用: 可以在java程序中通过编码的方式发送Http请求
5.1.2 入门案例 由于阿里云oss的sdk已经引入httpclient的maven坐标,所以不必再引入
1
2
3
4
5
6
7
8
9
10
11
12
13
14
15
16
17
18
19
20
21
22
23
24
25
26
27
28
29
30
31
32
33
34
35
36
37
38
39
40
41
42
43
44
45
46
47
48
49
50
51
52
53
54
55
56
57
58
59
60
61
62
63
64
65
66
67
68
69
70
71
72
73
74
75
76
77
78
79
80
81
82
83
84
85
86
87
88
89
90
91
92
93
package com.sky.test.server.httpclient;import com.alibaba.fastjson.JSONObject;import org.apache.http.HttpEntity;import org.apache.http.client.methods.CloseableHttpResponse;import org.apache.http.client.methods.HttpGet;import org.apache.http.client.methods.HttpPost;import org.apache.http.entity.StringEntity;import org.apache.http.impl.client.CloseableHttpClient;import org.apache.http.impl.client.HttpClients;import org.apache.http.util.EntityUtils;import org.junit.jupiter.api.Test;import org.springframework.boot.test.context.SpringBootTest;import java.io.IOException;@SpringBootTest public class HttpClientTest { @Test public void testGET () throws IOException { CloseableHttpClient httpClient = HttpClients.createDefault(); HttpGet httpGet = new HttpGet ("http://localhost:8080/user/shop/status" ); CloseableHttpResponse response = httpClient.execute(httpGet); int statusCode = response.getStatusLine().getStatusCode(); System.out.println(statusCode); HttpEntity entity = response.getEntity(); System.out.println("返回数据:" + EntityUtils.toString(entity)); response.close(); httpClient.close(); } @Test public void testPost () throws IOException { CloseableHttpClient httpClient = HttpClients.createDefault(); HttpPost httpPost = new HttpPost ("http://localhost:8080/admin/employee/login" ); JSONObject jsonObject = new JSONObject (); jsonObject.put("username" , "admin" ); jsonObject.put("password" , "123456" ); StringEntity stringEntity = new StringEntity (jsonObject.toString()); stringEntity.setContentType("application/json" ); stringEntity.setContentEncoding("UTF-8" ); httpPost.setEntity(stringEntity); CloseableHttpResponse response = httpClient.execute(httpPost); int statusCode = response.getStatusLine().getStatusCode(); System.out.println(statusCode); HttpEntity entity = response.getEntity(); System.out.println("返回数据:" + EntityUtils.toString(entity)); response.close(); httpClient.close(); } }
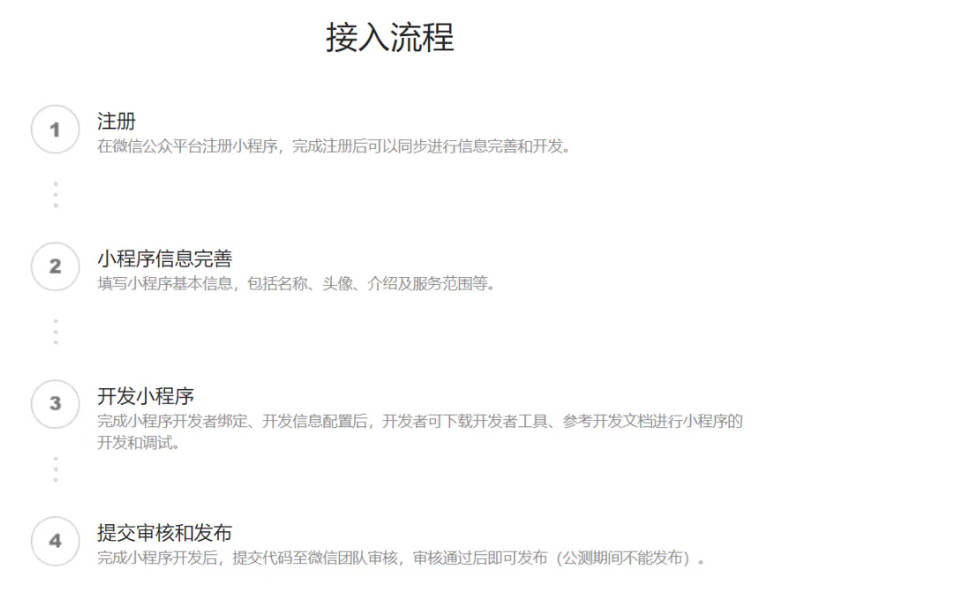
5.2 微信小程序开发
5.2.1 准备工作
5.2.2 入门案例
小程序包含一个描述整体程序的app和多个描述各自页面的page
一个小程序主题部分由三个文件组成,必须放到项目的根目录,如下
app.js: 小程序逻辑
app.json: 小程序公共配置
app.wxss: 小程序公共样式表
一个小程序由4个文件组成:
js:页面逻辑
wxml:页面结构
json:页面配置
wxss:页面样式表
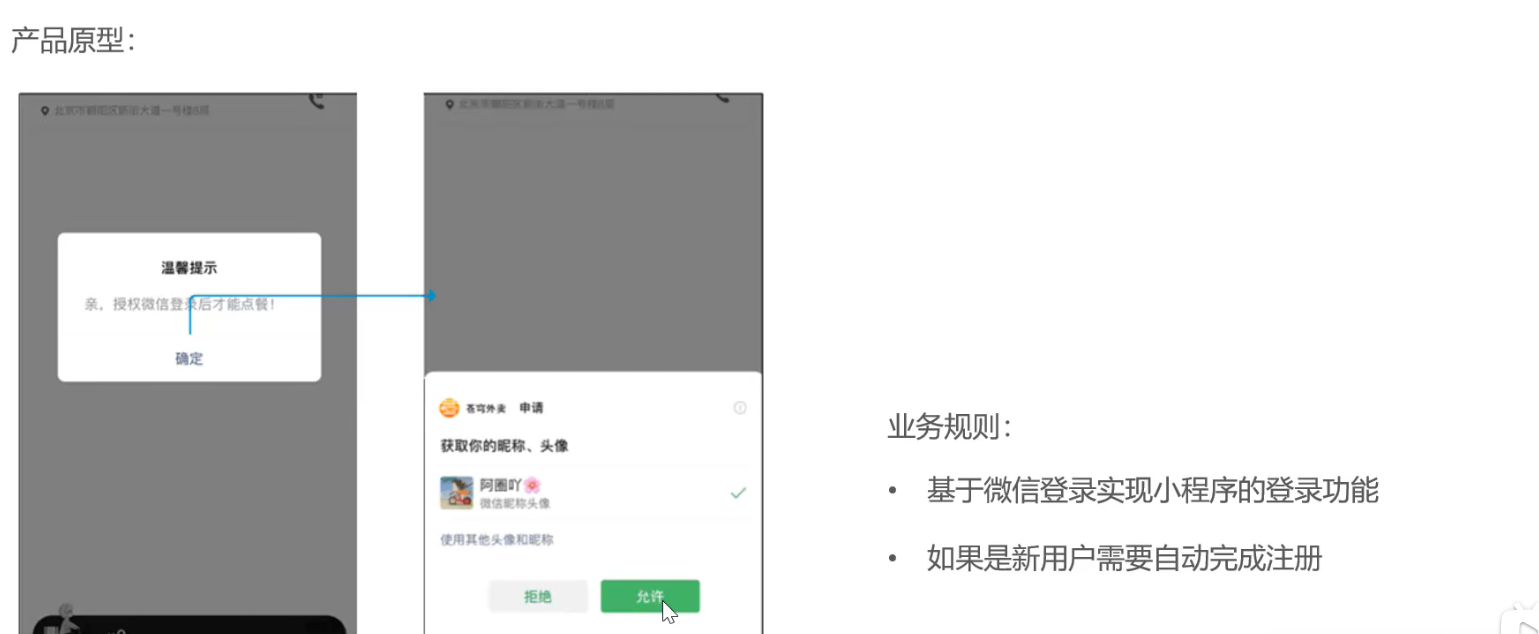
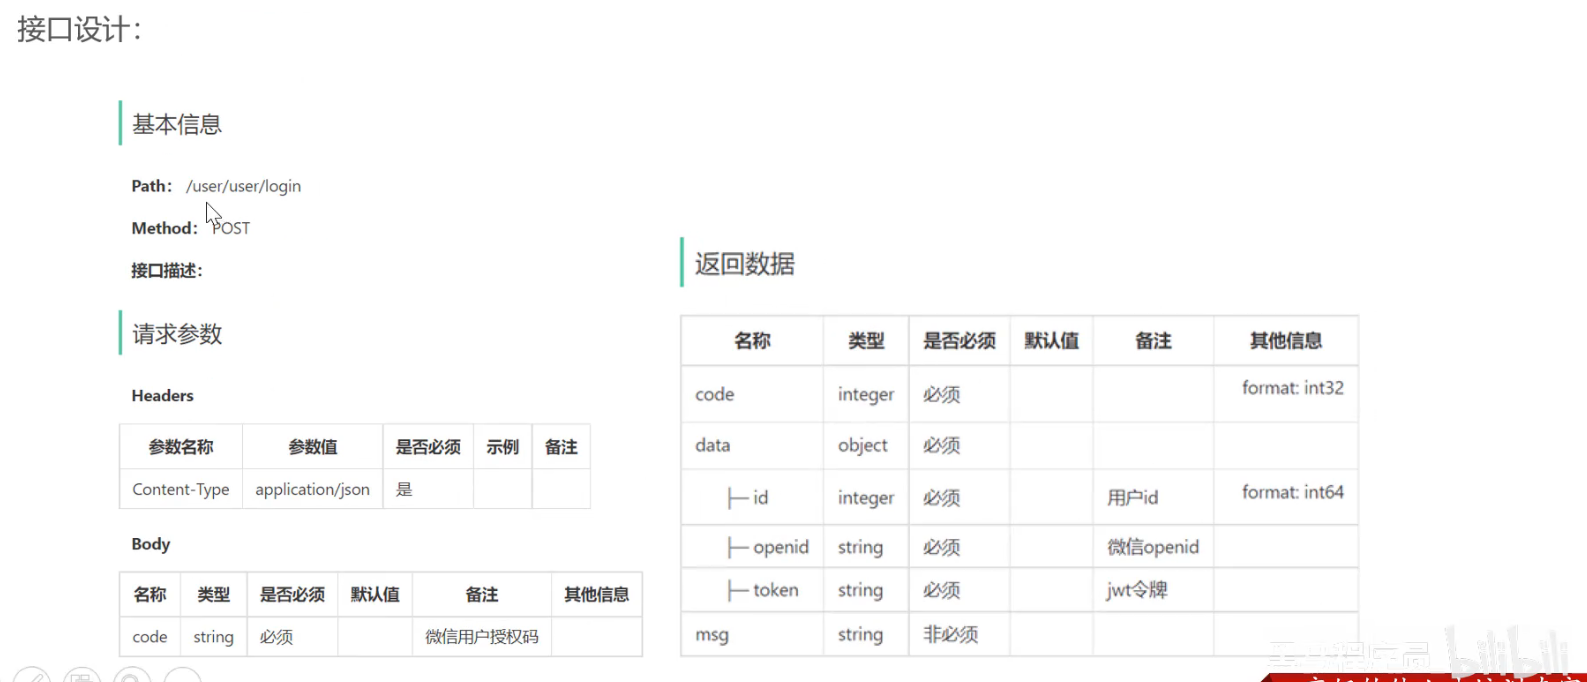
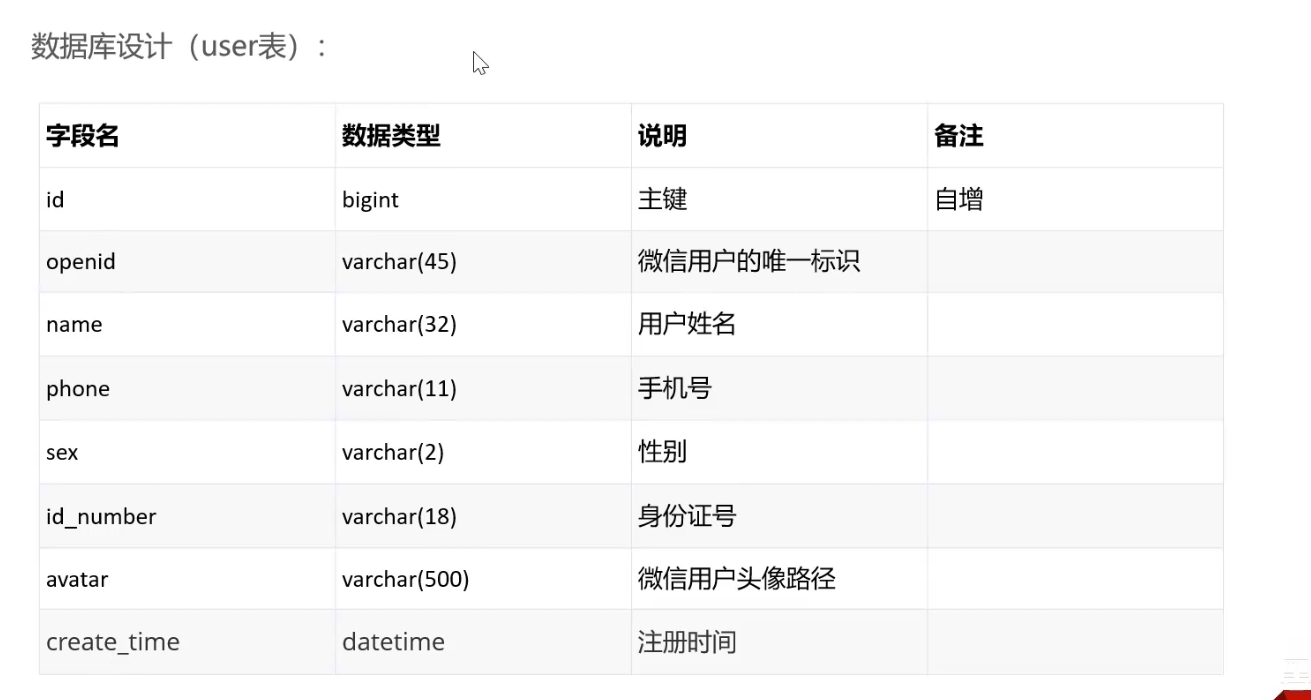
5.3 微信登陆 5.3.1 需求分析和设计
5.4 导入商品浏览功能代码 5.4.1 需求分析和设计
产品原型
接口设计
查询分类
根据分类id查询菜品
根据分类id查询套餐
根据套餐id查询包含的菜品
6. 缓存菜品、购物车 6.1 缓存菜品
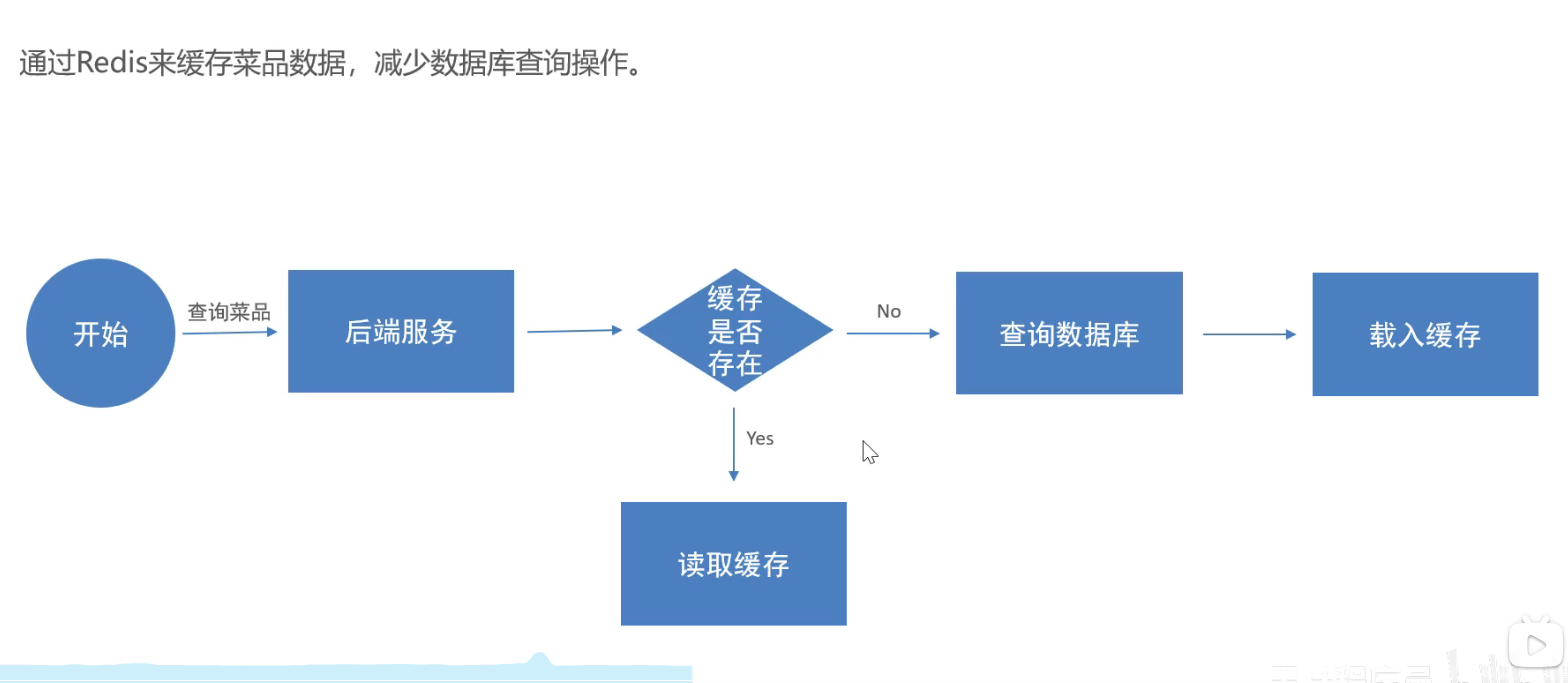
问题说明: 用户端展示的菜品通过查询数据库获得,如果用户端的访问量增加,那么查询数据库的访问压力也会增加
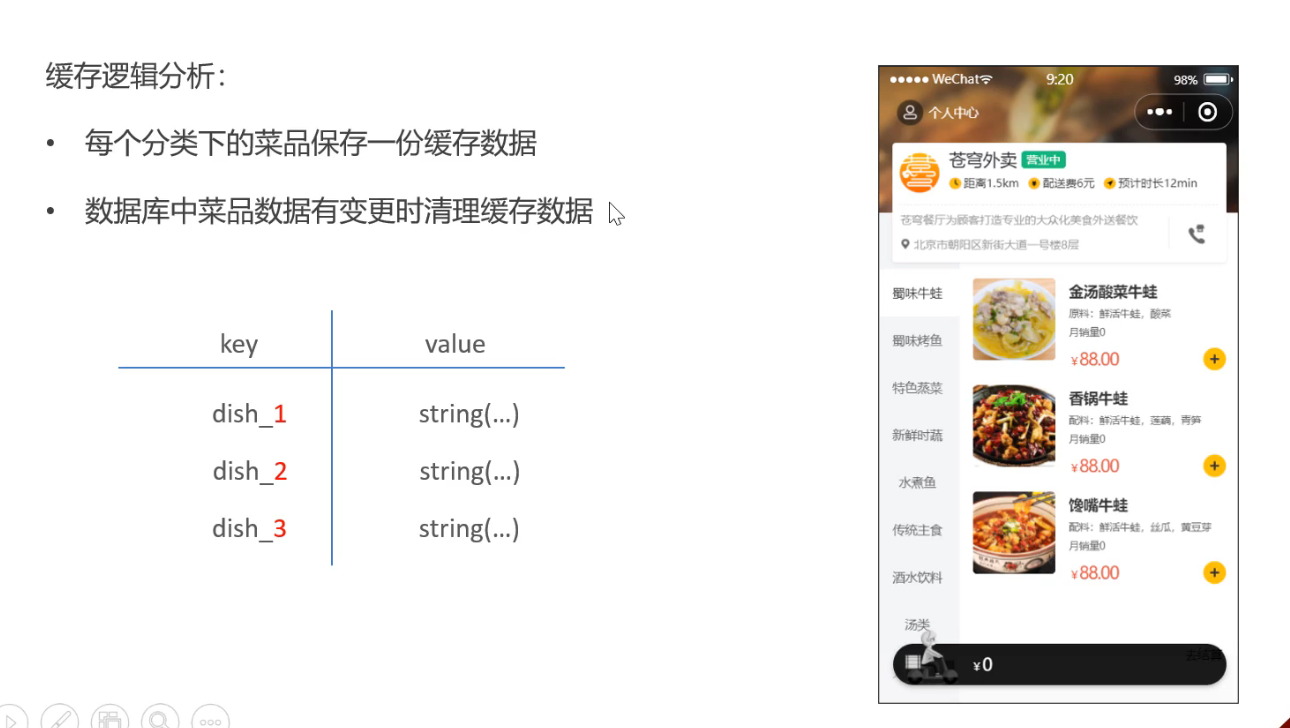
实现思路:通过redis来缓存菜品数据,减少数据库查询操作
1
2
3
4
5
6
7
8
9
10
11
12
13
14
15
16
17
18
19
20
21
22
23
24
25
26
27
28
29
@GetMapping("/list") @ApiOperation("根据分类id查询菜品") public Result<List<DishVO>> list (Long categoryId) { String key = "dish_" + categoryId; List<DishVO> list = (List<DishVO>) redisTemplate.opsForValue().get(key); if (list != null && list.size() > 0 ){ return Result.success(list); } Dish dish = new Dish (); dish.setCategoryId(categoryId); dish.setStatus(StatusConstant.ENABLE); list = dishService.listWithFlavor(dish); redisTemplate.opsForValue().set(key, list); return Result.success(list); }
6.2 缓存套餐 6.2.1 Spring Cache Spring Cache是一个框架,实现了基于注解的缓存功能,只需要简单地加一个注解,就能实现缓存的功能。
Spring Cache提供了一层抽象,底层可以切换不同的缓存实现,例如:
1 2 3 4 <dependency > <groupId > org.springframework.boot</groupId > <artifactId > spring-boot-starter-cache</artifactId > </dependency >
常用注解:
@EnableCaching: 开启缓存注解功能,通常加在启动类上@Cacheable: 在方法执行前先查c询缓存中是否有数据,如果有,则直接返回。没有则将数据放入缓存中再返回@CachePut(cacheNames = "userCache", key = "#user.id"): 将方法的返回值放入缓存中 @CacheEvict:将一条或多条数据从缓存中删除
6.2.2 实现思路
导入Spring Cache和Redis相关的maven坐标
在启动类上加入@EnableCaching注解,开启缓存注解功能
在用户端接口SetmealController的list方法上加入@Cacheable注解
在管理端接口SetmealController的save、delete、update等方法上加上CacheEvict注解
6.2.3 代码开发
1
2
3
4
5
6
7
8
9
10
@SpringBootApplication @EnableTransactionManagement @Slf4j @EnableCaching public class SkyApplication { public static void main (String[] args) { SpringApplication.run(SkyApplication.class, args); log.info("server started" ); } }
Controller使用查询@Cacheable(cacheNames = "setMealCache", key = "#categoryId") //
1 2 3 4 5 6 7 8 9 10 11 12 13 14 15 16 17 @GetMapping("/list") @ApiOperation("根据分类id查询套餐") @Cacheable(cacheNames = "setMealCache", key = "#categoryId") public Result<List<Setmeal>> list (Long categoryId) { Setmeal setmeal = new Setmeal (); setmeal.setCategoryId(categoryId); setmeal.setStatus(StatusConstant.ENABLE); List<Setmeal> list = setMealService.list(setmeal); return Result.success(list); }
Controller更新时删除缓存@CacheEvict(cacheNames = "setMealCache", key = "#setmealDTO.categoryId")
1
2
3
4
5
6
7
8
9
10
11
12
13
14
15
16
17
18
19
20
21
22
23
24
25
26
27
28
29
30
31
32
33
34
35
36
37
38
39
40
41
42
43
44
45
46
@PostMapping @ApiOperation("新增套餐") @CacheEvict(cacheNames = "setMealCache", key = "#setmealDTO.categoryId") public Result addSetMeal (@RequestBody SetmealDTO setmealDTO) { log.info("新增套餐:{}" , setmealDTO); setMealService.addSetMeal(setmealDTO); return Result.success(); } @GetMapping("/{id}") @ApiOperation("根据id查询套餐") public Result<SetmealVO> getSetmealById (@PathVariable Long id) { log.info("根据id获取套餐信息:{}" ,id); SetmealVO setmealVO = setMealService.getSetmealById(id); return Result.success(setmealVO); } @PutMapping @ApiOperation("修改套餐") @CacheEvict(cacheNames = "SetMealCache", allEntries = true) public Result updateSetmeal (@RequestBody SetmealDTO setmealDTO) { log.info("修改套餐{}" ,setmealDTO); setMealService.update(setmealDTO); return Result.success(); } @PostMapping("/status/{status}") @ApiOperation("套餐起售、停售") @CacheEvict(cacheNames = "SetMealCache", allEntries = true) public Result updateStatus (Long id, @PathVariable Integer status) { log.info("套餐起售、停售:id{},status:{}" ,id,status); setMealService.updateStatus(id,status); return Result.success(); } @DeleteMapping() @ApiOperation("根据套餐id批量删除套餐接口") @CacheEvict(cacheNames = "SetMealCache", allEntries = true) public Result deleteSetmealByIds (@RequestParam List<Long> ids) { log.info("根据套餐id批量删除套餐:{}" ,ids); setMealService.deleteSetmealByIds(ids); return Result.success(); }
6.3 添加购物车 6.3.1 需求分析和设计
6.3.2 代码开发 1 2 3 4 5 6 7 8 9 10 11 12 13 14 15 16 17 18 19 20 21 22 23 24 25 26 27 28 29 30 31 32 33 34 35 36 37 38 39 40 41 42 43 44 45 46 47 48 49 50 51 52 53 54 55 56 @Autowired private ShoppingCartMapper shoppingCartMapper;@Autowired private DishMapper dishMapper;@Autowired private SetmealMapper setmealMapper;@Override public void addShoppingCart (ShoppingCartDTO shoppingCartDTO) { ShoppingCart shoppingCart = new ShoppingCart (); BeanUtils.copyProperties(shoppingCartDTO, shoppingCart); Long currentId = BaseContext.getCurrentId(); shoppingCart.setUserId(currentId); List<ShoppingCart> list = shoppingCartMapper.list(shoppingCart); if (list != null && list.size() > 0 ) { ShoppingCart cart = list.get(0 ); cart.setNumber(cart.getNumber() + 1 ); shoppingCartMapper.updateNumberById(cart); }else { Long dishId = shoppingCartDTO.getDishId(); if (dishId != null ){ Dish dish = dishMapper.getById(dishId); shoppingCart.setName(dish.getName()); shoppingCart.setImage(dish.getImage()); shoppingCart.setAmount(dish.getPrice()); }else { Long setmealId = shoppingCartDTO.getSetmealId(); Setmeal setMeal = setmealMapper.getById(setmealId); shoppingCart.setName(setMeal.getName()); shoppingCart.setImage(setMeal.getImage()); shoppingCart.setAmount(setMeal.getPrice()); } shoppingCart.setNumber(1 ); shoppingCart.setCreateTime(LocalDateTime.now()); shoppingCartMapper.insert(shoppingCart); } } @Override public List<ShoppingCart> list (Long userId) { return shoppingCartMapper.list(ShoppingCart.builder().userId(userId).build()); }
6.4 清空购物车 @Delete("delete from shopping_cart where user_id = #{userId}")
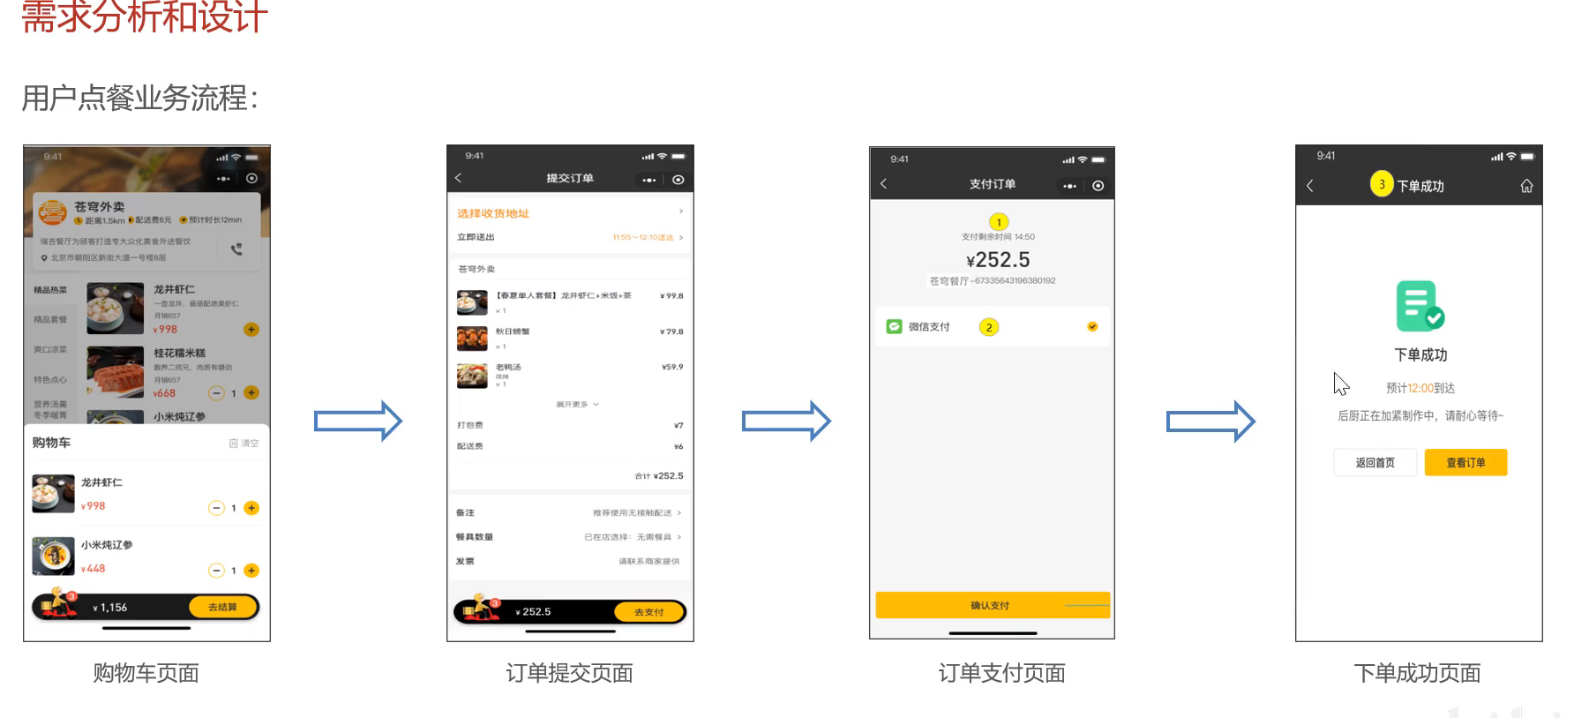
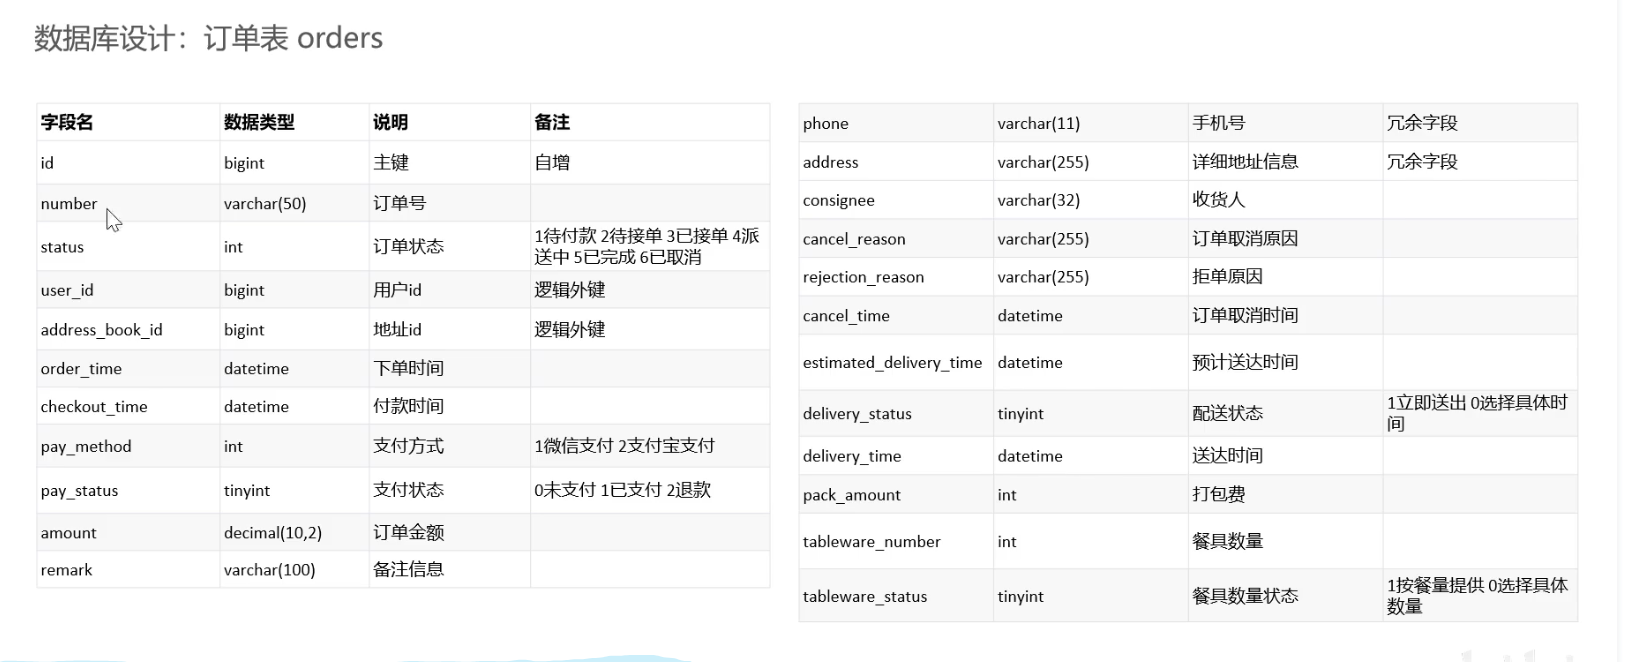
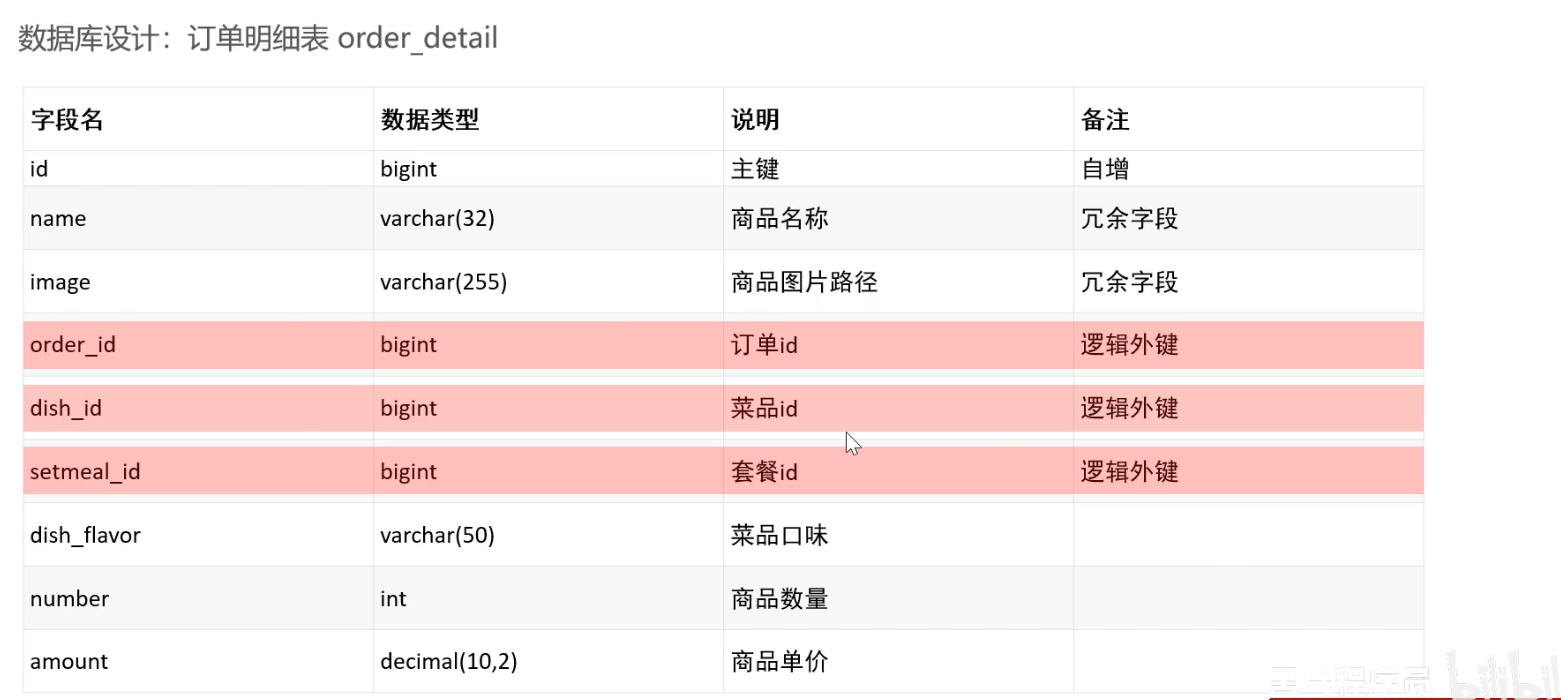
7. 用户下单、订单支付 7.1 用户下单
需求分析
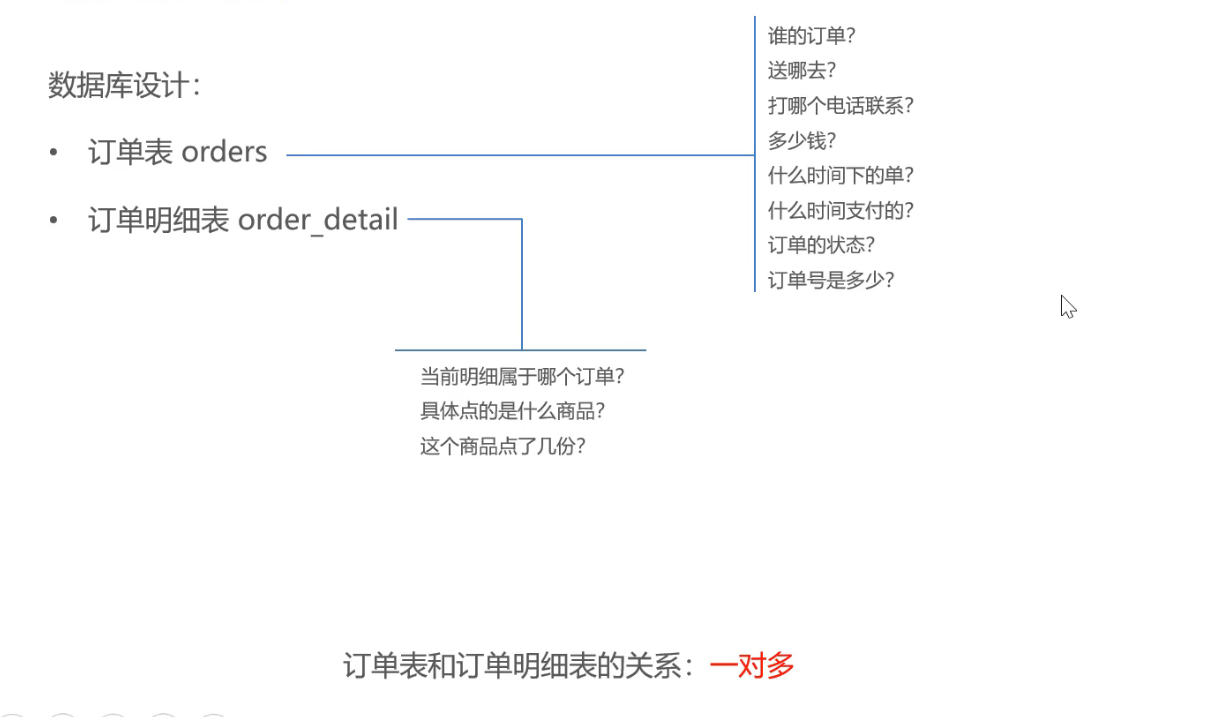
数据库设计
1 2 3 4 5 6 7 8 9 10 11 12 @Autowired private OrderService orderService;@PostMapping("/submit") @ApiOperation("用户端订单提交") public Result<OrderSubmitVO> submitOrder (@RequestBody OrdersSubmitDTO ordersSubmitDTO) { log.info("用户下单,参数为:{}" , ordersSubmitDTO); OrderSubmitVO orderSubmitVO = orderService.submitOrder(ordersSubmitDTO); return Result.success(orderSubmitVO); }
1 2 3 4 5 6 7 8 9 10 11 12 13 14 15 16 17 18 19 20 21 22 23 24 25 26 27 28 29 30 31 32 33 34 35 36 37 38 39 40 41 42 43 44 45 46 47 48 49 50 51 52 53 54 55 56 57 58 59 60 61 62 63 64 65 66 67 68 69 70 71 72 73 74 75 76 77 78 79 80 81 82 83 84 85 86 87 88 89 90 91 92 93 94 95 96 97 98 package com.sky.service.impl;import com.sky.constant.MessageConstant;import com.sky.context.BaseContext;import com.sky.dto.OrdersSubmitDTO;import com.sky.entity.AddressBook;import com.sky.entity.OrderDetail;import com.sky.entity.Orders;import com.sky.entity.ShoppingCart;import com.sky.exception.AddressBookBusinessException;import com.sky.mapper.AddressBookMapper;import com.sky.mapper.OrderDetailMapper;import com.sky.mapper.OrderMapper;import com.sky.mapper.ShoppingCartMapper;import com.sky.service.OrderService;import com.sky.vo.OrderSubmitVO;import org.springframework.beans.BeanUtils;import org.springframework.beans.factory.annotation.Autowired;import org.springframework.stereotype.Service;import org.springframework.transaction.annotation.Transactional;import java.time.LocalDateTime;import java.util.ArrayList;import java.util.List;@Service public class OrderServiceImpl implements OrderService { @Autowired private OrderMapper orderMapper; @Autowired private OrderDetailMapper orderDetailMapper; @Autowired private AddressBookMapper addressBookMapper; @Autowired private ShoppingCartMapper shoppingCartMapper; @Override @Transactional public OrderSubmitVO submitOrder (OrdersSubmitDTO ordersSubmitDTO) { AddressBook addressBook = addressBookMapper.getById(ordersSubmitDTO.getAddressBookId()); if (addressBook == null ){ throw new AddressBookBusinessException (MessageConstant.ADDRESS_BOOK_IS_NULL); } List<ShoppingCart> shoppingCartList = shoppingCartMapper.list(ShoppingCart.builder().userId(BaseContext.getCurrentId()).build()); if (shoppingCartList == null || shoppingCartList.isEmpty()){ throw new AddressBookBusinessException (MessageConstant.SHOPPING_CART_IS_NULL); } Orders orders = new Orders (); BeanUtils.copyProperties(ordersSubmitDTO, orders); orders.setOrderTime(LocalDateTime.now()); orders.setPayStatus(Orders.UN_PAID); orders.setStatus(Orders.PENDING_PAYMENT); orders.setNumber(String.valueOf(System.currentTimeMillis())); orders.setPhone(addressBook.getPhone()); orders.setConsignee(addressBook.getConsignee()); orders.setUserId(BaseContext.getCurrentId()); orderMapper.insertOrder(orders); List<OrderDetail> orderDetails = new ArrayList <>(); for (ShoppingCart shoppingCart : shoppingCartList){ OrderDetail orderDetail = new OrderDetail (); BeanUtils.copyProperties(shoppingCart, orderDetail); orderDetail.setOrderId(orders.getId()); orderDetails.add(orderDetail); } orderDetailMapper.insertBatch(orderDetails); shoppingCartMapper.deleteByUserId(BaseContext.getCurrentId()); return OrderSubmitVO.builder() .id(orders.getId()) .orderTime(orders.getOrderTime()) .orderNumber(orders.getNumber()) .orderAmount(orders.getAmount()) .build(); } }
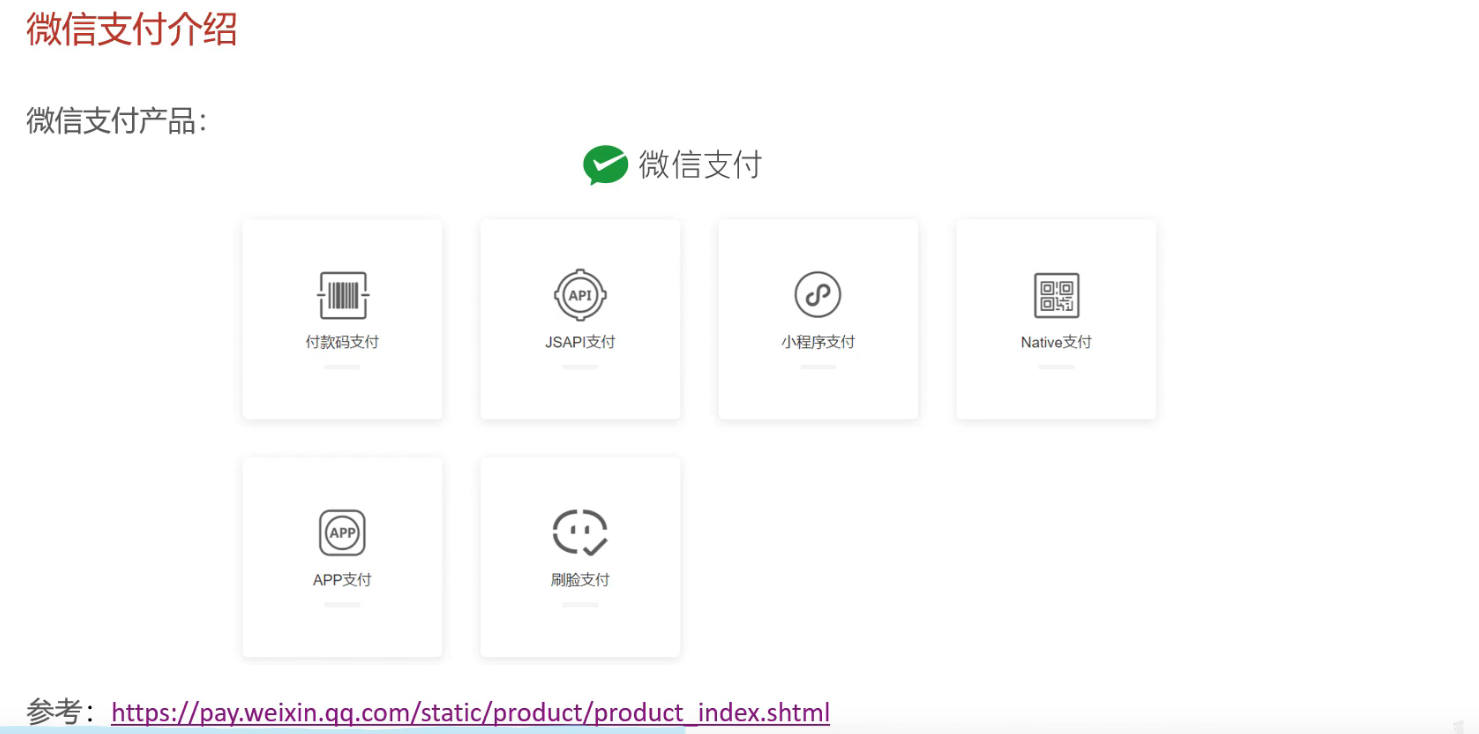
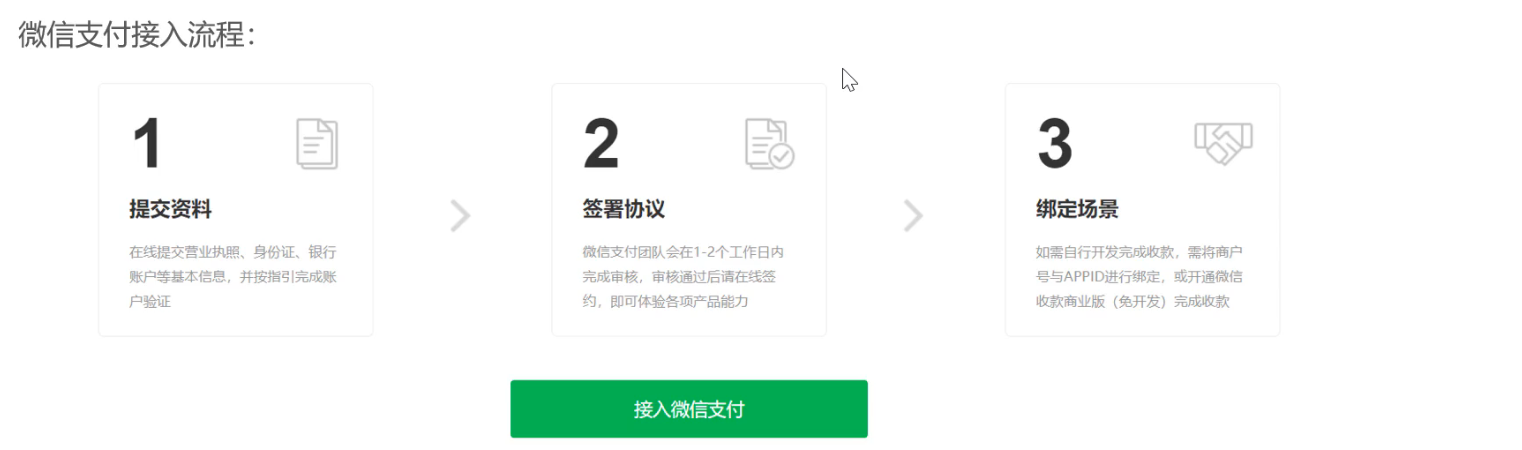
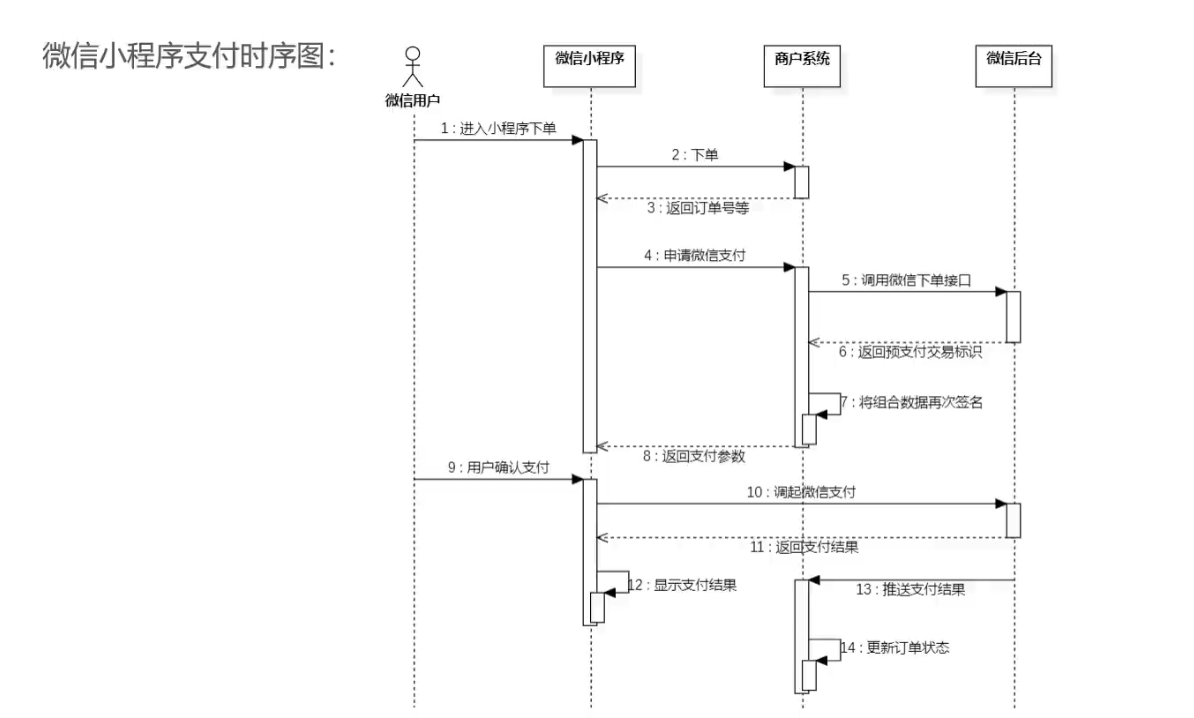
7.2 订单支付 7.2.1 微信支付介绍
产品介绍_JSAPI支付|微信支付商户文档中心
7.2.2 微信支付准备工作
下载cpolar:cpolar - secure introspectable tunnels to localhost
连接账户:cpolar.exe authtoken ZGY2N2M3ZTUtNjZmMC00OTVmLWEwMDAtOGQzNDQ4OWZkZWU4
运行:cpolar.exe http 80
8. 订单状态定时处理、来单提醒和客户催单 8.1 Spring Task 8.1.1 介绍 Spring Task是Spring框架提供的任务调度工具,可以按照约定的时间自动执行某个代码逻辑
应用场景:
信用卡每月还款提醒
在线支付应用处理未支付订单
某个纪念日为用户发送通知
使用步骤
启动类加@EnableScheduling
方法上加@Scheduled(cron = "0/5 * * * * ?") (类上需要加上@Component注解)
8.1.2 cron表达式 cron表达式可以理解为就是一个字符串,通过cron表达式可以定义任务的触发时间
构成规则:分成6或7个域,用空格分隔开,每个域代表一个含义
每个域的含义:秒 分 时 日 月 周 年(年可选)
2025年5月21日8点56分20秒
秒
分
时
日
月
周
年
20
56
08
21
5
?(日和周只能有一个出现)
2022
, - * /
, - * /
, - * /
, - * / L(每月最后一天) W(每月几号最近的工作日)
, - * /
, - * / L(1L本月最后一个星期1) #(3#4第三周的星期四)
, - * /
cron表达式在线生成器: https://cron.qqe2.com
8.1.3 入门案例
Spring Task 使用步骤
导入maven坐标 spring-context (spring boot默认已导入)
启动类添加注解@EnableScheduling开启任务调度
自定义定时任务类(需要加上@Component注解)
8.2 订单状态定时处理
需求分析
下单后未支付,订单一直处于“待支付”状态
用户收货后管理端没有点击完成,订单一直处于“派送中”状态
实现思路
通过定时任务每分钟检查一次是否存在支付超时订单,如果存在则修改订单状态为“已取消”
task
1 2 3 4 5 6 7 8 9 10 11 12 13 14 15 16 17 18 19 20 21 22 23 24 25 26 27 28 29 30 31 32 33 34 35 36 37 38 39 40 41 42 43 44 45 46 47 48 49 50 51 52 53 54 55 56 57 58 59 60 package com.sky.task;import com.sky.constant.MessageConstant;import com.sky.entity.Orders;import com.sky.mapper.OrderMapper;import lombok.extern.slf4j.Slf4j;import org.springframework.beans.factory.annotation.Autowired;import org.springframework.scheduling.annotation.Scheduled;import org.springframework.stereotype.Component;import java.time.LocalDateTime;import java.util.List;@Component @Slf4j public class OrderTask { @Autowired OrderMapper orderMapper; @Scheduled(cron = "*/10 * * * * ?") public void processTimeOutOrder () { log.info("定时处理超时订单:{}" , LocalDateTime.now()); List<Orders> orderList = orderMapper.getByStatusAndOrderTimeLT(Orders.PENDING_PAYMENT, LocalDateTime.now().plusMinutes(-15 )); if (orderList != null && orderList.size() > 0 ){ for (Orders orders : orderList) { orders.setStatus(Orders.CANCELLED); orders.setCancelTime(LocalDateTime.now()); orders.setCancelReason(MessageConstant.ORDER_OVERTIME); } orderMapper.batchUpdate(orderList); } } @Scheduled(cron = "0 0 1 * * ?") public void processDeliveryOrder () { log.info("定时处理处于派送中的订单:{}" , LocalDateTime.now()); List<Orders> orderList = orderMapper.getByStatusAndOrderTimeLT(Orders.DELIVERY_IN_PROGRESS, LocalDateTime.now().plusHours(-5 )); if (orderList != null && orderList.size() > 0 ){ for (Orders orders : orderList) { orders.setStatus(Orders.CANCELLED); orders.setDeliveryTime(LocalDateTime.now()); } orderMapper.batchUpdate(orderList); } } }
1 2 3 4 5 6 7 8 9 10 11 12 13 14 15 16 17 18 19 20 21 22 23 24 25 26 27 28 29 30 31 32 33 <update id ="batchUpdate" > update orders <set > <if test ="list[0].cancelReason != null and list[0].cancelReason!='' " > cancel_reason=#{list[0].cancelReason}, </if > <if test ="list[0].rejectionReason != null and list[0].rejectionReason!='' " > rejection_reason=#{list[0].rejectionReason}, </if > <if test ="list[0].cancelTime != null" > cancel_time=#{list[0].cancelTime}, </if > <if test ="list[0].payStatus != null" > pay_status=#{list[0].payStatus}, </if > <if test ="list[0].payMethod != null" > pay_method=#{list[0].payMethod}, </if > <if test ="list[0].checkoutTime != null" > checkout_time=#{list[0].checkoutTime}, </if > <if test ="list[0].status != null" > status = #{list[0].status}, </if > <if test ="list[0].deliveryTime != null" > delivery_time = #{list[0].deliveryTime} </if > </set > where id in <foreach collection ="orderList" item ="order" separator ="," open ="(" close =")" > #{order.id} </foreach >
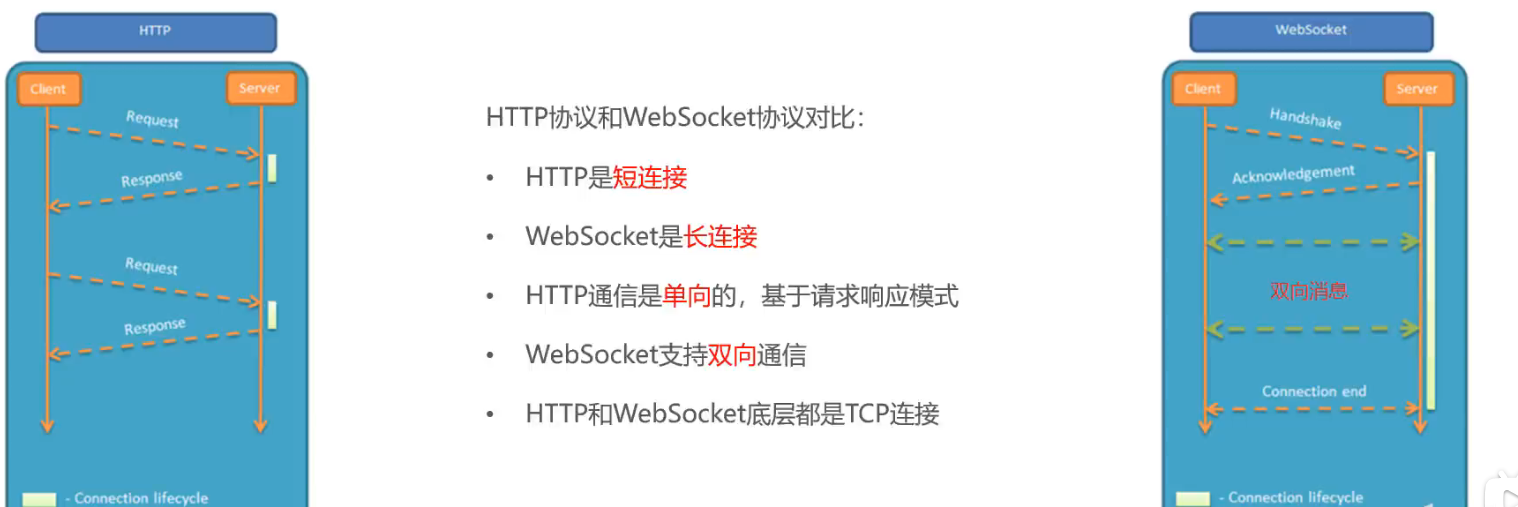
8.3 WebSocket WebSocket是基于TCP的一种新的网络协议。它实现了浏览器与服务器全双工通信—-浏览器和服务器只需要完成一次握手,两者之间就可以创建持久性的连接,并进行双向数据传输
单工通信 只支持信号在一个方向上传输(正向或反向),任何时候不能改变信号的传输方向。
半双工通信 允许信号在两个方向上传输,但某一时刻只允许信号在一个信道上单向传输。
全双工通信 允许数据同时在两个方向上传输,即有两个信道,因此允许同时进行双向传输。
应用场景
视频弹幕
网页聊天
体育实况更新
股票基金报价实时更新
入门案例
实现步骤:
使用websocket.html页面作为WebSocket客户端
1 2 3 4 5 6 7 8 9 10 11 12 13 14 15 16 17 18 19 20 21 22 23 24 25 26 27 28 29 30 31 32 33 34 35 36 37 38 39 40 41 42 43 44 45 46 47 48 49 50 51 52 53 54 55 56 57 58 59 60 61 62 63 64 65 66 67 68 69 <!DOCTYPE HTML > <html > <head > <meta charset ="UTF-8" > <title > WebSocket Demo</title > </head > <body > <input id ="text" type ="text" /> <button onclick ="send()" > 发送消息</button > <button onclick ="closeWebSocket()" > 关闭连接</button > <div id ="message" > </div > </body > <script type ="text/javascript" > var websocket = null ; var clientId = Math .random ().toString (36 ).substr (2 ); if ('WebSocket' in window ){ websocket = new WebSocket ("ws://localhost:8080/ws/" +clientId); } else { alert ('Not support websocket' ) } websocket.onerror = function ( setMessageInnerHTML ("error" ); }; websocket.onopen = function ( setMessageInnerHTML ("连接成功" ); } websocket.onmessage = function (event ){ setMessageInnerHTML (event.data ); } websocket.onclose = function ( setMessageInnerHTML ("close" ); } window .onbeforeunload = function ( websocket.close (); } function setMessageInnerHTML (innerHTML ){ document .getElementById ('message' ).innerHTML += innerHTML + '<br/>' ; } function send ( var message = document .getElementById ('text' ).value ; websocket.send (message); } function closeWebSocket ( websocket.close (); } </script > </html >
导入WebSocket的maven坐标
1 2 3 4 <dependency > <groupId > org.springframework.boot</groupId > <artifactId > spring-boot-starter-websocket</artifactId > </dependency >
导入WebSocket服务端组件WebSocketServer, 用于和客户端通信
导入配置类WebSocketConfiguration,注册WebSocket服务端组件
导入定时任务类WebSocketTask,定时向客户端推送数据
8.4 来单提醒 设计:
通过WebSocket实现管理端页面和服务端保持长连接状态
当客户支付后,调用WebSocket的相关API实现服务端向客户端推送消息
客户端浏览器解析服务端推送的消息,判断是来单提醒还是客户催单,进行相应的消息提示和语音播报
约定服务端发送给客户端浏览器的数据格式为JSON,字段包括:type、orderId、content
type:消息类型,1为来单提醒、2为客户催单
orderId:为订单id
content:为消息内容
8.5 客户催单
需求分析
用户在小程序中点击催单按钮,需要第一时间通知外卖商家,通知形式有:
9.数据统计-图形报表 9.1 Apache Echarts 9.1.1 介绍 Apache Echarts是一款基于JavaScript的数据可视化图标库,提供直观、生动、可交互、可个性化定制的数据可视化图标
官网地址: https://echarts.apache.org/zh/index.html
9.1.2 入门案例 使用Echarts,重点在于研究当前图标所需的数据格式,通常是需要后端提供符合格式要求的动态数据,然后响应前端来展示图标
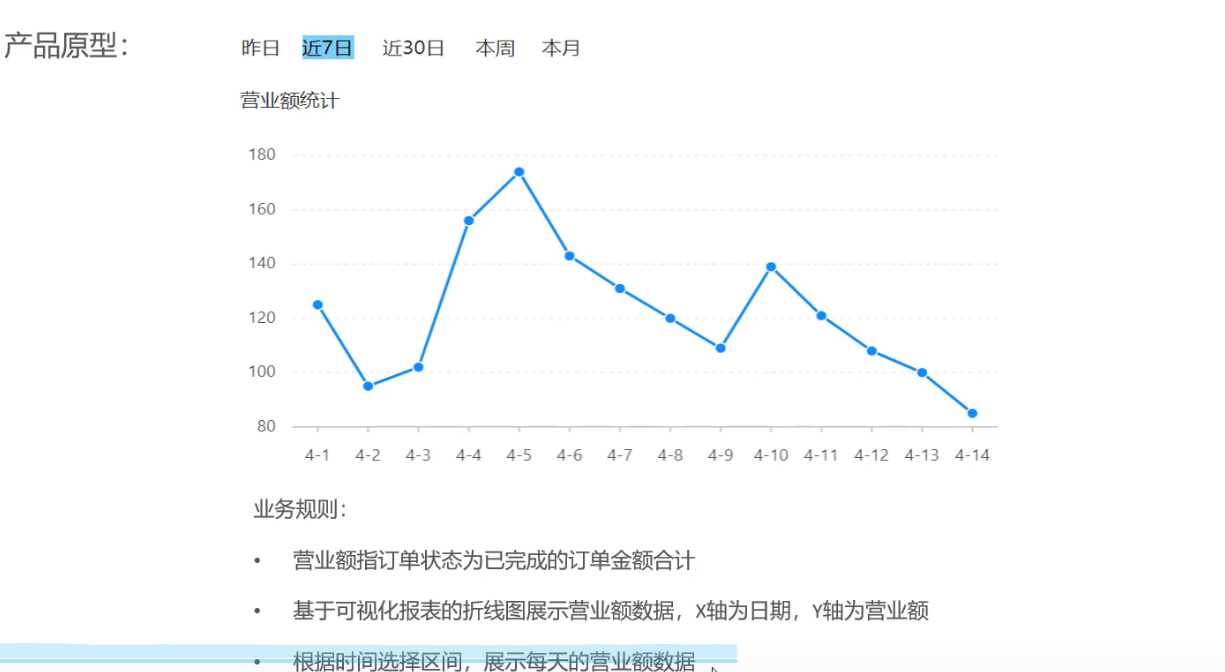
9.2 营业额统计 9.2.1 需求分析和设计
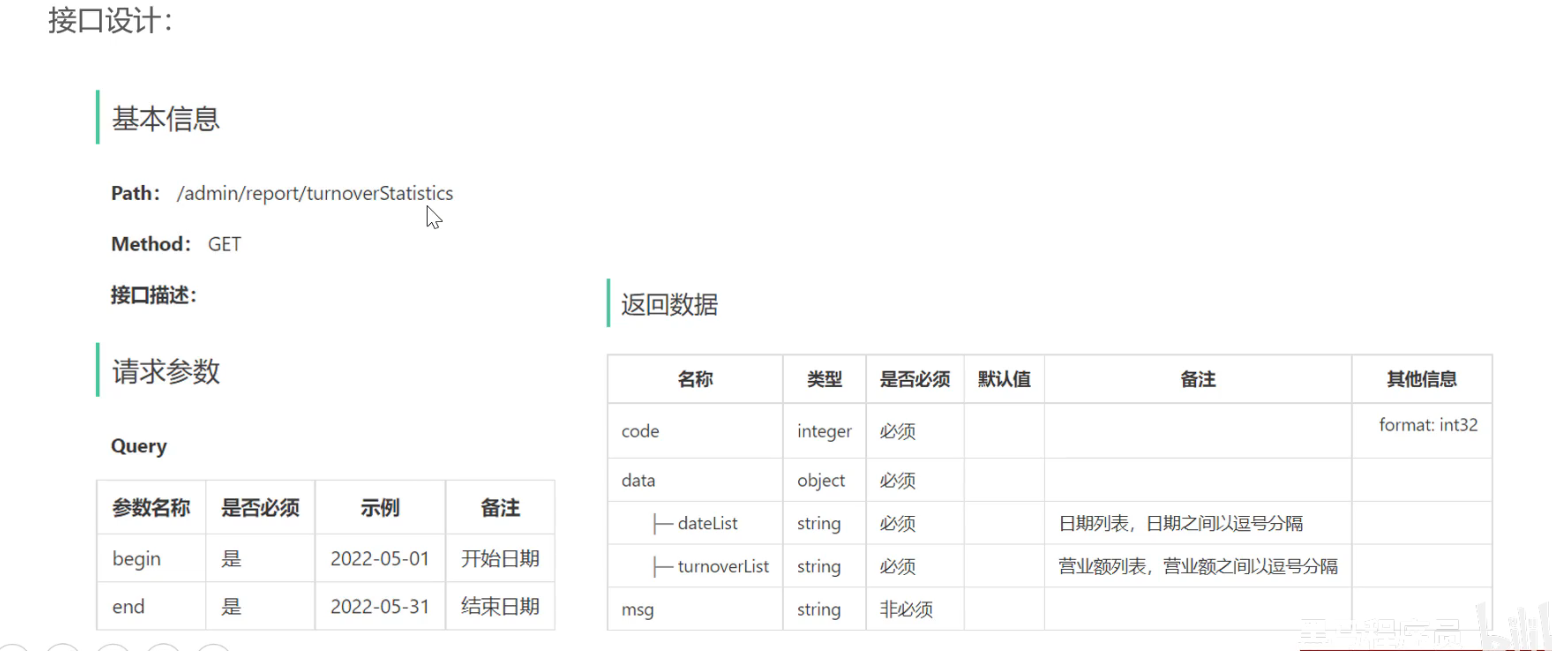
9.2.2 代码开发
1 2 3 4 5 6 7 8 9 10 11 12 13 14 15 16 17 18 19 20 21 @RestController @Slf4j @RequestMapping("/admin/report") @Api(tags = "数据统计相关接口") public class ReportController { @Autowired private ReportService reportService; @GetMapping("/turnoverStatistics") @ApiOperation("获取营业额数据") public Result<TurnoverReportVO> turnoverStatistics ( @DateTimeFormat(pattern = "yyyy-MM-dd") LocalDate begin, @DateTimeFormat(pattern = "yyyy-MM-dd") LocalDate end) { log.info("营业额数据统计:start = {}, end = {}" , begin, end); return Result.success(reportService.getTurnoverStatistics(begin,end)); } }
1 2 3 4 5 6 7 8 9 10 11 12 13 14 15 16 17 18 19 20 21 22 23 24 25 26 27 28 29 30 31 32 33 34 35 36 37 38 39 40 41 42 43 44 45 46 47 48 49 50 51 52 53 54 55 56 57 58 59 60 61 62 63 64 65 package com.sky.service.impl;import com.sky.entity.Orders;import com.sky.mapper.OrderMapper;import com.sky.service.ReportService;import com.sky.vo.TurnoverReportVO;import lombok.extern.slf4j.Slf4j;import org.apache.commons.lang3.StringUtils;import org.springframework.beans.factory.annotation.Autowired;import org.springframework.stereotype.Service;import java.time.LocalDate;import java.time.LocalDateTime;import java.time.LocalTime;import java.util.*;@Service @Slf4j public class ReportServiceImpl implements ReportService { @Autowired private OrderMapper orderMapper; @Override public TurnoverReportVO getTurnoverStatistics (LocalDate begin, LocalDate end) { List<LocalDate> dateList = new ArrayList <>(); dateList.add(begin); while (!begin.equals(end)) { begin = begin.plusDays(1 ); dateList.add(begin); } List<Double> turnoverList = new ArrayList <>(); for (LocalDate date : dateList) { LocalDateTime dayStart = LocalDateTime.of(date, LocalTime.MIN); LocalDateTime dayEnd = LocalDateTime.of(date, LocalTime.MAX); Map<String, Object> map = new HashMap <>(); map.put("dayStart" , dayStart.toString()); map.put("dayEnd" , dayEnd.toString()); map.put("status" , Orders.COMPLETED); Double turnover = orderMapper.sumByMap(map); turnover = turnover == null ? 0.0 : turnover; turnoverList.add(turnover); } return TurnoverReportVO.builder() .dateList(StringUtils.join(dateList, "," )) .turnoverList(StringUtils.join(turnoverList, "," )) .build(); } }
1 2 3 4 5 6 7 8 9 10 11 12 13 14 <select id ="sumByMap" resultType ="java.lang.Double" parameterType ="Map" > select sum(amount) from orders <where > <if test ="dayStart != null" > and delivery_time > #{dayStart} </if > <if test ="dayEnd != null" > and delivery_time < #{dayEnd} </if > <if test ="status != null" > and status = #{status} </if > </where > </select >
9.3 用户统计 1 2 3 4 5 6 7 8 9 10 11 12 13 14 15 16 17 18 19 20 21 22 23 24 25 26 27 28 29 30 31 32 33 34 public UserReportVO getUserStatistics (LocalDate begin, LocalDate end) { List<LocalDate> dateList = new ArrayList <>(); dateList.add(begin); while (!begin.equals(end)){ begin = begin.plusDays(1 ); dateList.add(begin); } List<Integer> newUserList = new ArrayList <>(); List<Integer> totalUserList = new ArrayList <>(); for (LocalDate date : dateList) { LocalDateTime dayStart = LocalDateTime.of(date, LocalTime.MIN); LocalDateTime dayEnd = LocalDateTime.of(date, LocalTime.MAX); Map<String, Object> map = new HashMap <>(); map.put("dayEnd" , dayEnd.toString()); Integer totalUser = userMapper.countByMap(map); map.put("dayStart" , dayStart.toString()); Integer newUser = userMapper.countByMap(map); newUserList.add(newUser); totalUserList.add(totalUser); } return UserReportVO.builder() .dateList(StringUtils.join(dateList,"," )) .newUserList(StringUtils.join(newUserList,"," )) .totalUserList(StringUtils.join(totalUserList,"," )) .build(); }
1 2 3 4 5 6 7 8 9 10 11 <select id ="countByMap" resultType ="java.lang.Integer" > select count(id) from user <where > <if test ="dayStart != null" > and create_time > #{dayStart} </if > <if test ="dayEnd != null" > and create_time < #{dayEnd} </if > </where > </select >
9.4 订单统计 1 2 3 4 5 6 7 8 9 10 11 12 13 14 <select id ="countByMap" resultType ="java.lang.Integer" > select count(id) from orders <where > <if test ="dayStart != null" > and order_time > #{dayStart} </if > <if test ="dayEnd != null" > and order_time < #{dayEnd} </if > <if test ="status != null" > and status = #{status} </if > </where > </select >
9.5 销量排名TOP10 1 2 3 4 5 6 7 8 9 10 11 12 13 14 15 16 17 18 19 20 21 22 23 24 25 26 27 28 29 30 31 32 <select id ="getTop10" resultType ="com.sky.vo.SalesTop10ReportVO" > SELECT GROUP_CONCAT(name ORDER BY sn DESC SEPARATOR ',') AS nameList, GROUP_CONCAT(sn ORDER BY sn DESC SEPARATOR ',') AS numberList FROM ( SELECT ANY_VALUE(d.name) as name, SUM(d.number) as sn FROM order_detail as d INNER JOIN orders as o ON d.order_id = o.id <where > <if test ="status != null" > and o.status = #{status} </if > <if test ="dayStart != null" > and o.order_time > #{dayStart} </if > <if test ="dayEnd != null" > and o.order_time < #{dayEnd} </if > </where > GROUP BY d.dish_id ORDER BY sn DESC LIMIT 10 ) AS top10 </select >
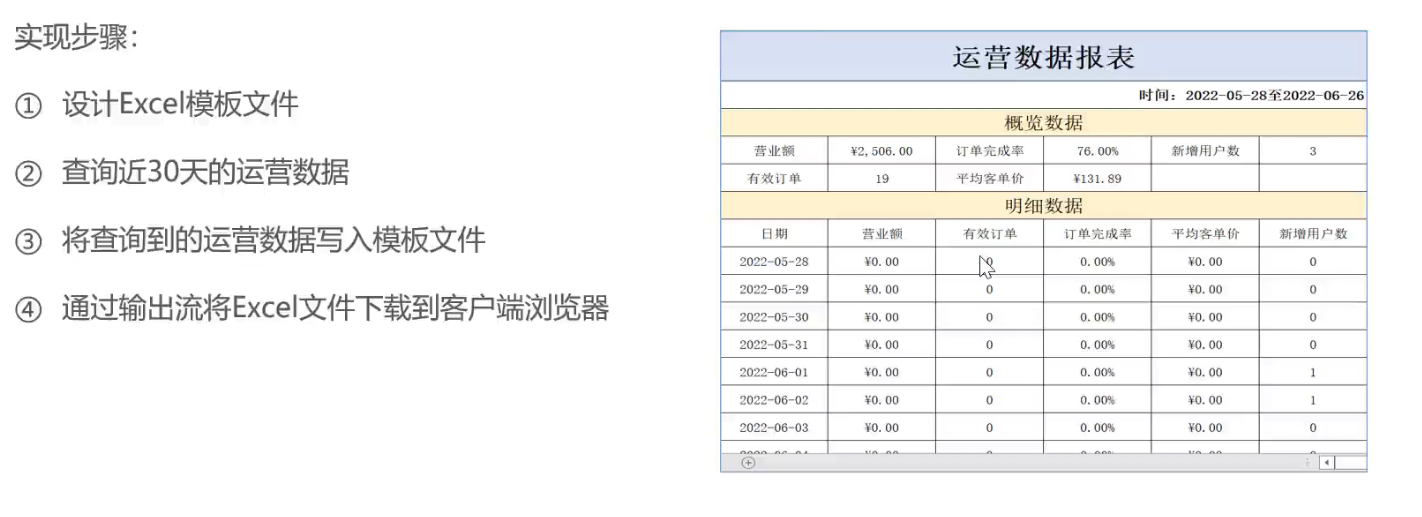
10 导出Excel报表 10.1 Apache POI
Apache POI 是一个处理Microsoft office各种文件格式的开源项目。可以使用POI在Java程序中对各种office文件进行读写操作。POI通常用于处理Excel文件
应用场景:
· 银行网银系统导出交易明细
· 各种业务系统导出Excel报表
· 批量导入业务数据
导入maven坐标
1 2 3 4 5 6 7 8 9 10 11 12 13 14 <properties > <poi > 3.16</poi > </properties > <dependency > <groupId > org.apache.poi</groupId > <artifactId > poi</artifactId > <version > ${poi}</version > </dependency > <dependency > <groupId > org.apache.poi</groupId > <artifactId > poi-ooxml</artifactId > <version > ${poi}</version > </dependency >
10.2 导入运营数据 10.2.1 分析设计
10.2.2 代码开发 1 2 3 4 5 6 7 8 9 10 11 12 13 14 15 16 17 18 19 20 21 22 23 24 25 26 27 28 29 30 31 32 33 34 35 36 37 38 39 40 41 42 43 44 45 46 47 48 49 50 51 52 53 54 55 56 57 58 59 60 61 62 63 64 65 66 67 68 69 70 71 72 73 74 75 76 77 78 79 80 81 82 83 84 85 86 87 88 89 90 91 92 93 94 95 96 97 98 99 100 101 102 103 104 105 106 107 108 109 110 111 112 113 114 115 116 117 118 119 120 121 122 123 124 125 126 127 128 129 130 131 132 133 134 135 136 137 138 139 140 141 142 143 144 145 146 147 148 149 150 151 152 153 154 155 156 157 158 159 160 161 162 163 164 165 166 167 168 169 170 171 172 173 174 175 176 177 178 179 180 181 182 183 184 185 186 187 188 189 190 191 192 193 194 195 196 197 198 199 200 201 202 203 204 205 206 207 208 209 210 211 212 213 214 215 216 217 218 219 220 221 222 223 224 225 226 227 228 229 230 231 232 233 234 235 236 237 238 239 240 package com.sky.service.impl; import com.sky.entity.Orders; import com.sky.mapper.OrderDetailMapper; import com.sky.mapper.OrderMapper; import com.sky.mapper.UserMapper; import com.sky.service.ReportService; import com.sky.service.WorkspaceService; import com.sky.vo.*; import lombok.extern.slf4j.Slf4j; import org.apache.commons.lang3.StringUtils; import org.apache.poi.xssf.usermodel.XSSFRow; import org.apache.poi.xssf.usermodel.XSSFSheet; import org.apache.poi.xssf.usermodel.XSSFWorkbook; import org.springframework.beans.factory.annotation.Autowired; import org.springframework.stereotype.Service; import javax.servlet.ServletOutputStream; import javax.servlet.http.HttpServletResponse; import java.io.IOException; import java.io.InputStream; import java.time.LocalDate; import java.time.LocalDateTime; import java.time.LocalTime; import java.util.*; @Service @Slf4j public class ReportServiceImpl implements ReportService { @Autowired private OrderMapper orderMapper; @Autowired private UserMapper userMapper; @Autowired private OrderDetailMapper orderDetailMapper; @Autowired private WorkspaceService workspaceService; @Override public TurnoverReportVO getTurnoverStatistics(LocalDate begin, LocalDate end) { // 当前集合用于存放begin到end范围内的每天的日期 List<LocalDate > dateList = new ArrayList<> (); dateList.add(begin); while(!begin.equals(end)) { begin = begin.plusDays(1); dateList.add(begin); } List<Double > turnoverList = new ArrayList<> (); for(LocalDate date : dateList) { LocalDateTime dayStart = LocalDateTime.of(date, LocalTime.MIN); LocalDateTime dayEnd = LocalDateTime.of(date, LocalTime.MAX); Map<String, Object> map = new HashMap<> (); map.put("dayStart", dayStart.toString()); map.put("dayEnd", dayEnd.toString()); map.put("status", Orders.COMPLETED); Double turnover = orderMapper.sumByMap(map); turnover = turnover == null ? 0.0 : turnover; turnoverList.add(turnover); } //封装返回结果 return TurnoverReportVO.builder() .dateList(StringUtils.join(dateList, ",")) .turnoverList(StringUtils.join(turnoverList, ",")) .build(); } @Override public UserReportVO getUserStatistics(LocalDate begin, LocalDate end) { List<LocalDate > dateList = new ArrayList<> (); dateList.add(begin); while(!begin.equals(end)){ begin = begin.plusDays(1); dateList.add(begin); } // select sum(id) from user where create_time > ? and create_time < ? List<Integer > newUserList = new ArrayList<> (); // select sum(id) from user where create_time < ? List<Integer > totalUserList = new ArrayList<> (); for(LocalDate date : dateList) { LocalDateTime dayStart = LocalDateTime.of(date, LocalTime.MIN); LocalDateTime dayEnd = LocalDateTime.of(date, LocalTime.MAX); Map<String, Object> map = new HashMap<> (); map.put("dayEnd", dayEnd.toString()); Integer totalUser = userMapper.countByMap(map); map.put("dayStart", dayStart.toString()); Integer newUser = userMapper.countByMap(map); newUserList.add(newUser); totalUserList.add(totalUser); } return UserReportVO.builder() .dateList(StringUtils.join(dateList,",")) .newUserList(StringUtils.join(newUserList,",")) .totalUserList(StringUtils.join(totalUserList,",")) .build(); } @Override public OrderReportVO getOrderStatistics(LocalDate begin, LocalDate end) { List<LocalDate > dateList = new ArrayList<> (); dateList.add(begin); while(!begin.equals(end)){ begin = begin.plusDays(1); dateList.add(begin); } // 查询每天订单数和有效的订单数 List<Integer > newOrderList = new ArrayList<> (); List<Integer > validOrderList = new ArrayList<> (); for(LocalDate date : dateList) { // 查询订单总数 select count(id) from orders where order_time < ? and order_time > ? LocalDateTime dayStart = LocalDateTime.of(date, LocalTime.MIN); LocalDateTime dayEnd = LocalDateTime.of(date, LocalTime.MAX); Integer orderCount = getOrderCount(dayStart, dayEnd, null); //查询有效订单数 select count(id) from orders where order_time > ? and order_time < ? and status = completed Integer validOrderCount = getOrderCount(dayStart, dayEnd, Orders.COMPLETED); newOrderList.add(orderCount); validOrderList.add(validOrderCount); } //计算时间区间内订单总数 Integer totalOrderCount = newOrderList.stream().reduce(Integer::sum).get(); Integer validOrderCount = validOrderList.stream().reduce(Integer::sum).get(); return OrderReportVO.builder() .dateList(StringUtils.join(dateList,",")) .validOrderCountList(StringUtils.join(validOrderList,",")) .orderCountList(StringUtils.join(newOrderList,",")) .totalOrderCount(totalOrderCount) .validOrderCount(totalOrderCount) .orderCompletionRate(totalOrderCount == 0 ? 0.0 : validOrderCount.doubleValue() / totalOrderCount.doubleValue()) .build(); } @Override public SalesTop10ReportVO getTop10(LocalDate begin, LocalDate end) { LocalDateTime dayStart = LocalDateTime.of(begin, LocalTime.MIN); LocalDateTime dayEnd = LocalDateTime.of(end, LocalTime.MAX); List<String > top10NameList = new ArrayList<> (); List<Integer > top10CountList = new ArrayList<> (); // select d.dish_id, ANY_VALUE(name) as name, sum(d.number) as sn from order_detail as d left join orders as o group by d.dish_id having o.status = #{status} order by sn DESC; return orderDetailMapper.getTop10(dayStart,dayEnd,Orders.COMPLETED); } @Override public void reportBusinessData(HttpServletResponse response) { // 1. 查询数据库,获取运营数据 LocalDate startDate = LocalDate.now().minusDays(30); LocalDate endDate = LocalDate.now().minusDays(1); BusinessDataVO businessData = workspaceService.getBusinessData(LocalDateTime.of(startDate, LocalTime.MIN), LocalDateTime.of(endDate, LocalTime.MAX)); // 2. 通过POI写入数据 InputStream in = this.getClass().getClassLoader().getResourceAsStream("template/运营数据报表模板.xlsx"); ServletOutputStream outputStream = null; XSSFWorkbook sheets = null; try { sheets = new XSSFWorkbook(in); // 填充数据 XSSFSheet sheet1 = sheets.getSheet("Sheet1"); sheet1.getRow(1).getCell(1).setCellValue("时间: " + startDate + " -- " + endDate); sheet1.getRow(3).getCell(2).setCellValue(businessData.getTurnover()); sheet1.getRow(3).getCell(4).setCellValue(businessData.getOrderCompletionRate()); sheet1.getRow(3).getCell(6).setCellValue(businessData.getNewUsers()); sheet1.getRow(4).getCell(2).setCellValue(businessData.getValidOrderCount()); sheet1.getRow(4).getCell(4).setCellValue(businessData.getUnitPrice()); //sheet1.getRow(7).getCell(2) for (int i = 0; i < 30; i++) { LocalDate localDate = startDate.plusDays(i); BusinessDataVO dayData = workspaceService.getBusinessData(LocalDateTime.of(localDate, LocalTime.MIN), LocalDateTime.of(localDate, LocalTime.MAX)); sheet1.getRow(7 + i).getCell(1).setCellValue(localDate.toString()); sheet1.getRow(7 + i).getCell(2).setCellValue(dayData.getTurnover()); sheet1.getRow(7 + i).getCell(3).setCellValue(dayData.getValidOrderCount()); sheet1.getRow(7 + i).getCell(4).setCellValue(dayData.getOrderCompletionRate()); sheet1.getRow(7 + i).getCell(5).setCellValue(dayData.getUnitPrice()); sheet1.getRow(7 + i).getCell(6).setCellValue(dayData.getNewUsers()); } // 3. 通过输出流,传输到客户端 outputStream = response.getOutputStream(); sheets.write(outputStream); outputStream.close(); sheets.close(); } catch (IOException e) { throw new RuntimeException(e); } } private Integer getOrderCount(LocalDateTime begin, LocalDateTime end, Integer status) { Map<String, Object> map = new HashMap<> (); map.put("dayStart", begin); map.put("dayEnd", end); map.put("status", status); return orderMapper.countByMap(map); } }
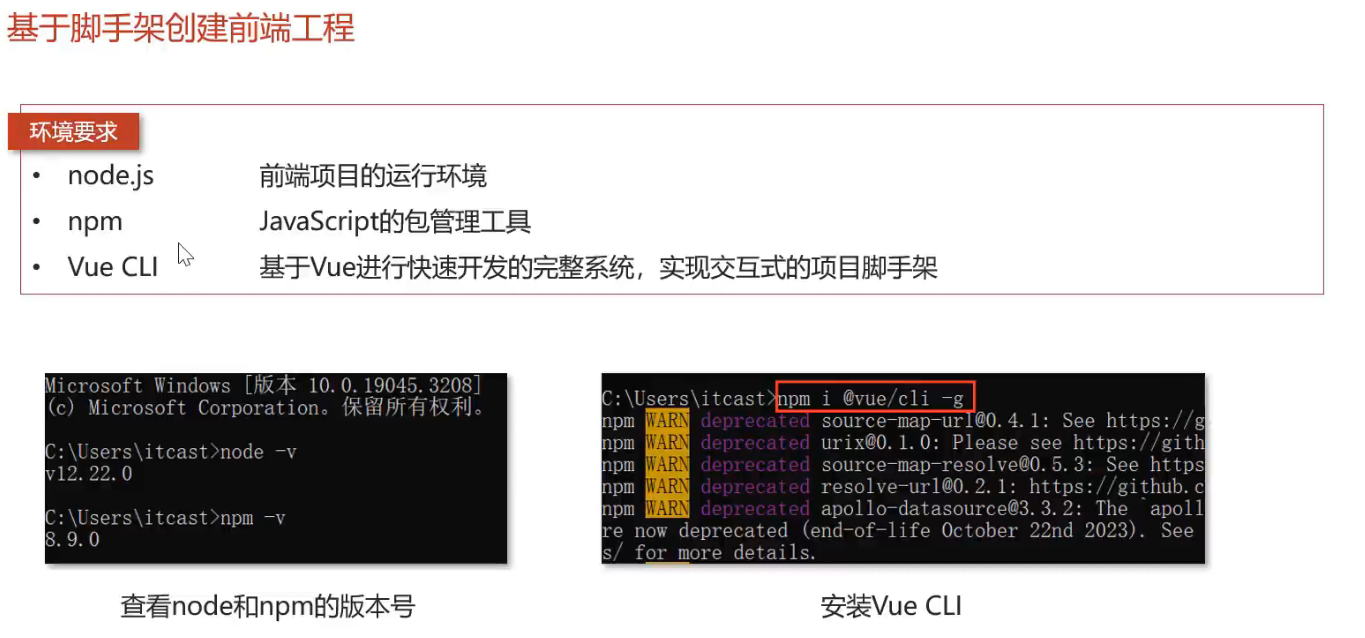
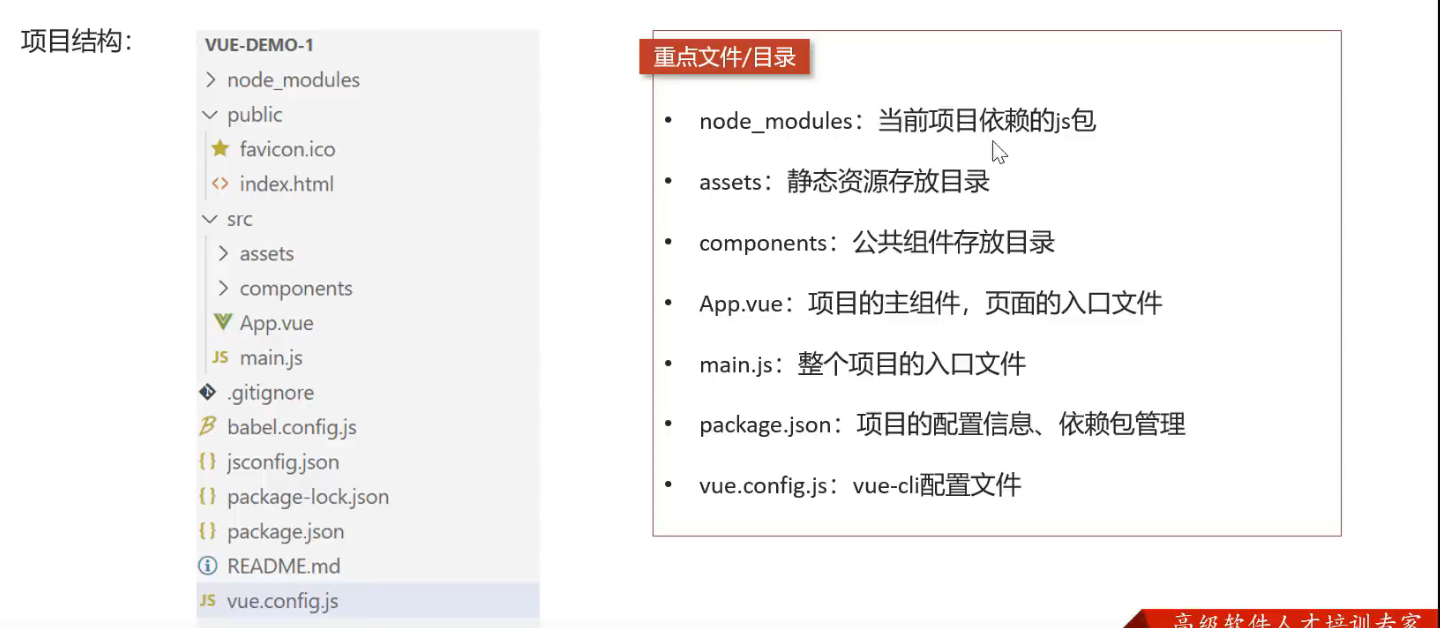
11. 前端部分 11.1 vue基础回顾 11.1.1 基于脚手架创建前端工程
使用Vue CLI创建前端工程:
1 2 npm i @vue/cli -g vue create vue-demo-1
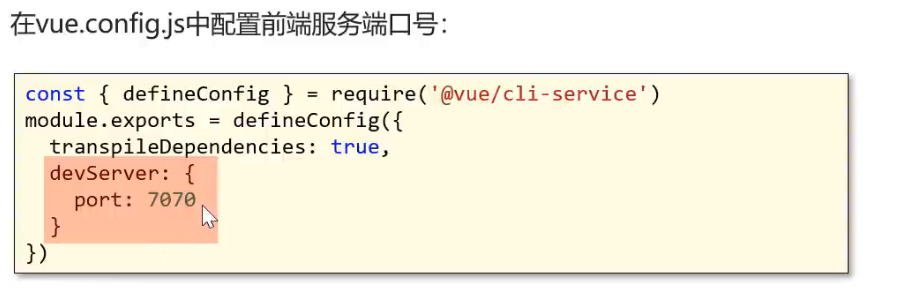
修改前端服务端口号
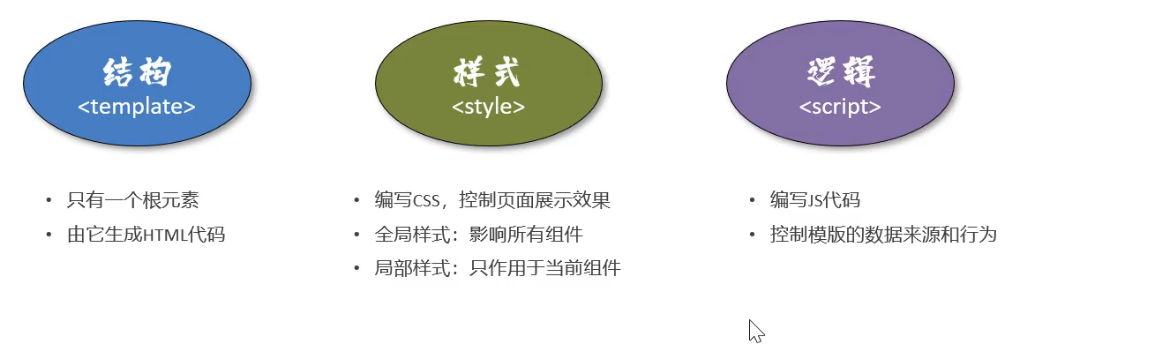
11.1.2 vue基本使用方式 vue组件 vue的组件文件以.vue结尾,每个组件由三部分组成:
结构 样式 逻辑
1 2 3 4 5 6 7 8 9 10 11 12 13 14 15 16 17 18 19 20 21 22 23 24 25 26 27 28 29 <template > <div id ="app" > <img alt ="Vue logo" src ="./assets/logo.png" > <HelloWorld msg ="Welcome to Your Vue.js App" /> </div > </template > <script > import HelloWorld from './components/HelloWorld.vue' export default { name : 'App' , components : { HelloWorld } } </script > <style > #app { font-family : Avenir, Helvetica, Arial, sans-serif; -webkit-font-smoothing : antialiased; -moz-osx-font-smoothing : grayscale; text-align : center; color : #2c3e50 ; margin-top : 60px ; } </style >
文本插值 作用: 用来绑定data方法返回的对象属性
用法: {{}}
1 2 3 4 5 6 7 8 9 10 11 12 13 14 15 <template> <div> <h1> {{age > 60 ? name : "青年"}} </h1> </div> </template> <script> export default{ data() { return {name: "老年", age: 70} } } </script>
属性绑定 作用:为标签的属性绑定data方法中返回的属性
用法: v-bind:xxx,简写为:xxx
1 2 3 4 5 6 7 8 9 10 11 12 13 <template> <div class="hello"> <div><input type="text" :value="age"></div> <div><img :src="src"></div> </div> </template> <script> export default { data() { return {age: 50, name: "张三", src:"https://img-s.msn.cn/tenant/amp/entityid/BB1msKEx?w=0&h=0&q=60&m=6&f=jpg&u=t"}; }, }
事件绑定 作用:为元素绑定对应的事件
用法:v-on:xxx简写为@xxx
1 2 3 4 5 6 7 8 9 10 11 12 13 14 15 16 17 18 <template> <div class="hello"> <div> <input type="button" value="Save" @click="save"/> </div> </div> </template> <script> export default { name: 'HelloWorld', methods: { save() { alert(this.name) } } } </script>
双向绑定 作用:表单输入项和data方法中的属性进行绑定,任意一方改变都会同步给另一方 (输入框和data中的任意地方改变都会影响另一边)
用法: v-model
1 2 3 4 5 6 7 8 9 10 11 12 13 14 15 16 17 18 19 20 21 22 23 <template> <div class="hello"> <h2>{{ name}}</h2> <input type="text" v-model="name"> <div> <input type="button" value="点击改变" @click="change"/> </div> </div> </template> <script> export default { data() { return { name: "张三"}; }, methods: { change() { this.name = "李四" } } } </script>
条件渲染 作用: 根据表达式的值来动态渲染页面元素
用法: v-if,v-else,v-else-if
1 2 3 4 5 6 7 8 9 10 11 12 13 14 15 16 17 18 <template> <div class="hello"> <div> <div v-if="sex == 1"> 男 </div> <div v-else-if="sex == 0"> 女</div> <div v-else> 未知</div> </div> </div> </template> <script> export default { data() { return { sex: 0}; } </script>
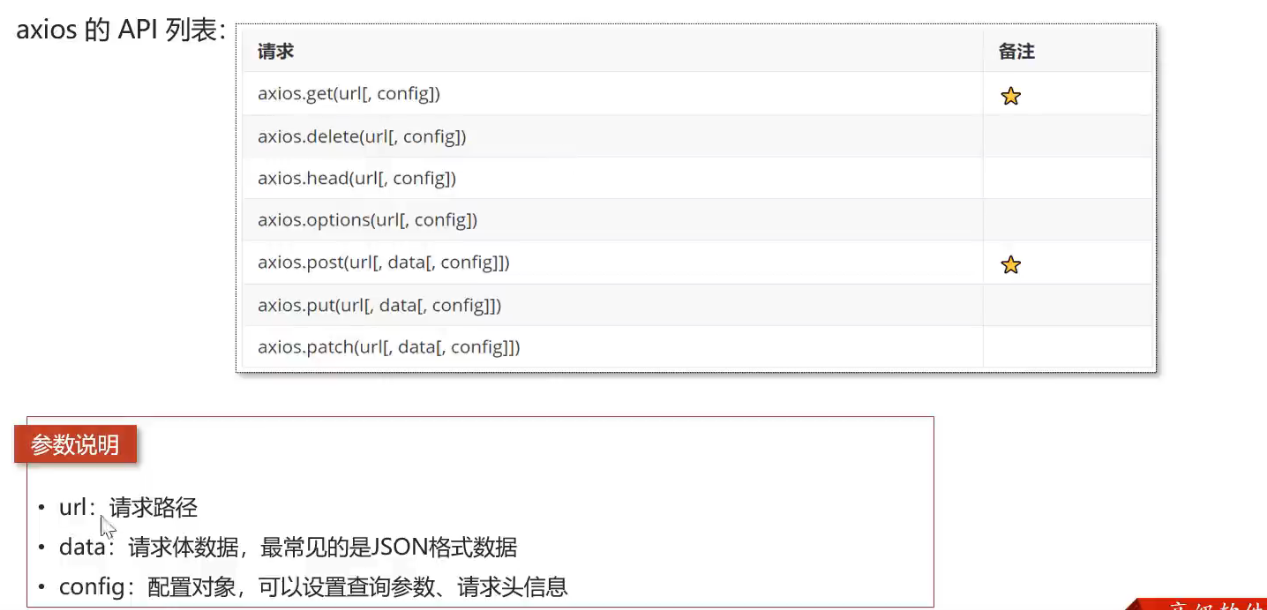
axios (异步) Axios是一个基于promise的网络请求库,作用与浏览器和node.js中
安装命令:npm install axios
导入命令: import axios from 'axios'
为了解决跨域问题,可以在vue.config.js文件中配置代理:
1 2 3 4 5 6 7 8 9 10 11 12 13 14 15 16 17 18 19 const { defineConfig } = require ('@vue/cli-service' )module .exports = defineConfig ({ transpileDependencies : true , devServer :{ port :7070 , proxy : { '/api' : { target : "http://localhost:8080" , pathRewrite : { "^/api" : '' } } } }, })
1 2 3 4 5 6 7 8 9 10 11 12 13 14 15 16 17 18 19 20 21 22 23 24 25 26 <template> <div> <input type="button" value='get方式请求' @click="getMethod"/> </div> </template> <script> import axios from 'axios' export default { methods: { getMethod(){ axios.get("/api/admin/shop/status",{ headers:{ token: "eyJhbGciOiJIUzI1NiJ9.eyJlbXBJZCI6MSwiZXhwIjoxNzQ4NjI1MjUwfQ.2UbrxjgMvSqiottavZ0M8r4zBOc8qNzh2Rr_fhFp7dw" } }).then(res => { console.log(res.data), console.log(res.data.code) }) } } } </script>
另一种axios请求方式
1 2 3 4 5 6 7 8 9 10 11 12 13 14 15 16 17 getMethod2 ( axios ({ mehtod : 'post' , url :'/api/admin/shop/status' , data : { data01 : 1 , data02 : "2" }, headers :{ token : "eyJhbGciOiJIUzI1NiJ9.eyJlbXBJZCI6MSwiZXhwIjoxNzQ4NjI1MjUwfQ.2UbrxjgMvSqiottavZ0M8r4zBOc8qNzh2Rr_fhFp7dw" } }).then (res => console .log (res.data ), console .log (res.data .code ) }) }
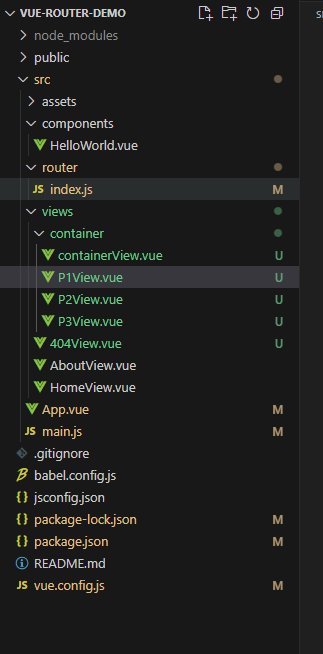
11.2 Vue-Router 11.2.1 Vue-Router 介绍 vue属于单页面应用,所谓的路由,就是根据浏览器路径不同,用不同的视图组件替换这个页面内容
使用vue ui然后手动配置或者使用npm install vue-router
11.2.2 路由配置
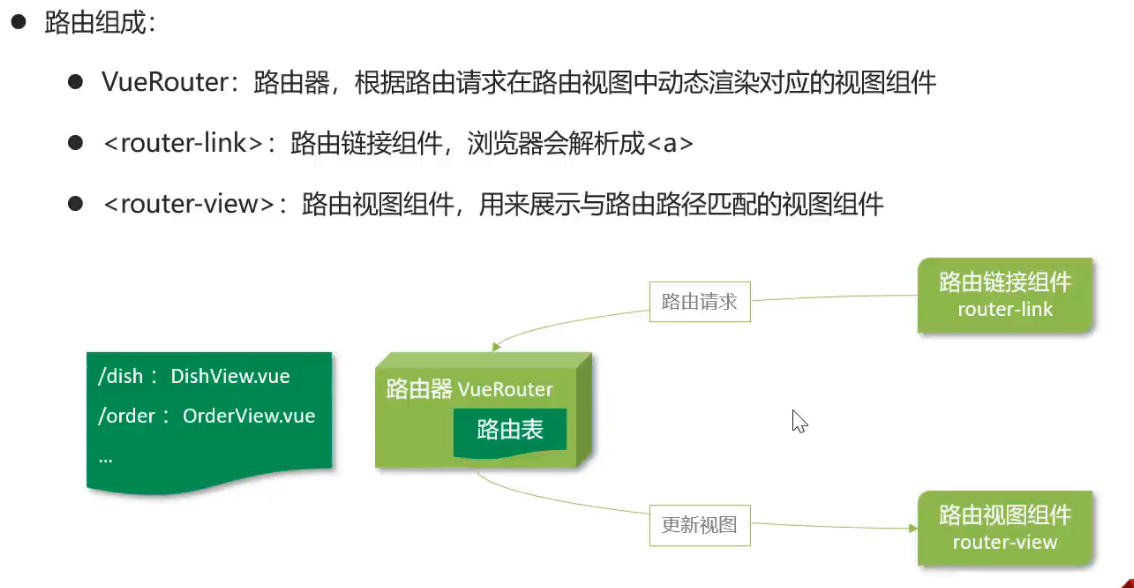
路由组成
VueRouter:路由器,根据路由请求在路由视图中动态渲染对应的视图组件<router-link>: 路由链接组件,浏览器会解析成<a>router-view: 路由视图组件, 用来展示与路由路径匹配的组件
1 2 3 4 5 6 7 8 9 10 11 12 13 <template> <div id="app"> <!-- 路由链接组件 --> <nav> <router-link to="/">Home</router-link> | <router-link to="/about">About</router-link> </nav> <!-- 路由视图组件展示的位置 --> <router-view/> </div> </template>
1 2 3 4 5 6 7 8 9 10 11 12 13 14 15 16 17 18 19 20 21 22 23 24 25 26 27 28 29 import Vue from 'vue' import VueRouter from 'vue-router' import HomeView from '../views/HomeView.vue' Vue .use (VueRouter )const routes = [ { path : '/' , name : 'home' , component : HomeView }, { path : '/about' , name : 'about' , component : () => import ( '../views/AboutView.vue' ) } ] const router = new VueRouter ({ routes }) export default router
路由配置
路由路径和视图对应关系配置 ./router/index.js
<router-link>: ./App.vue<router-view>: ./App.vue
<router-link>路由跳转方式:
标签式:./App.vue
编程式: ./App.vue
1 2 3 4 5 6 7 8 9 10 11 12 13 14 15 16 17 18 19 20 21 22 23 24 25 26 27 28 29 <template> <div id="app"> <!-- 路由链接组件 --> <nav> <!-- 标签式路由跳转 --> <router-link to="/">Home</router-link> | <router-link to="/about">About</router-link> <!-- 编程式路由跳转 --> <input type="button" value="编程式跳转" @click="jump"/> </nav> <!-- 路由视图组件展示的位置 --> <router-view/> </div> </template> <script> export default { methods: { jump() { this.$router.push("/") } } } </script>
1 2 3 4 5 6 7 8 { path: '/404 ', component: () => import("../views/404View.vue" ) } , { path: '*', redirect: "/404" }
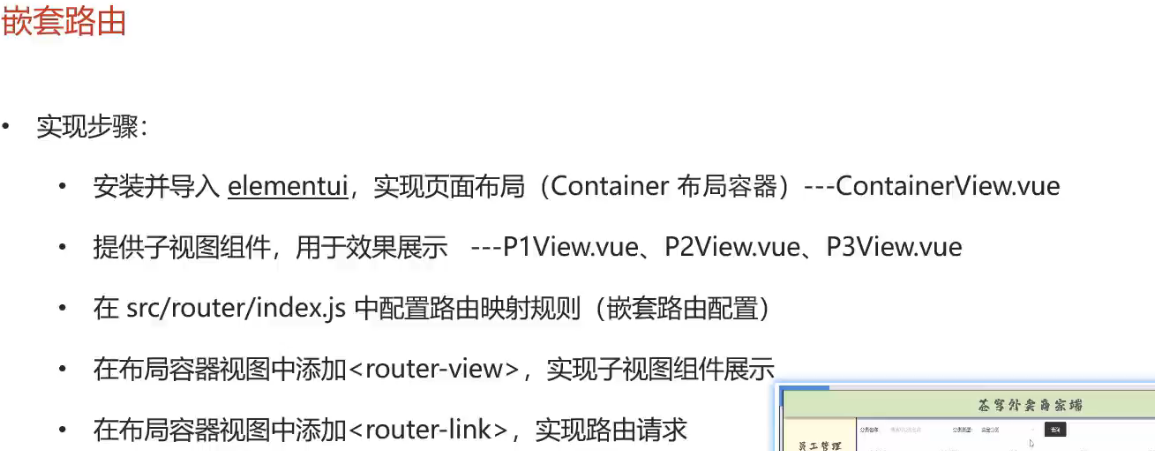
11.2.3 嵌套路由 嵌套路由: 组件内要切换内容,就需要用到嵌套路由(子路由)
安装: npm i element-ui -S vue3使用element-ui-plus
导入
1 2 3 4 5 6 7 8 9 10 11 12 13 14 15 16 17 import Vue from 'vue' import App from './App.vue' import router from './router' import ElementUI from 'element-ui' import 'element-ui/lib/theme-chalk/index.css' Vue .config .productionTip = false Vue .use (ElementUI )new Vue ({ router, render : h =>h (App ) }).$mount('#app' )
提供子视图
1 2 3 <template> <div> 这是P1 </div> </template>
路由配置
1 2 3 4 5 6 7 8 9 10 11 12 13 14 15 16 17 18 19 { path : '/c' , component : () => import ("../views/container/containerView.vue" ), children : [ { path : '/c/p1' , component : () => import ("../views/container/P1View.vue" ) }, { path : '/c/p2' , component : () => import ("../views/container/P2View.vue" ) }, { path : '/c/p3' , component : () => import ("../views/container/P3View.vue" ) } ] }
布局容器中添加<router-view>和<router-link>
1 2 3 4 5 6 7 8 9 10 11 12 13 14 15 16 17 <template> <el-container> <el-header>Header</el-header> <el-container> <el-aside width="200px"> <router-link to="/c/p1"> P1 View</router-link> <br> <router-link to="/c/p2"> p2 view</router-link> <br> <router-link to='/c/p3'> p3 view</router-link> </el-aside> <el-main> <!-- P1 P2 P3 替换的位置 --> <router-view/> </el-main> </el-container> </el-container> </template>
11.3 状态管理vuex 11.3.1 vuex介绍
vuex是一个专门为Vue.js应用程序开发的状态管理库
vuex可以在多个组件之间共享数据,并且共享的数据是响应式的,即数据的变更能及时渲染到模板
vuex采用集中式存储管理所有组件的状态
安装: npm install vuex@next --save
核心概念
state:状态对象,集中定义各个组件共享的数据mutations: 类似一个事件,用于修改共享数据,要求必须是同步函数actions: 类似于mutation,可以包含异步操作,通过调用mutation来改变共享数据
11.3.2 使用方式 创建带有vuex功能的脚手架工程
定义共享数据./store/index.js 1 2 3 4 5 6 7 8 9 10 11 12 13 14 15 16 17 18 19 20 21 22 23 24 25 26 import Vue from 'vue' import Vuex from 'vuex' Vue .use (Vuex )export default new Vuex .Store ({ state : { name : "未登录游客" }, getters : { }, mutations : { }, actions : { }, modules : { } })
使用
1 2 3 4 5 6 7 <template> <div class="hello"> <h1>{{ msg }}</h1> <h1>{{$store.state.name}}</h1> </div> </template>
在mutations中定义函数,修改共享数据 1 2 3 4 5 6 7 8 9 10 11 12 13 14 15 16 17 18 19 20 21 22 23 24 25 26 27 28 29 import Vue from 'vue' import Vuex from 'vuex' Vue .use (Vuex )export default new Vuex .Store ({ state : { name : "未登录游客" }, getters : { }, mutations : { setName (state,name ){ state.name = name } }, actions : { }, modules : { } })
使用
1 2 3 4 5 6 7 8 9 10 11 12 13 14 15 16 17 18 19 20 <template> <div id="app"> <input type="button" value="通过mutations修改state" @click="handleUpdate"/> </div> </template> <script> export default { name: "App", methods: { handleUpdate(){ // mutation中的函数不能直接调用,必须使用如下方式调用 this.$store.commit('setName', "新名字,李四") } } } </script>
在actions中定义函数,用于调用mutation 安装axios:npm install axios
定义actions函数:
1 2 3 4 5 6 7 8 9 10 11 12 13 14 15 16 17 18 19 20 21 22 23 24 25 26 27 28 29 30 31 32 33 34 35 36 37 38 39 40 41 42 43 44 45 46 import Vue from 'vue' import Vuex from 'vuex' import axios from 'axios' Vue .use (Vuex ) export default new Vuex .Store ({ state : { name : "未登录游客" }, getters : { }, mutations : { setName (state,name ){ state.name = name } }, actions : { setNameByAxios (context ){ axios ({ url : '/api/admin/employee/login' , method : 'post' , data : { username : "admin" , password : '123456' } }).then (res => if (res.data .code == 1 ){ context.commit ('setName' , res.data .data .name ) } }) } }, modules : { } })
App.vue中使用
1 2 3 4 5 6 7 8 9 10 11 12 13 14 15 16 17 18 19 20 <template> <div id="app"> <input type='button' value="员工登录换名" @click="handleLogin"/> </div> </template> <script> export default { name: "App", methods: { handleLogin(){ // 调用actions当中的函数 setNameByAxios this.$store.dispatch('setNameByAxios') } } } </script>
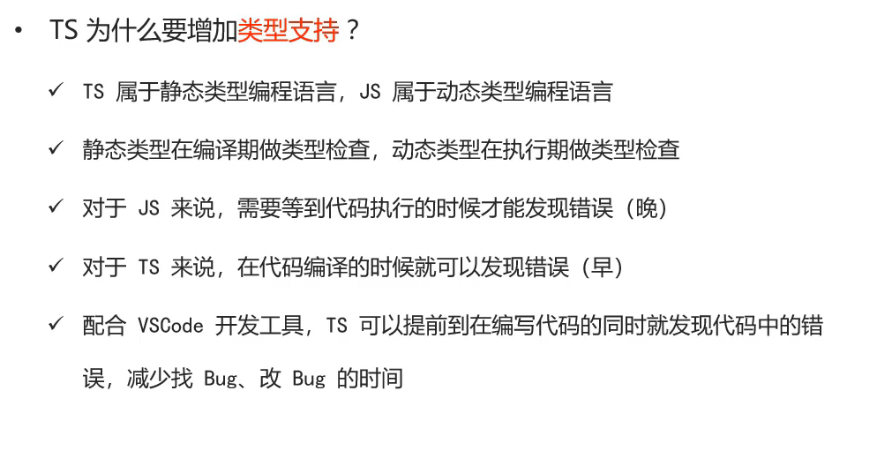
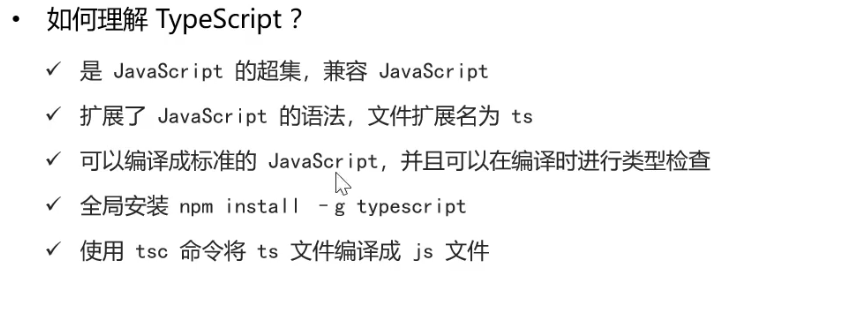
11.4 TypeScript 11.4.1 TypeScript介绍 TypeScript(TS)是微软推出的开源语言
TypeScript是JavaScript的超集(JS有的TS都有)
TypeScript = Type + JavaScript (在JS基础上增加了类型支持)
1 2 3 4 5 let age = 18 let age :number = 18
TypeScript 文件扩展名为ts
TypeScript可以编译成标准的JavaScript,并且在编译时进行类型检查
安装typescript: npm install -g typescript
查看TS版本: tsc -v
编译TS为JS:tsc hello.ts
运行编译后的TS: node hello.js
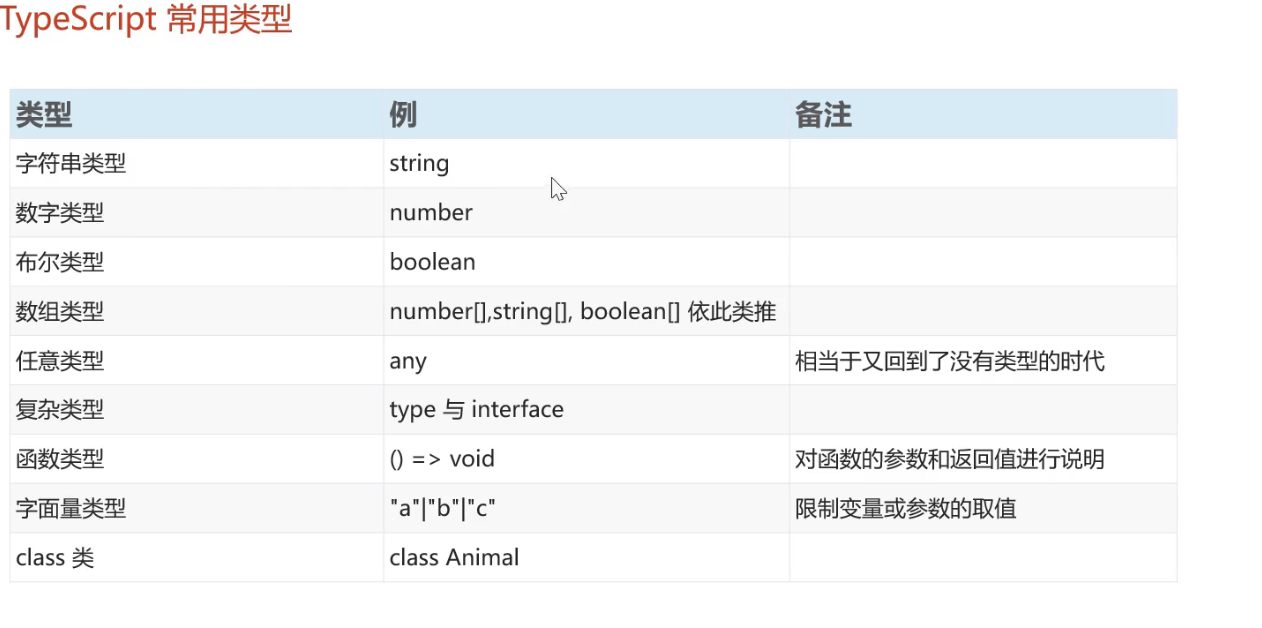
11.4.2 TypeScript常用类型
类型标注的位置
标注变量: let msg:string = "hello"
标注参数:
1 2 3 oneMethod (name:string ){ console .log (name) }
1 2 3 4 const m = (name :string ):string => return "返回类型为String" + name }
字符串、数值、boolean 1 2 3 4 5 6 7 8 9 10 11 12 13 14 let uesrname : string = "admin" let age : number = 20 let isTrue : boolean = true console .log (uesrname)console .log (age)console .log (isTrue)
字面量类型 1 2 3 4 5 6 7 8 function printText (greet:string , name:"tom" | "lily" | "fei" | "jerry" ):string { return greet + " : " + name } console .log (printText ("hello" ,"tom" ))
interface类型(类似于结构体) 1 2 3 4 5 interface Cat { name : string , age : number } const cat1 :Cat = {name : "小白" , age : 3 }
在interface中定义属性时,可以使用?标注可选的属性
1 2 3 4 interface Cat { name : string , age?: number }
class类
1 2 3 4 5 6 7 8 9 10 11 12 13 class User { name : string ; constructor (name: string ){ this .name = name; } study ( console .log ('[${this.name}]正在学习' ) } } const u = new User ("Tom" )console .log (u.name )u.study ()
1 2 3 4 5 6 7 8 9 10 11 12 13 14 15 16 17 interface Animal { name : string , eat (): void } class Bird implements Animal { name : string constructor (name: string ){ this .name = name } eat (): void { console .log (this .name + "eat bug" ) } } const b = new Bird ("鹦鹉" )b.eat ();
1 2 3 4 5 6 7 8 9 10 class Parrot extends Bird { say ():void { console .log ("我是鹦鹉:" + this .name ) } } const p = new Parrot ("小小鹦" )p.eat (); p.say ();
11.5 前端项目 11.5.1 前端环境搭建 技术选型
node.js
vue
ElementUI
axios
vuex
vue-router
typescript
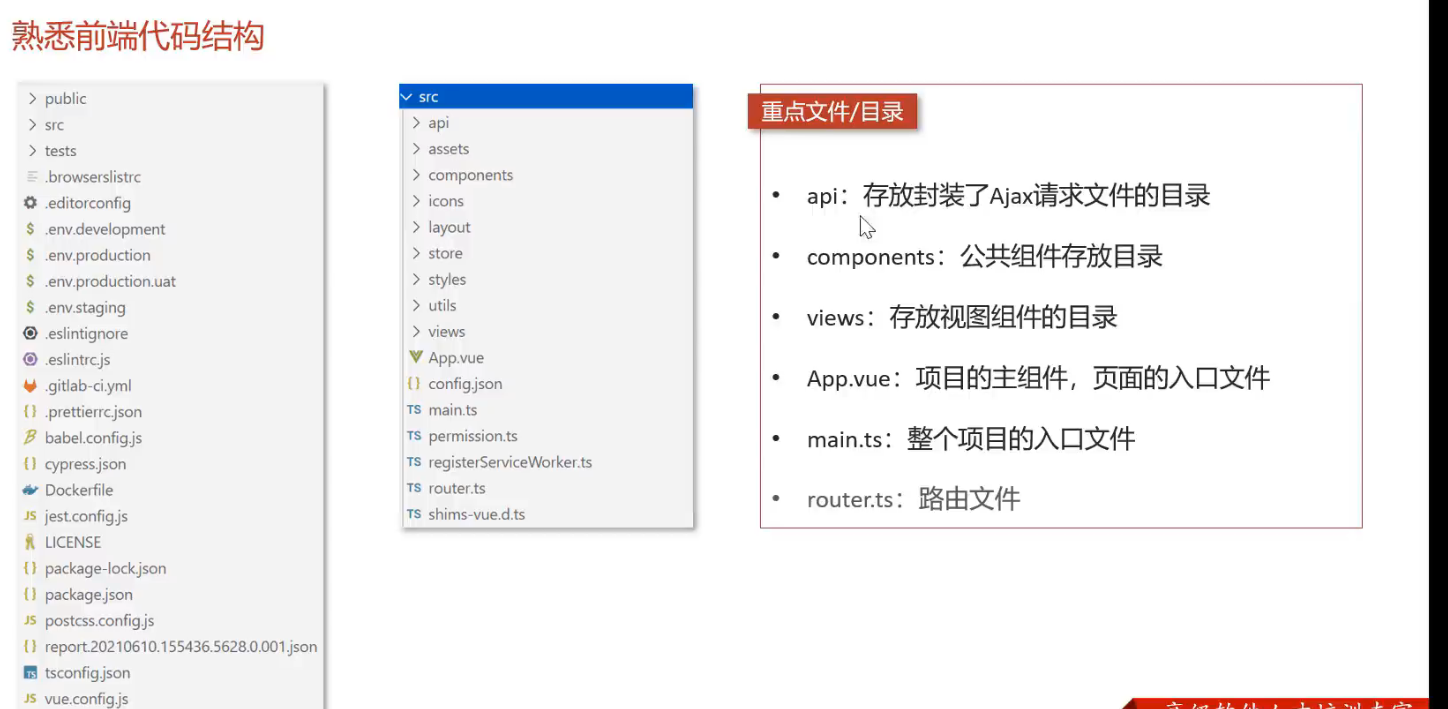
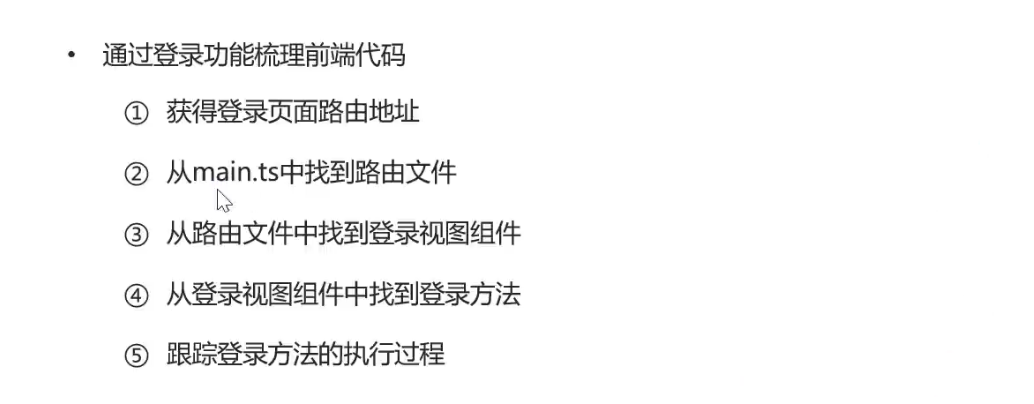
熟悉前端代码结构
11.5.2 员工分页查询 11.5.3 启用/禁用员工账号 11.5.4 新增员工 11.5.5 修改员工